
As a strength coach and personal trainer for over 20 years, I want you to get more out of your workout than just being completely gassed. Below are 10 of my favorite exercises, with demos, practical coaching cues, and easier options, followed by three workout plans. If you’re over 40 or getting back into exercise, choose the version you can do today and build from there.
10 Best Exercises to Lose Belly Fat
These are options, not a checklist to finish in one session. Start with the comparison table if you’re unsure which movements suit you, or tap a card for instructions and trainer tips. The difficulty labels describe the full versions; beginners can use the easier options.
Choose the right belly fat exercise: compare all 10
Use this table to match the movements to your experience and equipment. Each exercise name links to its full card. The cards’ timed prescriptions match the workout plans; rep-based options are for separate sessions.
| Exercise | Difficulty | Equipment | Main benefit | Easier alternative |
|---|---|---|---|---|
| Dumbbell Burpee Press | Advanced | 2 hex dumbbells | Full-body strength • Conditioning | Step-back squat thrust, no weights |
| Kettlebell Swings | Intermediate | Kettlebell | Hip power • Conditioning | Kettlebell deadlift |
| Squat Thrusts | Intermediate | None | Bodyweight conditioning • Core control | Step back; hands on a fixed bench |
| Dumbbell High Cross Punches | Intermediate | 2 light dumbbells | Shoulder endurance • Core control | No weights; shorter reach |
| Incline Sprints | Advanced | Hill or treadmill | Cardio • Running intervals | Comfortable incline walking |
| Cross-Body Mountain Climbers | Intermediate | None | Core conditioning • Cardio | Slow knee drives; hands on a fixed bench |
| Dumbbell Clean and Press | Advanced | 2 dumbbells | Full-body power • Overhead strength | Practice the hinge and press separately |
| Goblet Squats | Beginner–intermediate | Dumbbell or kettlebell | Leg strength • Trunk stability | Bodyweight sit-to-stand |
| Renegade Row with Push-up | Advanced | 2 hex dumbbells | Upper-body strength • Core stability | Supported rows + separate incline push-ups |
| Reverse Lunges with Front Rack Hold | Intermediate | 2 dumbbells | Single-leg strength • Balance | Supported bodyweight reverse lunge |
Dumbbell Burpee Press
Not for you if: loading your hands, moving to the floor, or pressing overhead causes wrist, shoulder, or back pain.
Workout prescription: Workout 2 and Workout 3: 3 × 20 sec.; 30 sec. rest or longer as needed. Start with one set and the easier option if needed; stop the set when your form slips.
Key cues: Brace your plank; keep the weights close.
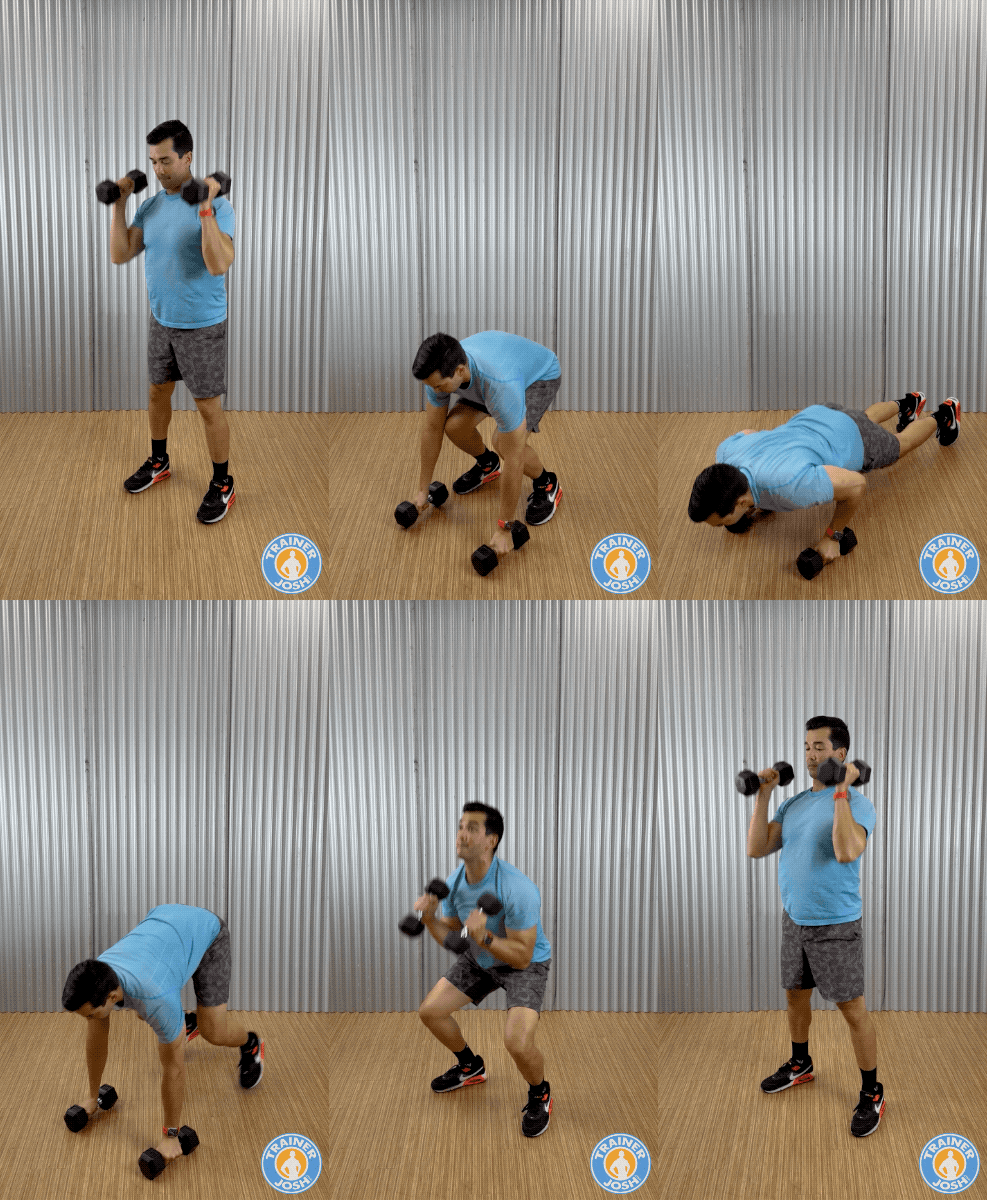
This variation links a squat thrust, a return to standing, and an overhead press. The plank challenges trunk stability; the squat and press coordinate your legs and upper body. The version shown has no push-up or jump at the top. It fits a short conditioning circuit once you know the separate movements. For heavier strength work, train the squat and press separately so the floor transition doesn’t limit the load.
- Set your position: Use stable hex dumbbells on a nonslip floor. Squat down and set them under your shoulders; keep your wrists straight and check that the weights cannot roll.
- Brace your torso: Brace your torso and step or hop your feet back into a straight-body plank. Place your weight through your hands before moving your feet.
- Plant your feet: Step or hop your feet forward outside your hands. Settle your whole feet on the floor and lower your hips before lifting.
- Stand and lift: Stand using your legs, keeping the dumbbells close as you bring them to your shoulders.
- Drive and press: Use a small knee dip and leg drive to assist the press. Keep your palms facing each other and your ribs over your pelvis.
- Lower with control: Lower the weights under control and repeat.
A firm, braced core in the plank; your legs and glutes driving you up; and your shoulders and triceps working through the press. Your breathing should increase while you stay in control of each rep.
Sharp joint pain, shoulder or lower-back pinching, or neck strain.
Stop if these symptoms occur. Get guidance for persistent or recurring symptoms before trying again.
Remove the weights and step one foot back at a time. If the floor transition is awkward, place your hands on a sturdy, fixed bench. Practice the overhead press separately with light dumbbells before combining the movements.
After every rep stays controlled, increase the dumbbells by the smallest available increment. Alternatively, add one controlled push-up in the plank if you can already do it well. Change one variable at a time; keep your feet grounded during the overhead press.
- Rounding your back as you lift the weights from the floor.
- Rushing the overhead phase before you have regained your balance.
- Bending your wrists backward during the press. Keep them stacked under the weights.
Technique context: ACSM push-press guidance
Kettlebell Swings
Not for you if: you have an active back or disc problem that hasn’t been assessed for this movement. Get individual guidance before adding swings.
Workout prescription: Workout 1: 3 × 20 sec. Workout 3, for experienced exercisers: 3 × 60 sec. Rest 30 sec. or longer as needed. Start with one short set; end it when your form or hip drive fades.
Key cues: Hike it back; snap your hips.
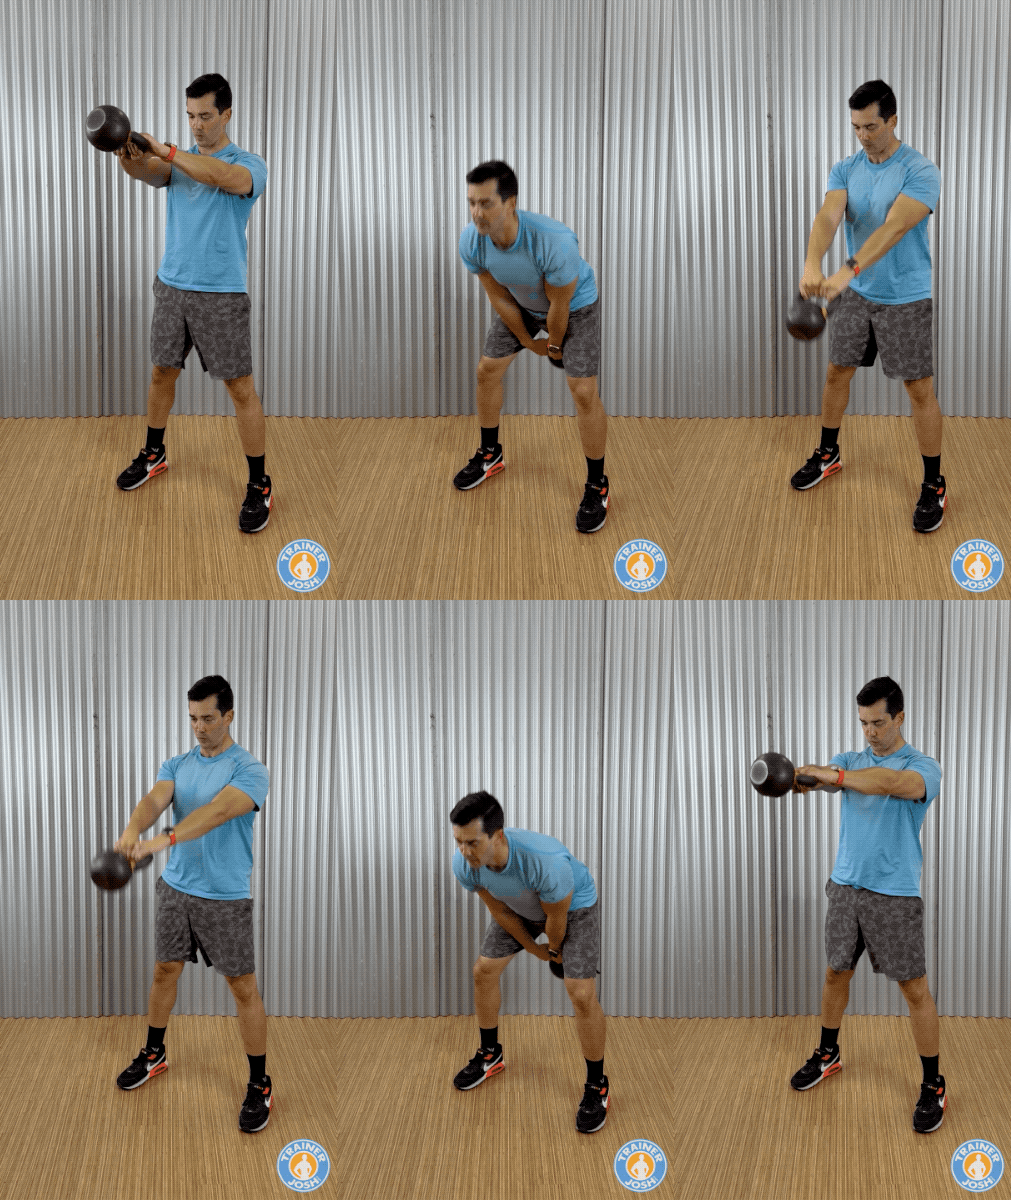
Swings add explosive hip extension to a routine that already includes squats and lunges. Your glutes and hamstrings produce the drive, while your trunk stays braced against the moving weight. You can practice power with both feet planted, without adding a jump or an overhead catch. Short, crisp sets emphasize power; longer intervals add a conditioning challenge, but only while the hip snap stays sharp.
- Set up your hinge: Place the bell about a foot in front of you. Stand roughly shoulder-width apart, soften your knees, and push your hips back to grip the handle with both hands. Keep your spine neutral and your feet flat.
- Hike it back: Brace your torso and hike the bell high between your thighs, like passing a football behind you. Keep it close rather than reaching down toward the floor.
- Drive through your hips: Push through your feet and quickly extend your hips and knees. Let that momentum float the bell toward chest height.
- Finish in a standing plank: Stand tall with your glutes tight, abs braced, and ribs over your pelvis. Keep your grip secure and arms long without shrugging or leaning backward.
- Time the return: Let the bell fall naturally. As your upper arms return toward your ribs, push your hips back and guide it between your thighs. Don’t yank it downward or bend forward while it is still far in front.
- Park it with control: After the final backswing, guide the bell forward onto the floor with your hips back and spine steady. Finish the set before your grip or position gives out.
Your glutes and hamstrings driving the lift, tension through the back of your thighs during the hinge, and firm abdominal bracing at the top.
Sharp pain, lower-back pinching, or a painful pull in your hamstrings or shoulders.
Stop if these symptoms occur. Get guidance for persistent or recurring symptoms before trying again.
Start with kettlebell deadlifts to learn the hinge at a slower pace. Set the bell down and reset your stance and brace between reps. Once that feels controlled, try one swing at a time using the finish in step 6. Build repeatable single swings before linking them together.
For rep-based practice, aim for 12–16 crisp reps with 1–2 good reps in reserve. When you can repeat that with a sharp hip drive and controlled return, try the next weight increment for a shorter set. Work toward 30–35 pounds as power develops; there’s no deadline. Keep the same technique before adding reps again. Change one variable at a time.
- Dropping into a deep squat instead of sending your hips backward with softly bent knees.
- Turning the swing into a front raise. If your shoulders tire before your hips, check whether you’re lifting with your arms; don’t assume a heavier bell will fix it.
- Rounding your back on the return or forcing the bell down faster than you can control.
Technique context: ACE kettlebell-swing guidance · NSCA two-arm swing technique
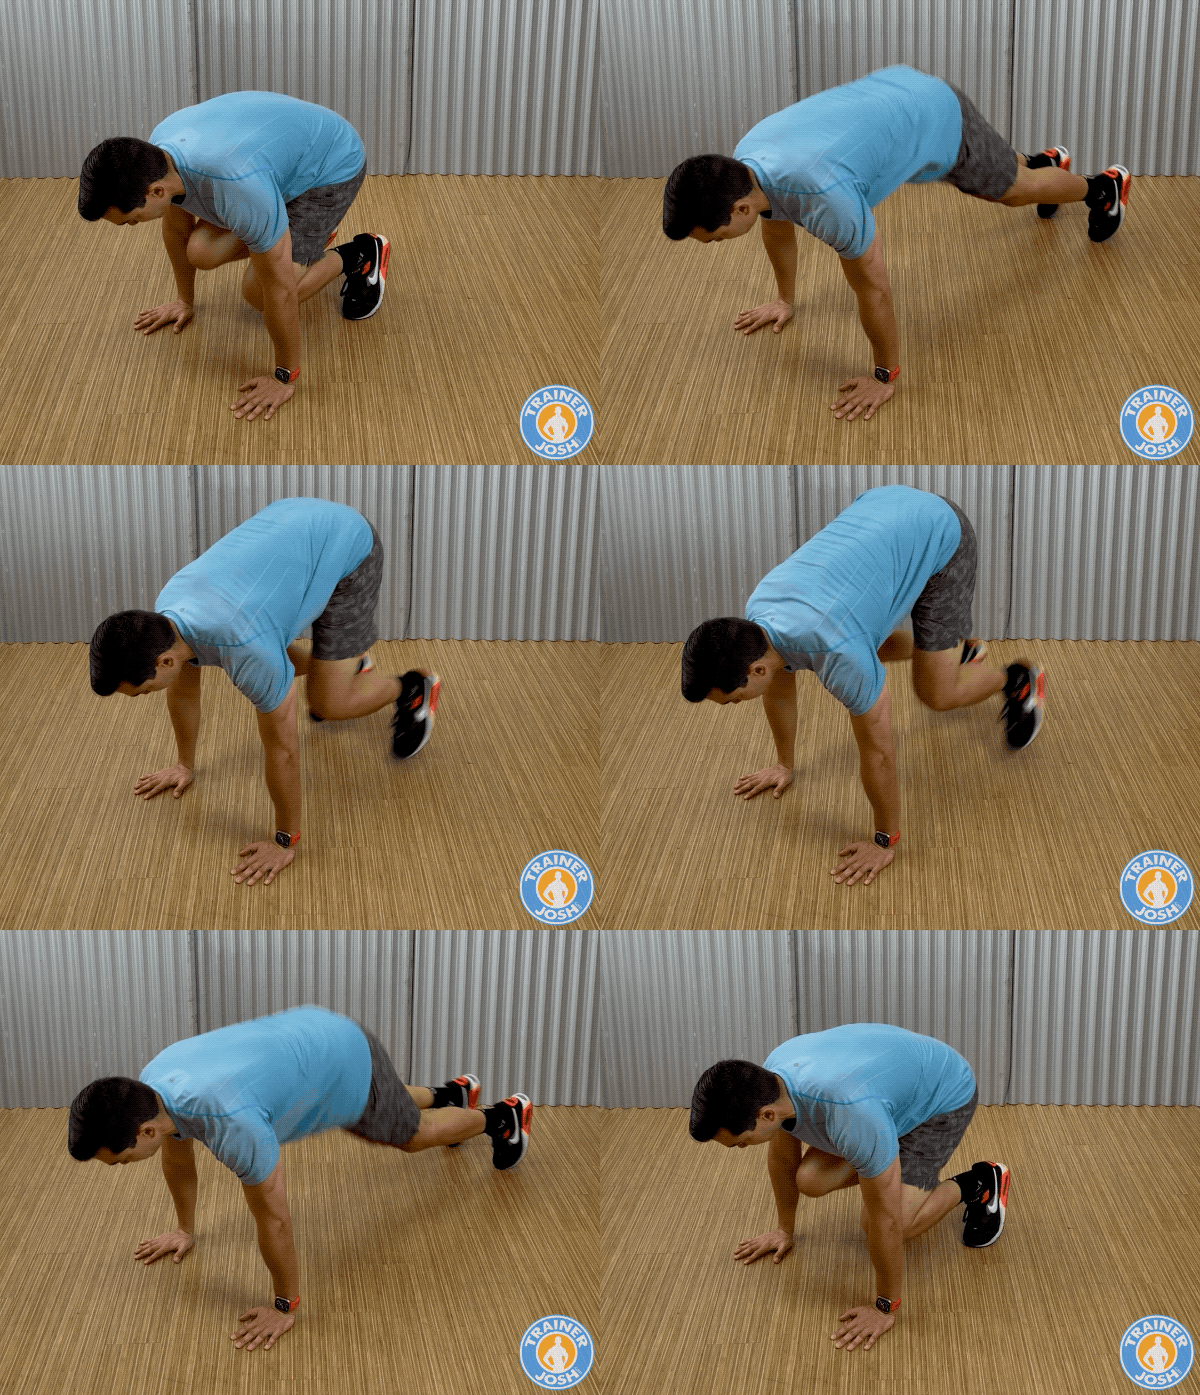
Squat Thrusts
Not for you if: you have an active back problem or wrist or shoulder pain with weight-bearing that hasn’t been assessed for this movement. Get individual guidance before adding squat thrusts.
Workout prescription: Workout 1: 3 × 20 sec., with 30 sec. rest or longer as needed. Start with one set.
Rep-based option: use 2–4 sets of 10–15 controlled reps instead of the timed interval; shorten the set when form slips.
Key cues: Shoulders over hands; land softly.
Squat thrusts link a crouch with a braced plank, giving you a bodyweight conditioning option in a small space. Your shoulders support you while your core keeps your trunk steady and your legs move in and out. Leaving out the push-up and vertical jump simplifies the sequence. There’s no landing from a standing jump, but hopping still loads your wrists, shoulders, and feet. Step through it when you need less impact.
- Set your hands: Crouch down and place your palms on a nonslip floor, about shoulder-width apart. Spread your fingers and put your shoulders over your hands.
- Brace before moving: Tighten your abdomen as if preparing for a gentle punch, without holding your breath. Look at the floor slightly ahead of your hands with your neck in line with your back.
- Move into a plank: Hop both feet back and land softly on your toes. Keep your head, hips, and heels in one line; let your core control the landing.
- Return to the crouch: Hop your feet forward only as far as you can comfortably control. Bend your knees and keep your hands planted.
- Repeat with control: Continue between the crouch and plank, as shown. One trip out and back is one rep. This version has no push-up or standing jump.
A firm abdominal brace, your shoulders supporting your weight, and your legs working as you move in and out. Your breathing and heart rate rise with the pace.
Sharp wrist or shoulder pain, lower-back pinching, light-headedness, or dizziness.
Stop if these symptoms occur. If dizziness persists or returns, get medical advice before another session.
Step one foot back at a time, pause in a steady plank, then step each foot forward. Alternate which leg leads. If reaching the floor is difficult, place your hands on a sturdy bench or box secured against sliding or tipping. Use a stable surface rather than a medicine ball that can roll.
Once 20 seconds stays controlled, build toward 30–45 seconds while keeping the same rest. Or add one strict push-up if you already perform them well. Change one variable at a time. A jumping burpee or dumbbell burpee press is a separate progression with extra landing or loading demands.
- Forcing your feet right up to your hands and rounding your lower back. Use a shorter return or elevate your hands.
- Locking your knees and crashing into the plank instead of controlling the landing.
- Tucking your chin toward your chest or craning your neck to look ahead.
Related technique: NASM burpee progressions (includes the push-up and jump variation). NHS guidance on dizziness.
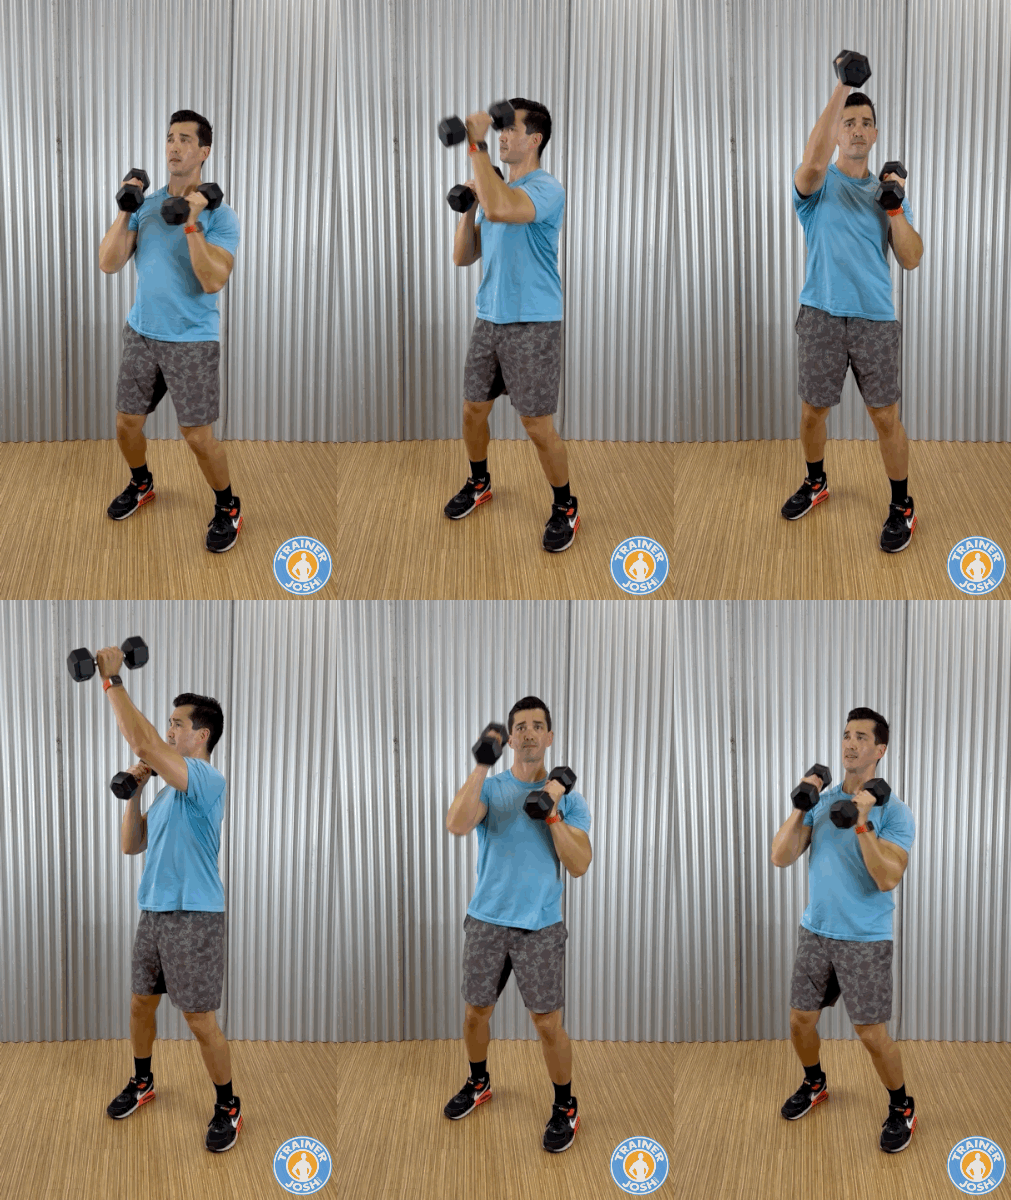
Dumbbell High Cross Punches
Not for you if: you have an active shoulder, elbow, or neck problem that makes reaching or holding weights painful. Get individual guidance before adding this movement.
Workout prescription: Workout 1 and Workout 3: 3 × 20 sec., with 30 sec. rest or longer as needed. Start with one set.
Rep-based option: use 2–4 sets of 20–30 total punches (10–15 per side) instead of the timed interval. Stop before you lose control.
Key cues: Reach smoothly; keep a soft elbow.
This standing drill gives your shoulders repeated work while your trunk stays braced against the alternating cross-body reach. It adds upper-body endurance and coordination to a circuit without another floor transition or jumping movement. The upward angle means you lift the dumbbell against gravity; this version is closer to an alternating diagonal press than a boxing power drill. Use a controlled rhythm rather than throwing the weights.
- Set your stance: Stand about shoulder-width apart with soft knees. Hold the dumbbells near your shoulders, palms facing inward and wrists straight.
- Brace and breathe: Firm your abdomen as if preparing for a gentle punch. Keep breathing, with your ribs over your pelvis and your neck relaxed.
- Reach up and across: Move your right hand diagonally upward toward the space above your left shoulder. Use a comfortable range and stop short of snapping your elbow straight.
- Keep your guard: Hold your left hand near your cheek or shoulder while the right arm moves. Keep the dumbbells clear of your face and each other.
- Return, then switch: Bring the right weight back under control, then repeat with the left. Each single-arm reach counts as one punch.
Your shoulders working, a firm abdominal brace, and increasing muscular fatigue as the set continues. Your breathing may quicken while the movement stays smooth.
Sharp shoulder pinching, elbow pain, neck strain, lower-back aching, or dizziness.
Stop if these symptoms occur. Get guidance for persistent or recurring symptoms before trying again.
Practice with empty hands first. Shorten the diagonal reach and slow the pace until both sides feel coordinated. If holding the unused hand up is tiring, lower it between reps. Add the light dumbbells only when you can keep the same smooth motion.
Keep the weights light and take about two seconds to return each hand. Or build from 20 seconds toward 30–45 seconds while keeping your rest. Change one variable at a time. Don’t turn the progression into rapid-fire weighted punches or a test of heavier dumbbells.
- Bending your wrist backward instead of keeping it aligned with your forearm.
- Flaring the elbow far out to the side before reaching. Let the hand travel along a comfortable diagonal.
- Chasing a higher or farther target than your shoulder comfortably allows.
Related guidance: Shirley Ryan AbilityLab’s fitness-boxing tips and modifications (a broader boxing routine, not this exact diagonal-press variation).
Incline Sprints
Not for you if: you have an uncontrolled heart or blood-pressure condition, unexplained symptoms with exertion, or an active leg or back injury. Get individual guidance before vigorous intervals. New to running? Use the walking option below.
Workout prescription: Workout 2: 3 × 30 sec. of controlled hard running, with at least 30 sec. of recovery. Allow 60–90 sec. or longer when needed; the listed rest is a minimum. Shorten the work to 10–15 sec. if needed, or walk instead. Include warm-up, speed transitions, and cool-down separately.
Key cues: Short, smooth strides; look ahead.
Running uphill adds a climbing demand, so you can raise the effort without relying only on faster speed. Your legs drive you up the slope while your cardiovascular system handles the repeated bouts. For this circuit, “sprints” means hard running you can control, not a maximum-speed test. An incline changes how your legs are loaded; it doesn’t guarantee pain-free running or make the exercise suitable for every joint.
- Choose your setup: Outdoors, use a gradual hill with even footing and a clear route. On a treadmill, attach the safety clip, locate the stop control, and follow the machine’s starting instructions. Keep your hands free of weights.
- Warm up: Walk or jog easily for 5–10 minutes. Rehearse the slope at an easy pace before adding speed; choose a gentler grade if it changes your stride.
- Build the effort: Increase treadmill speed gradually while moving on the belt. Use a challenging pace with enough control to slow down smoothly. Don’t jump onto a fast belt from the side rails.
- Run smoothly: Keep your head in line with your spine, shoulders relaxed, and a slight whole-body lean from your ankles. Let your feet land beneath you rather than reaching far forward.
- Recover fully: Gradually slow to an easy walk. Outdoors, walk back down carefully. Begin another effort only when your breathing has settled enough to speak comfortably and your stride feels controlled.
- Finish safely: Cool down with easy walking for 5–10 minutes. Stop the treadmill belt completely before stepping off. Use the safety stop and handrails if needed in an emergency.
Your glutes, thighs, and calves working, with a faster heartbeat and deeper breathing during the effort. Breathing should ease during recovery.
Sharp joint or tendon pain, lower-back pinching, chest pressure, dizziness, faintness, or unusual breathlessness.
Stop if these symptoms occur. Chest pressure, fainting, or severe unexplained breathlessness warrants urgent medical help; don’t resume the interval.
Walk at a comfortable speed on a gentle incline, or start flat. Choose a pace and grade that let you speak in sentences without hanging on the rails. Build comfortable walking time first, then introduce brief brisk intervals. A steeper hill isn’t automatically an easier workout.
When every interval stays smooth and you recover well, add a small amount of speed or incline. If you shortened the work, build back toward 30 seconds first. Keep adequate recovery and change one variable at a time. Don’t add weights or cut rest just to make the session tougher.
- Folding at the waist or craning your neck down toward your feet.
- Choosing the incline or speed from someone else’s workout instead of your own running ability.
- Starting the next interval because the timer beeps while you’re still struggling to recover.
Related guidance: American College of Cardiology on exercise intensity · Precor treadmill safety instructions (follow your own machine’s manual).
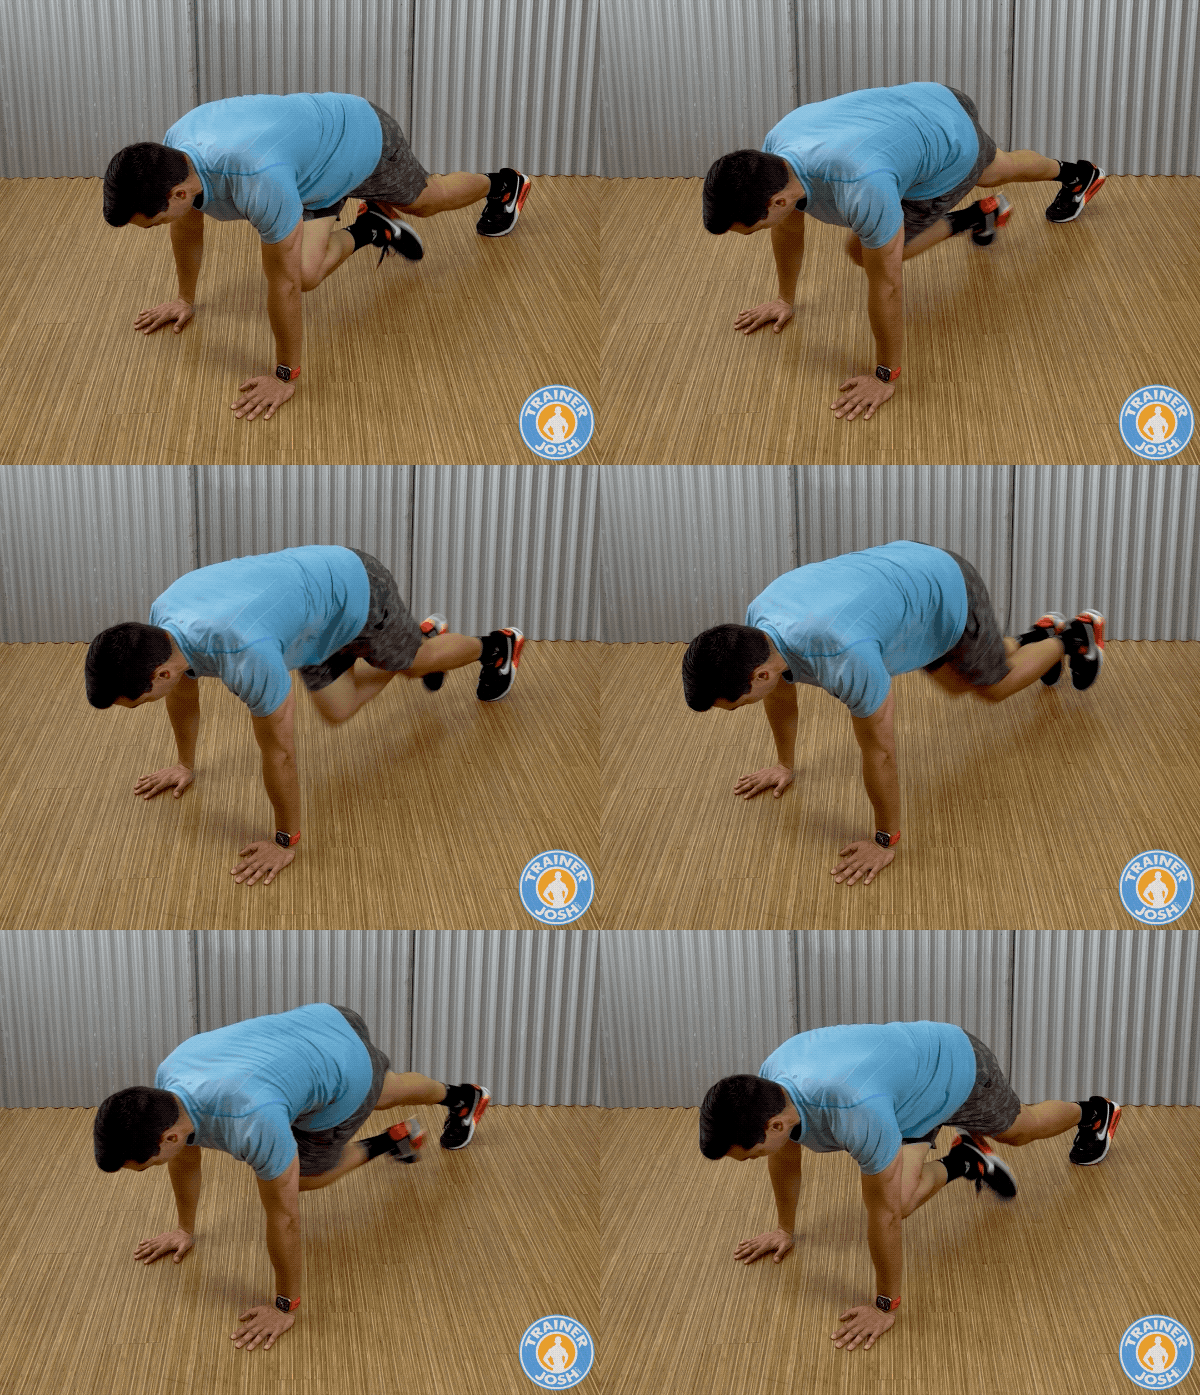
Cross-Body Mountain Climbers
Not for you if: you have an active back or disc problem, or wrist or shoulder symptoms with weight-bearing, that haven’t been assessed for this movement. Get individual guidance before adding climbers.
Workout prescription: Workout 1 and Workout 3: 3 × 20 sec., with 30 sec. rest or longer as needed. Start with one set.
Rep-based option: use 2–3 sets of 10–15 controlled knee drives per side instead of the timed interval. Shorten the set when form slips.
Key cues: Move the knee across; keep the trunk steady.
Think of this as a moving plank. Each diagonal knee drive changes your support while your abdominal muscles, including the obliques, help control your trunk. Your shoulders support your upper body and your hip flexors bring the knee forward. It adds coordination and core endurance to the circuit without needing a standing jump. A quicker pace adds a conditioning challenge only while you can keep the same control.
- Set your plank: Place your hands under your shoulders on a nonslip surface. Step your feet back, keep your arms straight without forcing the elbows, and line up your head, hips, and heels.
- Set your gaze: Look at the floor slightly ahead of your hands, keeping your neck in line with your spine.
- Drive diagonally: Bring your right knee toward your left elbow through a comfortable range. You don’t need to make contact.
- Finish the rep: Extend the right leg back and place the foot down before bringing your left knee toward your right elbow.
- Find your rhythm: Alternate sides slowly at first. Count each knee drive as one rep, and increase pace only when the transitions stay smooth.
Tension through your abdominal wall and sides, your hip flexors working as the knee comes forward, and steady muscular effort in your shoulders and chest. Breathing may quicken as the set continues.
Sharp wrist or shoulder pain, lower-back pinching, a painful catch at the front of your hip, numbness, or tingling.
Stop if these symptoms occur. Get guidance for persistent or recurring symptoms; don’t push through them to finish the interval.
Put your hands on a sturdy bench or box secured against sliding or tipping. Bring one knee across at a time through a shorter range, then return the foot before switching. Raise the support further if needed. If supporting yourself on your hands remains uncomfortable, choose a pain-free floor-based core exercise such as a dead bug instead.
Add a two-second pause near the end of each diagonal drive without forcing knee-to-elbow contact. Or build from 20 seconds toward 30–45 seconds while keeping your rest. Change one variable at a time. Keep this version bodyweight-only; you don’t need ankle weights or suspension straps to progress it.
- Rocking backward or tucking your pelvis just to touch the opposite elbow.
- Piking your hips up to make room for the knee instead of shortening the drive.
- Bending your elbows and sinking between your shoulders as you switch legs.
Technique context: Sport Singapore’s mountain-climber variations · Peak Physio’s hands-elevated climber.
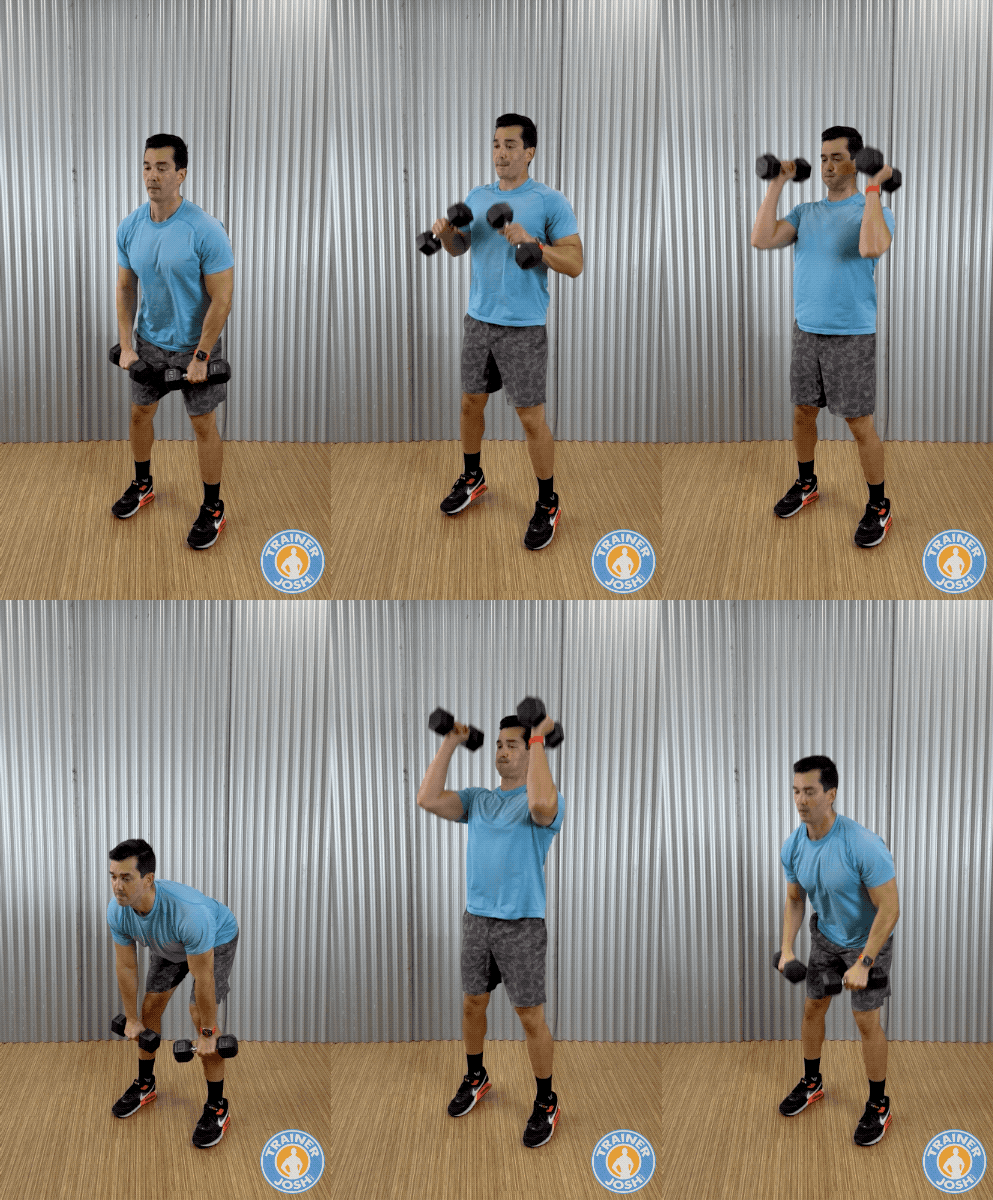
Dumbbell Clean and Press
Not for you if: you have an active shoulder or back problem, or pain when catching weights or reaching overhead. Get individual guidance before combining these movements.
Workout prescription: Workout 2: 3 × 20 sec., with 30 sec. rest or longer as needed. Start with one short set.
Rep-based option: use 2–4 sets of 6–10 crisp reps, resting 60–90 sec. or longer. Finish with 1–2 good reps in reserve; stop sooner if speed or technique fades.
Key cues: Brace your trunk; control each phase.
The hang clean links a quick hip-and-leg drive with catching the weights, then the press adds overhead work. Your trunk keeps you organized through both phases, making this a useful coordination and full-body strength exercise. Dumbbells give each arm its own movement path, but the combination still takes practice. In this circuit, the goal is repeatable, crisp reps—not lifting as much as possible or rushing to exhaustion.
- Set the hang: Stand about shoulder-width apart with the dumbbells at your sides. Soften your knees and hinge at your hips, lowering the weights toward knee height with your spine neutral.
- Drive upward: Push through your feet and quickly extend your hips and knees to start the weights rising. Avoid swinging them away from you.
- Catch in a mini-dip: Move your elbows underneath the dumbbells as you bend into a shallow squat. Receive the weights at shoulder height with your wrists aligned and elbows slightly forward, then stand.
- Press overhead: Brace and press through a comfortable range, using palms facing inward if comfortable. Keep your ribs over your pelvis. For a push press, add a shallow upright knee dip and leg drive; don’t thrust your hips forward.
- Guide the weights down: Lower your elbows toward your ribs as the dumbbells return to your shoulders. Then lower to your sides and reset the hinge before the next rep; don’t yank them downward.
Your legs and glutes driving the clean, a firm abdominal brace through the catch, and your shoulders and triceps working during the press. Your upper back helps support the weights.
Sharp shoulder pinching, painful clicking, lower-back pressure or pain, or a painful pull in your biceps or wrists.
Stop if these symptoms occur. Get guidance for persistent or recurring symptoms rather than trying to press through them.
Practice light dumbbell Romanian deadlifts and overhead presses as separate exercises. Then learn single hang cleans with a full reset between reps before adding the press. Use less than the trial weight range if needed. A coach can help you practice the catch.
Once the top of your rep range stays crisp with reserve, try the smallest available weight increase and return to fewer reps. Keep the same controlled catch and lowering. A lighter single-arm version adds a balance and trunk-control challenge, but learn it separately. Change one variable at a time.
- Starting the clean with a biceps curl before the legs have driven the weights upward.
- Letting your back round as you lower into the hang.
- Letting your wrists fold backward instead of supporting the dumbbells over your forearms.
Technique context: NSCA’s dumbbell hang clean-to-push-press guidance.
Goblet Squats
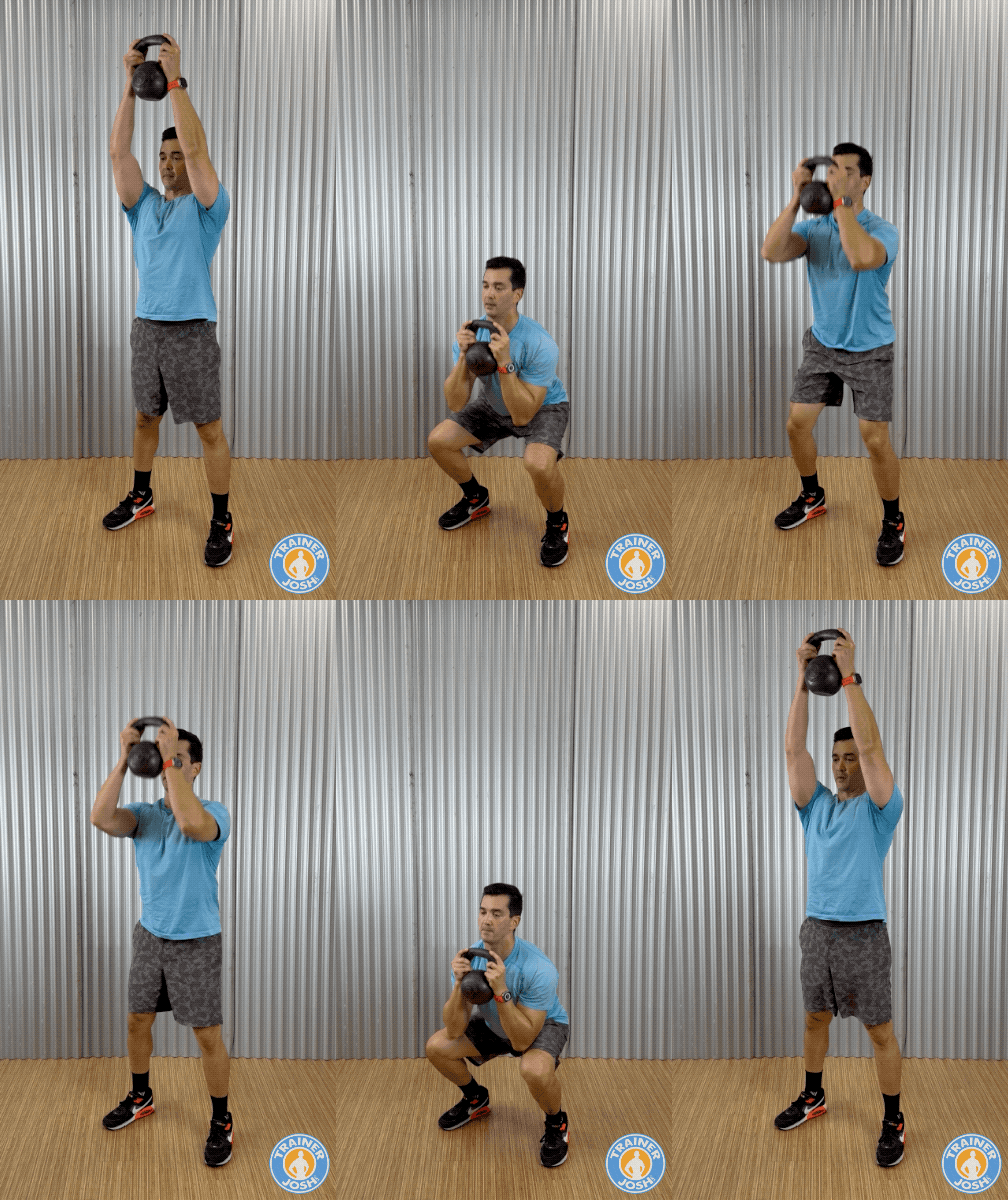
Not for you if: you have an active knee, hip, or back problem that makes squatting painful, or cannot hold the weight comfortably. Get individual guidance before adding load.
Workout prescription: Workout 1 and Workout 3: 3 × 20 sec., with 30 sec. rest or longer as needed. Start with one set.
Rep-based option: use 2–3 sets of 8–12 controlled reps, resting 60–90 sec. or longer. Choose a load that leaves 1–2 good reps in reserve; use less than the trial range while learning if needed.
Key cues: Knees follow toes; use a comfortable depth.
Goblet squats train your thighs and glutes while your trunk and upper back support the weight at your chest. Holding the load in front can help you balance as you sit into the squat. It’s a practical way to build the leg strength used when standing from a chair or climbing stairs, with just one weight. You don’t need a barbell or a maximum-depth squat to make the movement useful.
- Find your stance: Stand about shoulder-width apart with toes turned slightly outward. Adjust the width a little until bending your knees and hips feels comfortable.
- Secure the weight: Hold a kettlebell by its horns, as shown, or cup the top head of a fixed dumbbell with both hands. Keep it close to your chest and brace your abdomen.
- Lower with control: Bend your hips and knees together. Let your knees travel in the same direction as your toes while keeping your feet firmly supported.
- Choose your bottom position: Stop at the depth where you can stay balanced and keep your back controlled. Don’t use your elbows to force your knees farther apart.
- Stand smoothly: Exhale as you rise, bringing your hips and chest up together. Finish standing without leaning backward, then reset for the next rep.
Your thighs and glutes working, firm abdominal tension, and your arms and upper back supporting the weight. Pressure stays spread across your feet.
Sharp knee or hip pinching, lower-back pain, or painful strain in your wrists or shoulders.
Stop if these symptoms occur. Get guidance for persistent or recurring symptoms before adding more weight or depth.
Use a sturdy chair secured against sliding. Sit down under control without weights, then stand; choose a higher seat if needed. If ankle movement limits a comfortable squat, a stable squat wedge or lifting shoes may help. Keep your heels supported and test without weight first; avoid loose or stacked plates.
Try a 3–5-second lowering phase or a brief pause at your comfortable bottom position. Alternatively, once all sets reach 12 clean reps with reserve, add the smallest practical weight increment and return to 8 reps. Change one variable at a time.
- Forcing extra depth by rounding your lower back.
- Flaring your elbows and holding the weight away from your chest.
- Bouncing out of the bottom instead of controlling the change of direction.
Technique context: ACE goblet-squat guidance.
Renegade Row with Push-up
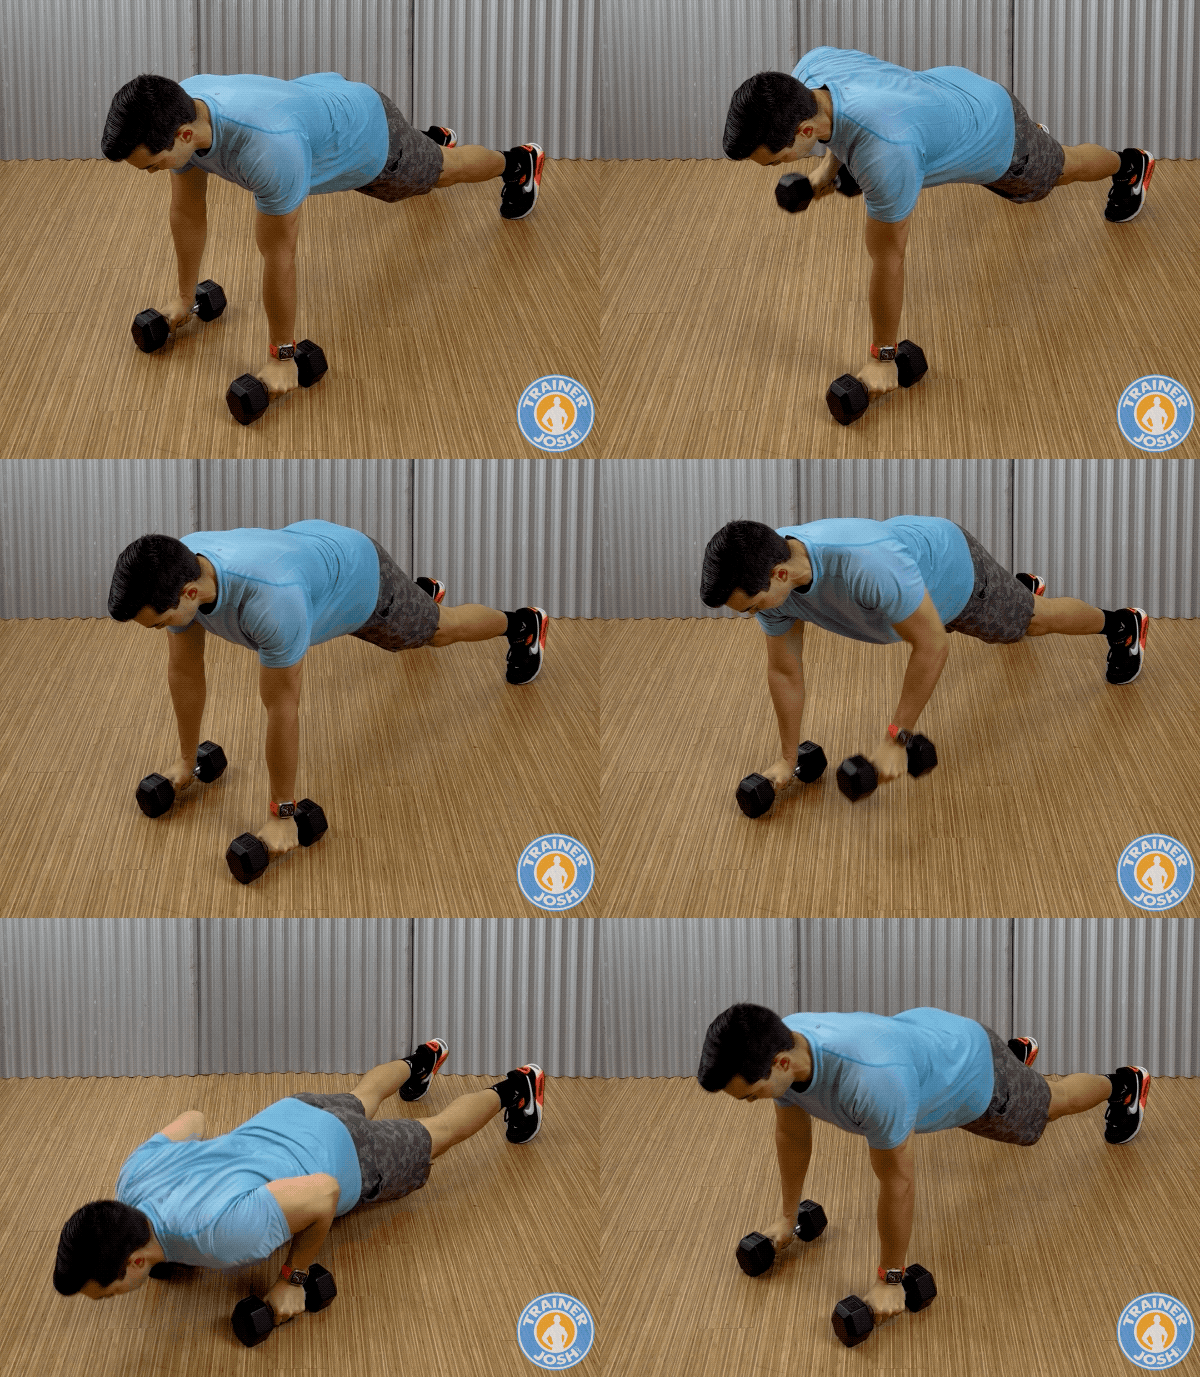
Not for you if: you have an active back or disc problem, or wrist or shoulder symptoms when supporting your weight, that haven’t been assessed for this movement. Get individual guidance before adding this combination.
Workout prescription: Workout 2 and Workout 3: 3 × 20 sec., with 30 sec. rest or longer as needed. Start with one short set.
Rep-based option: try 2–3 sets of 6–10 combinations, resting 60–90 sec. or longer. One combination = one row per side + one push-up. Do fewer if needed to finish with 1–2 clean combinations in reserve.
Key cues: Stay long through your neck; keep your wrists straight.
This combines upper-body pulling and pushing with the challenge of keeping your trunk steady as one hand leaves the floor. Your back and arms work during the rows; your chest, shoulders, and triceps handle the push-up. It’s useful when you want strength and core control in one sequence. Your ability to stabilize limits the load, so use supported rows separately when heavier back training is the goal.
- Check your base: Place fixed hex dumbbells on a firm, nonslip floor under your shoulders. Check that they neither roll nor tip and that the handles leave enough room for your fingers. Don’t use round dumbbells.
- Set a wide plank: Step your feet back, shoulder-width apart or a little wider. Grip the handles securely, brace your abdomen, and keep your head, hips, and heels in line.
- Row the first side: Pull one dumbbell toward your lower ribs with your elbow close to your body. Stop before you need to turn your chest to lift it higher.
- Switch sides: Lower the weight under control, regain your balance, then row and lower the other dumbbell.
- Add the push-up: With both weights settled, lower your chest between your hands through a comfortable range. Let your elbows angle back rather than flare straight sideways. Press up as one unit to complete the combination shown.
Your upper back and arms working during the row, your chest and triceps during the push-up, and firm tension through your abdomen, sides, glutes, and thighs.
Sharp wrist or shoulder pain, lower-back pinching, neck strain, numbness, or tingling.
Stop if these symptoms occur. Get guidance for persistent or recurring symptoms; changing your grip isn’t a reason to push through pain.
Practice supported one-arm rows and incline push-ups separately, using a sturdy bench secured against sliding or tipping. If combining the moves is the challenge, try the sequence from your knees on a mat, keeping a straight line from head to knees. Choose the version you can control comfortably before returning to the full plank.
Add a two-second pause at the top of each row while keeping the same stable stance. Alternatively, once all sets reach 10 clean combinations with reserve, try the smallest practical weight increase and return to fewer reps. Change one variable at a time; keep both feet on the floor.
- Choosing your usual supported-row weight. Start with the trial range or lighter; trunk control determines the load here.
- Reaching your chin toward the floor instead of lowering your chest during the push-up.
- Rushing to squeeze another combination into the timer instead of completing each phase.
Technique context: ACE renegade-row and push-up guidance.
Reverse Lunges with Front Rack Hold
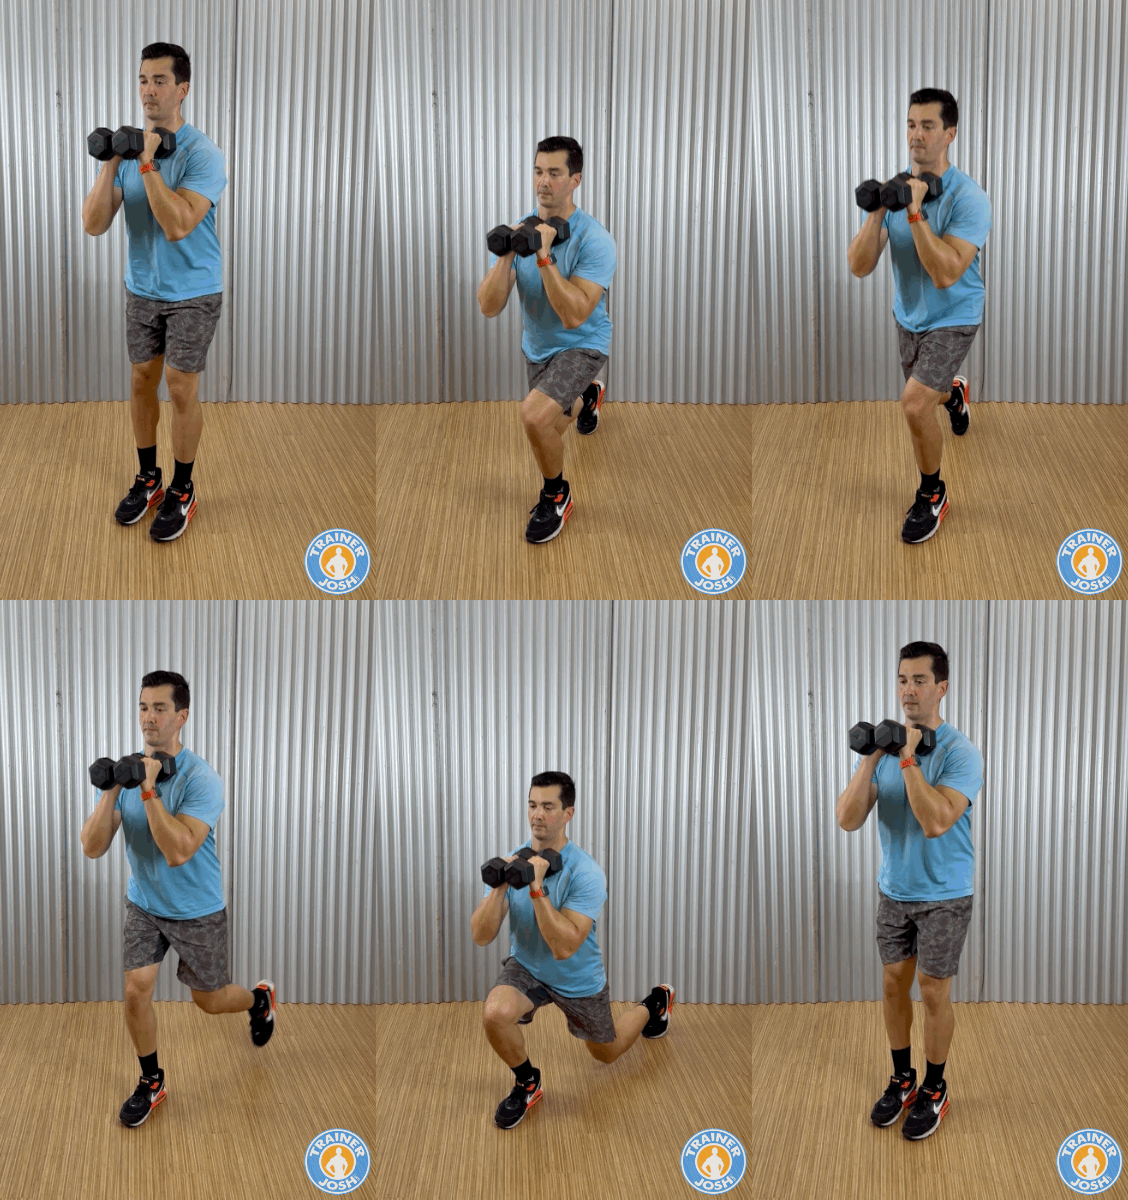
Not for you if: you have significant balance problems, painful rear-toe bending, or an active knee, hip, back, or shoulder problem that makes this movement uncomfortable. Get individual guidance before using the loaded version.
Workout prescription: Workout 1: 3 × 20 sec., alternating legs, with 30 sec. rest or longer as needed. Start with one set.
Rep-based option: use 2–3 sets of 8–12 reps per leg, resting 60 sec. or longer between sets and between legs as needed. Leave 1–2 clean reps per leg in reserve. Learn with body weight before trying the listed load.
Key cues: Keep your front foot planted; reset your balance between reps.
The front leg does much of the work as you lower and stand, training your thighs and glutes while the step challenges balance. Holding weights near your shoulders adds work for your arms, upper back, and trunk. Training each side gives you a chance to notice differences in control. Some people find stepping backward more comfortable than forward, but it isn’t a guarantee of pain-free knees or an automatic correction for strength imbalances.
- Set your rack: Stand hip-width apart. Hold the dumbbells close at shoulder height, palms facing each other, wrists straight, and elbows slightly forward. Keep a secure grip; don’t force your elbows high or arch your back.
- Step back: Brace your abdomen and move one foot backward, landing on the ball of that foot with the rear heel lifted. Keep your weight balanced over the planted front foot.
- Lower smoothly: Take about 2–3 seconds to bend both knees through a comfortable range. Let the front knee follow your toes. A small forward lean from your hips is fine with a steady spine; don’t force a perfectly vertical torso.
- Drive through the front foot: Keep your heel and the bases of your big and little toes connected to the floor as you rise. Bring the rear foot forward and finish standing without leaning back.
- Reset, then switch: Find your balance before the next step. Alternate sides during the timed circuit. For rep-based sets, you can finish one side before switching; each step back and return counts as one rep for the front leg.
Your front thigh and glute working, firm abdominal tension, and your arms and upper back supporting the weights. Your front foot and ankle work to steady you.
Sharp knee pain, hip or lower-back pinching, painful pressure in the rear big toe, wrist or shoulder pain, or dizziness.
Stop if these symptoms occur. Get guidance for persistent or recurring symptoms before trying another loaded set.
Leave out the weights and hold a fixed counter or sturdy support. Use a shallower step-back. If the stepping transition is difficult, practice a supported static split squat with both feet staying in place. This still bends the rear toes; choose a different comfortable exercise if toe pain is the limitation.
Once you can repeat 12 controlled reps per leg with reserve, add the smallest practical weight increment and return to 8 reps. Or try a lighter single dumbbell at one shoulder, resisting sideways lean; give both rack sides equal practice. Change one variable at a time and keep the same controlled depth.
- Pushing mostly off the rear foot instead of letting the front leg do the main work.
- Taking such a long step that you arch your back or feel a painful pull at the rear hip.
- Forcing your front shin to stay vertical. Use a comfortable knee path with your whole front foot supported.
Related technique: PureGym’s reverse-lunge guidance (general lunge technique; this demo adds the front rack hold).
Three Workout Plans to Put the Exercises Together
Pick one session that fits your current skills. These metabolic resistance training workouts combine strength exercises with timed conditioning. Use the cards above to choose your version of each move before starting. You can do Workouts 1 and 3 at home with weights and floor space; Workout 2 also needs a treadmill or suitable hill for its running intervals.
Build toward the adult activity guidelines: at least 150 minutes of moderate cardio or 75 minutes of vigorous cardio per week, or a mix, plus strength work for all major muscle groups on at least two days.
These are health targets, not a promise of a particular amount of fat loss. Start smaller if needed. If Workout 1 is your regular choice, include a supported row and incline push-up elsewhere in your routine to cover your back and chest.
Choose your workout: Workout 1 · Workout 2 · Workout 3.
Workout 1: Two Short Circuits (Beginner Options)
Start here with 20-second intervals and the easier versions: a sit-to-stand for goblet squats, a kettlebell deadlift for swings, hands-elevated climbers, unweighted punches, step-back squat thrusts, and supported bodyweight lunges. Alternate legs during the lunge interval. Begin with one round of each group; the full three rounds total 15 minutes of listed work and rest, before warm-up, transitions, and extra recovery.
| Order | Exercise | Sets | Work | Rest |
|---|---|---|---|---|
| A1 | Goblet Squats | 3 | 20 sec. | 30 sec. |
| A2 | Kettlebell Swings | 3 | 20 sec. | 30 sec. |
| A3 | Cross-Body Mountain Climbers | 3 | 20 sec. | 30 sec. |
| B1 | Dumbbell High Cross Punches | 3 | 20 sec. | 30 sec. |
| B2 | Squat Thrusts | 3 | 20 sec. | 30 sec. |
| B3 | Reverse Lunges with Front Rack Hold | 3 | 20 sec. | 30 sec. |
Workout 2: Strength and Running Intervals (Experienced Exercisers)
Choose this once you can perform the burpee press, clean and press, and renegade row with control. These are advanced combinations, even though the intervals are short. The running option is for experienced runners; use comfortable incline walking if needed. Allow time for treadmill speed changes and full recovery. The listed work and rest total about 16½ minutes, plus warm-up, transitions, and extra recovery.
| Order | Exercise | Sets | Work | Rest |
|---|---|---|---|---|
| A1 | Dumbbell Burpee Press | 3 | 20 sec. | 30 sec. |
| A2 | Incline Sprints | 3 | 30 sec. | 30 sec. |
| A3 | Planks | 3 | 30 sec. | 30 sec. |
| B1 | Dumbbell Clean and Press | 3 | 20 sec. | 30 sec. |
| B2 | Renegade Row with Push-up | 3 | 20 sec. | 30 sec. |
| B3 | Bicycle Crunches | 3 | 30 sec. | 30 sec. |
Workout 3: Longer Full-Body Circuit (Advanced)
Choose this once the shorter circuits feel repeatable and you recover well. It includes 60-second swing sets and several demanding movements; shorten the swing interval as soon as hip drive fades. For side planks, complete 20 seconds on each side before resting. The listed work and rest total about 23 minutes, plus warm-up, transitions, and extra recovery.
| Order | Exercise | Sets | Work | Rest |
|---|---|---|---|---|
| A1 | Goblet Squats | 3 | 20 sec. | 30 sec. |
| A2 | Cross-Body Mountain Climbers | 3 | 20 sec. | 30 sec. |
| A3 | Kettlebell Swings | 3 | 60 sec. | 30 sec. |
| A4 | Bicycle Crunches | 3 | 20 sec. | 30 sec. |
| A5 | Dumbbell High Cross Punches | 3 | 20 sec. | 30 sec. |
| A6 | Renegade Row with Push-up | 3 | 20 sec. | 30 sec. |
| A7 | Side Planks | 3 | 20 sec/side | 30 sec. |
| A8 | Dumbbell Burpee Press | 3 | 20 sec. | 30 sec. |
Equipment for These Workouts
Use what you already have and check each card’s equipment and starting-load notes. The bodyweight substitutions let you learn the movements before adding weights.
Some equipment links below are affiliate links. I may earn a commission if you buy through them.
Hex dumbbells
Use a pair for the presses, rows, squats, and lunges. Hex heads are less likely to roll; check their stability before floor exercises.
View dumbbellsKettlebell
For swings, choose a weight that lets you practice the hip hinge with control. Start light while learning the movement.
View kettlebellsIncline options
Use a treadmill with an incline or a gradual outdoor hill with even footing. Start with walking before progressing to running intervals.
See incline exerciseChoose a load you can control throughout the set. The right weight will differ between exercises.
My rule: earn the heavier weight. If you have to jerk, twist, or rush to finish a rep, lighten the load. Good technique comes first, and an exercise that causes pain is a reason to stop and reassess. A qualified trainer can help you learn unfamiliar lifts.
Want to add cardio? Keep it at a comfortable conversational pace, either after the circuit or on another day. My heart-rate zone calculator can help you estimate a cardio intensity range; it isn’t a special zone that guarantees more body-fat loss.
How Exercise Helps You Lose Belly Fat
QUICK ANSWER:
Exercise helps you lose fat by increasing the amount of calories that you burn, preserving lean muscle, and improving how your body is able to mobilize and burn stored fat.
Strength training is especially important because it helps you lose fat without sacrificing muscle. Cardio and HIIT can also increase energy expenditure and help reduce deep visceral belly fat.
Ab exercises strengthen your midsection, but losing the fat covering your stomach will still need overall body fat reduction.
Exercise Increases Calorie Burn & Helps Create an Energy Deficit
Think of body fat as stored energy. Exercise increases the amount of energy your body needs. When you consistently use more energy than you take in, your body draws on its stores, including fat, to help make up the difference.[1]
Your muscles use both carbohydrate and fat during exercise. Harder efforts generally rely more on carbohydrate, so the fuel you burn during a workout doesn’t tell you how much body fat you’ll lose over time.[2]
The squats, lunges, and rows in this plan work several large muscle groups. Along with cardio and walking, they can help create a calorie deficit without relying entirely on eating less.
But food intake still matters. Eating more in response to training can offset some of the calories you burn.[1] Make your meals support your workouts instead of treating a hard session as a free pass to eat more.
Strength Training Helps Preserve Lean Tissue During Weight Loss
Calorie restriction can mean losing lean tissue along with body fat. In adults with overweight or obesity, adding resistance training helps reduce the loss of fat-free mass compared with dieting alone.[4] That measure includes muscle, water, bone, and organs, so it doesn’t tell us exactly how much muscle was preserved.
Muscle also uses energy at rest, but the calorie burn from each pound is modest.[5] Keeping muscle is a good reason to lift weights without expecting a huge metabolism boost.
My goal for you is to lose fat while keeping your strength. Keep resistance training in your routine and track what you can lift alongside your weight and waist measurements.
Exercise Helps Reduce Deep Visceral Belly Fat
Visceral fat sits deep in your abdomen around your organs. Subcutaneous fat sits beneath your skin and includes the soft layer you can pinch.
Both types can decrease over the course of an exercise program.[6] With modest weight loss, visceral fat often decreases by a greater percentage than subcutaneous fat. A larger percentage reduction doesn’t establish that it “burns first.”[7]
Just because you don’t see your abs yet doesn’t mean your training isn’t helping. Your appearance alone can’t tell you how much visceral fat you’ve lost, and you shouldn’t expect belly fat to disappear in a particular order.
The Afterburn Effect Adds a Small Calorie Bonus
Your body can keep using extra energy after a demanding workout. The afterburn effect, or EPOC, measures oxygen use above resting levels during recovery. It isn’t a direct measurement of body fat burned.[8]
Some demanding sessions produce an afterburn lasting 3–24 hours, but even a prolonged effect can contribute only modestly to calorie burn.[8] The amount varies with the workout and how long researchers measure recovery.[9]
I’d treat afterburn as a small bonus. Don’t add rounds or cut your rest just to chase it. Choose the workout version you can perform well and recover from before your next session. You don’t need to finish completely gassed to make progress.
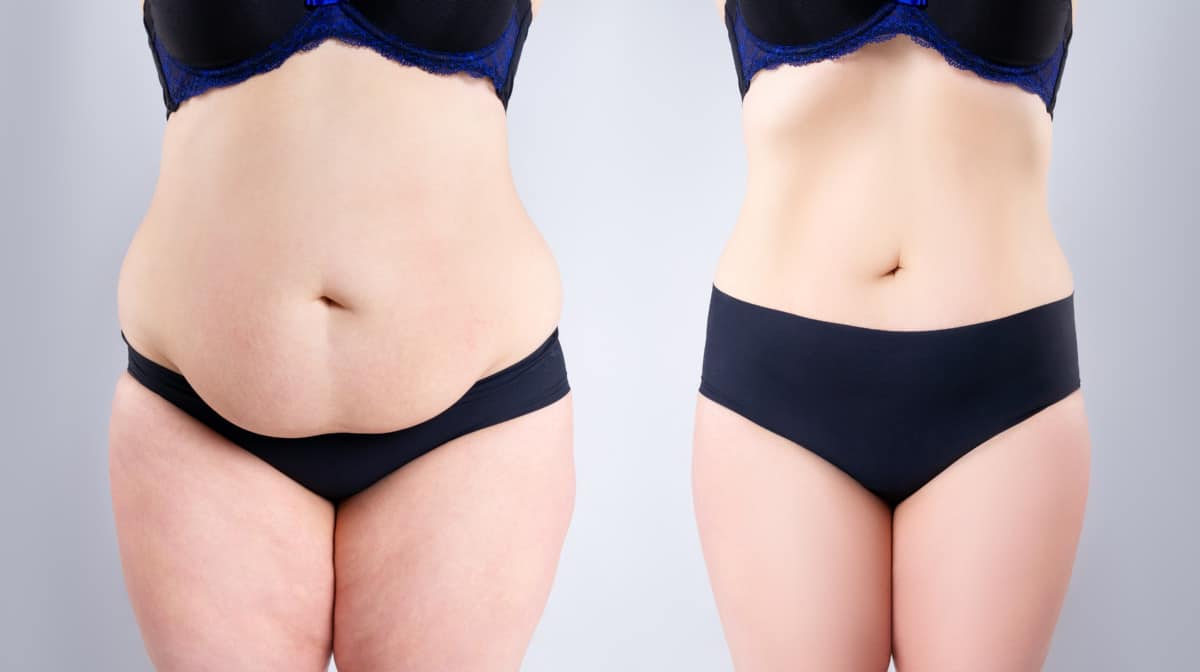
Why Your Waist May Change More Slowly
Your starting body composition, genetics, age, and hormonal changes—including changes around menopause[10]—can influence where you store fat and how your shape changes. There is no guaranteed order in which every person loses it. If your waist is changing more slowly than another area, that alone doesn’t mean your workouts have stopped working.
- Subcutaneous fat sits under the skin and includes the soft layer you can pinch.
- Visceral fat sits deeper around the abdominal organs. Excess abdominal fat is associated with greater health risk, but you can’t determine your visceral-fat level from belly shape or a pinch test.
Regular exercise can help reduce visceral fat—the deeper fat around your abdominal organs—even when the scale doesn’t change much.[11]
A waist measurement can help assess risk, alongside other health information. My guide to improving body composition goes deeper into building muscle when you feel slim elsewhere but still carry fat around your waist. For more ways to train the muscles along the sides of your waist, see my side-fat and oblique exercise guide.
HIIT vs. Walking vs. Strength Training for Belly Fat
Use strength training as the foundation, walking to add manageable activity, and harder intervals when your fitness and recovery allow. A timed circuit doesn’t have to be an all-out HIIT session.
| Training type | What it adds | How to use it |
|---|---|---|
| Strength training | Builds strength and helps preserve muscle during weight loss. | Use the exercises and workout plans above, choosing weights you can control. |
| HIIT | Alternates challenging efforts with recovery to train cardiovascular fitness. | Use intervals when you can keep good form and recover between efforts. Start with easier versions. |
| Walking or steady cardio | Adds activity and energy expenditure at a manageable pace. | Use it between strength sessions or whenever it fits your day. Brisk walks count. |
HIIT is useful, but it isn’t automatically better for fat loss. A 2023 review of 11 randomized trials found no clear advantage over continuous aerobic training for reducing body-fat percentage or abdominal visceral fat in adults with excess weight. You can get results without making every workout an all-out effort.
Hard sessions can temporarily raise energy use afterward—the afterburn effect—but research on post-exercise energy use doesn’t support treating it as the main driver of weight loss. Give more attention to the training and eating habits you can maintain. If you enjoy intervals, my HIIT workout guide explains how to structure work and recovery intervals when you’re ready to build your own session.
Why You’re Exercising but Not Losing Belly Fat
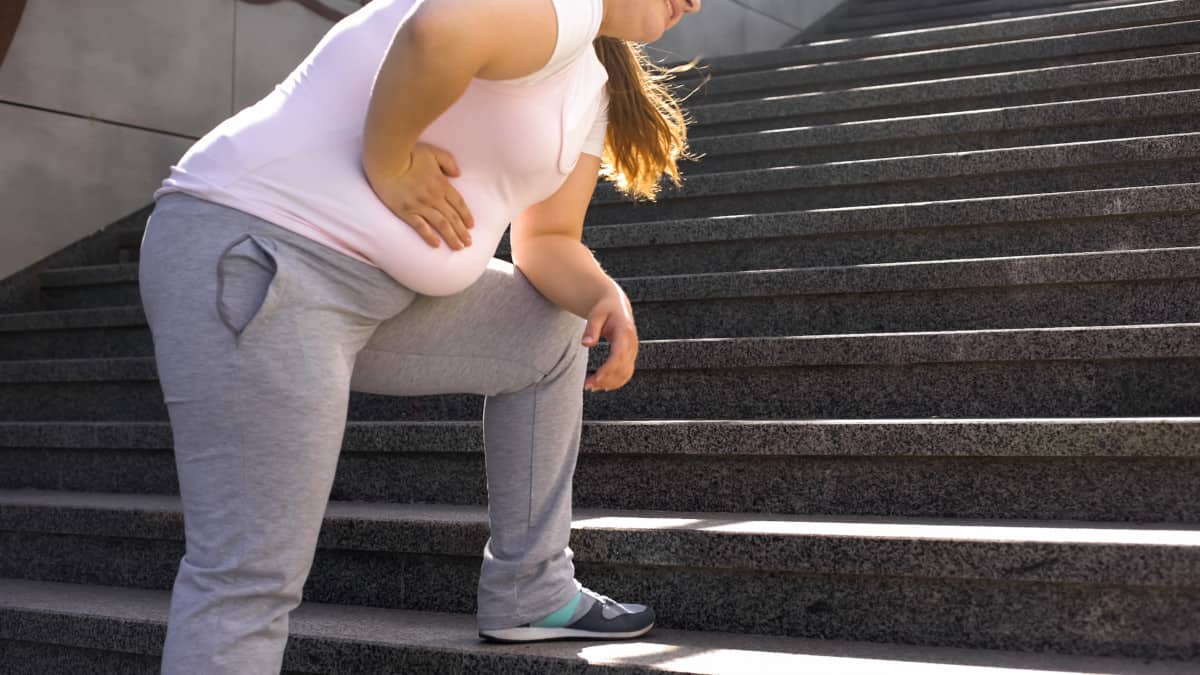
“I work out, but my belly won’t go away.” I hear this all the time. Before piling on another workout, look at the whole week. A few habits outside the gym can explain why your effort isn’t showing up the way you expected.
- Check the food and drinks you overlook. Record a few typical days, including weekends, snacks, cooking oils, and drinks. Look for one manageable change. You don’t need to slash your food intake to make the log useful.
- Look at movement outside your workouts. Take short walk breaks during long stretches of sitting. Start from your current activity level and add a manageable amount. A short walk you repeat is more useful than a step target you abandon.
- Review your training and recovery. Keep track of the weights, reps, and rounds you can perform with good form. If you’re constantly exhausted or your performance is slipping, give yourself more recovery before adding intensity.
- Check sleep and stress patterns. Late nights, skipped meals, and stress eating can make consistency harder. Choose one practical change, such as a regular bedtime or a prepared meal for busy days. My stress-belly guide covers this in more detail.
- Count alcohol as part of the picture. Drinks and mixers add calories, and a night out may affect your food choices and sleep. If you drink, planning the amount ahead of time can help. See my guide to alcohol and weight loss.
If your weight and waist trends remain unchanged over several weeks, adjust one habit and reassess. Unexpected weight changes or persistent symptoms deserve a conversation with your healthcare professional rather than an automatic increase in exercise.
How Long Does It Take to Lose Belly Fat With Exercise?
“How long before I see results?” The honest answer is that there is no fixed deadline for your waist. Your starting point, consistency, health, and how your body distributes fat all matter. Plan for a gradual process over weeks and months.
The CDC describes gradual weight loss of about 1–2 pounds per week as more likely to stay off than faster loss. That refers to total body weight, not a promise of pure fat loss or a specific number of inches from your stomach. A slower pace can still be progress.
Early changes on the scale can include water, stored carbohydrate, and digestive contents. They don’t tell you how much abdominal fat you’ve lost. Likewise, a few days with no scale change are too short to judge the whole plan.
If you’re working on the last few pounds or changes around the lower belly, keep the same patient approach. Trying to force a dramatic six-week transformation can make the routine harder to sustain.
Nutrition and Recovery Basics
There’s a saying among trainers: “You can’t out-train a bad diet.” The useful takeaway is to make your meals support the work you’re doing. Choose portions that support gradual progress while leaving you with enough energy to train and recover.
- Include protein at meals. Foods such as eggs, fish, lean meat, yogurt, tofu, and beans can help you meet your needs. My protein calculator can help you estimate a daily target to support your strength training and muscle preservation. Use that estimate to plan protein across your meals.
- Build filling meals. Include vegetables, fruit, beans, or whole grains alongside your protein, and drink water regularly. Plan food you enjoy so the routine is easier to repeat.
- Watch portions and liquid calories. Small, repeatable changes to snacks, alcohol, or sugary drinks may be easier to maintain than a rigid food ban. Calorie needs vary; one fixed target won’t suit everyone. Use my calorie calculator for weight loss to estimate a starting daily range, then adjust based on your progress over several weeks.
Research in adults with obesity during weight loss supports combining exercise with sufficient protein to help preserve fat-free mass. You don’t have to turn each meal into a complicated calculation to start improving those habits.
One off-plan meal doesn’t erase your progress. Return to your usual routine at the next meal instead of crash dieting or adding a punishment workout. Consistency matters more than perfection.
For simple meal-planning ideas, you can get my flat belly foods list below.
CLICK HERE: Get the Food List Cheat Sheet ➔Track progress the same way each time:
- Use a tape measure at the same place around your waist, under similar conditions, once a week. Stand relaxed and avoid pulling the tape tight.
- If you weigh yourself, compare trends across several weeks rather than reacting to one reading. Log your weight consistently, and treat any body-fat percentage reported by your scale as an estimate.
- Keep a short workout log and notice how your clothes fit. Better strength, stamina, and consistency are useful signs alongside changes in your waist.
Your Action Plan to Lose Belly Fat
FAQs
What exercise burns the most belly fat?
No single exercise reliably burns the most fat specifically from your stomach. Combine full-body strength training with cardio you can repeat consistently, and use eating habits that support gradual fat loss.
Can walking reduce belly fat?
Yes. Walking adds physical activity and energy expenditure, which can support fat loss. Choose a manageable pace and build up gradually. It works well alongside the strength workouts above.
Are crunches good for losing belly fat?
Crunches strengthen your abdominal muscles, but they do not reliably remove the fat directly above them. Use them as part of a broader routine rather than your entire fat-loss plan.
Do planks burn belly fat?
Planks train core strength and endurance. They can be useful in your workouts, but holding them longer is not a reliable way to target stomach fat. Overall activity and nutrition still matter.
Why is belly fat the hardest to lose?
It is not always the hardest area for everyone. Genetics, age, hormones, and starting body composition affect where changes show first. Track your overall progress instead of assuming a slower-changing waist means the plan has failed.