
Your love handles are not broken. They’re just slow.
Here’s the honest answer, right up front: there’s no single magical exercise that melts fat off one specific spot on your body. Not crunches, not side bends, not that “10-minute love handle” routine you saw last week.
But here’s where it gets interesting. That doesn’t mean exercise is pointless here. Far from it. The right core work strengthens and shapes the underlying muscles, improves trunk control, and makes your waist look firmer as your overall body fat decreases.
In this article, you’ll get 13 exercises that actually earn their place in your routine, plus a full workout built from them. You won’t need to do all 13 in one sitting… just the ones that fit where you’re starting from.
Start Here: What Actually Works
What Works
- A sustainable calorie deficit
- Full-body resistance training
- Regular walking or cardio
- 2-3 well-chosen core exercises
- Consistency over several weeks
What Doesn’t Work
- Endless side crunches
- Waist trainers or sweat belts
- Trying to sweat more around your waist
- Doing all 13 exercises in one workout
- Changing your plan after a few days without visible results
START HERE: YOUR LOVE HANDLES WORKOUT AT A GLANCE
Workout time: 20-40 minutes
Frequency: 2-3 nonconsecutive days per week
Equipment: Bodyweight, a resistance band, and one light dumbbell or loaded backpack
Fitness level: Beginner to advanced
Main focus: Obliques, deep core, trunk stability, and full-body conditioning
Beginner: 2 rounds of Phase 1 and 2, plus 5-10 minutes of cardio
Advanced: 3 rounds of Phase 1, 4 rounds of Phase 2, plus 12-20 minutes of cardio
Rest 15-30 seconds between exercises, 45-60 seconds between rounds in Phase 1, and 60-90 seconds between rounds in Phase 2.
You do not need to do all 13 exercises. Choose the variations that allow you to maintain good form without sharp pain.
Love Handle Workout Plan
This workout strengthens the muscles around your waist (love handles especially) while combining full-body training and cardio to support overall fat loss.
Here’s the simple 3-phase routine you can follow at home with minimal equipment.
Phase 1: Targeted waist strength
4 exercises • 2–3 rounds
Phase 2: Full-body circuit
6 exercises • 2–4 rounds
Phase 3: Cardio finisher
5–20 minutes
Total time: 20–40 minutes
Frequency: 2–3 nonconsecutive days per week
Equipment: Bodyweight, resistance band, and one dumbbell or loaded backpack
Targeted Waist Strength
Build rotational strength, lateral stability, and control before moving into faster full-body work.
| Exercise | Reps | Purpose | Easier option |
|---|---|---|---|
| Standing Woodchops | 10–15 per side | Diagonal rotation | Bodyweight diagonal reach |
| Side-Plank Hip Lifts | 8–12 per side | Lateral core | Bent-knee side plank |
| Pallof Press | 10–12 per side | Anti-rotation | Elevated shoulder taps |
| Mermaid Crunches | 10–15 per side | Side-body flexion | Shorter range |
- Pivot through your hips and feet during woodchops.
- Keep your shoulders stacked during side-plank hip lifts.
- Press the band straight ahead without allowing your torso to rotate during Pallof presses.
- Move slowly enough to feel the side core working.
No band? Replace Pallof presses with bear-plank shoulder taps for 8–12 repetitions per side. Keep your knees hovering just above the floor and resist rotating your hips.
Full-Body Conditioning Circuit
Raise your heart rate while training the legs, upper body, and core together.
| Exercise | Reps/time | Main purpose | Beginner option |
|---|---|---|---|
| Jumping Jacks | 30–45 sec | Conditioning | Step jacks |
| Squat to Press | 10–15 | Legs and shoulders | Squat with overhead reach |
| Cross-Body Mountain Climbers | 20–30 sec | Core conditioning | Elevated knee drives |
| Spiderman Pushups | 6–10 total | Upper body and core | Incline Spiderman plank |
| Reverse Lunges | 8–12 per side | Legs, glutes, and balance | Chair-assisted split squat |
| Running in Place | 30–45 sec | Conditioning | Brisk marching |
Use what you have: one dumbbell, two light dumbbells, a resistance band, a loaded backpack, or a gallon water jug.
Right intensity: You should be breathing hard near the end of each round, but still able to control every repetition. Stop before your form becomes sloppy.
Choose Your Cardio Finisher
Pick the option that best fits your time and fitness level.
Beginner Version
- 2 rounds of Phase 1
- 2 rounds of Phase 2
- 5–10 minutes of walking or marching
| Standard exercise | Beginner substitution |
|---|---|
| Woodchops | Bodyweight diagonal reaches |
| Side-Plank Hip Lifts | Bent-knee side plank |
| Pallof Press | Elevated shoulder taps |
| Jumping Jacks | Step jacks |
| Cross-Body Mountain Climbers | Elevated knee drives |
| Spiderman Pushups | Incline Spiderman plank |
| Reverse Lunges | Chair-assisted split squats |
| Running in Place | Brisk marching |
Advanced Version
- 3 rounds of Phase 1
- 4 rounds of Phase 2
- 12–20 minutes of interval or steady cardio
- Use a stronger resistance band
- Hold a heavier dumbbell or backpack
- Slow the lowering phase to three seconds
- Add repetitions before adding more exercises
- Reduce rest slightly
- Progress from incline to floor-based movements
Losing the fat over your waist takes a calorie deficit, but you still want to protect the muscle that gives your body shape and strength. The BioTRUST GLP-1 Companion Stack is one option I like because it combines appetite support with ingredients designed to help support lean muscle during weight loss.
A 3-part daily stack designed to support people using GLP-1 medications or losing weight naturally. It combines muscle, protein, collagen, and appetite support to help you maintain a healthier body composition as you lose weight.
- Natural GLP-1 Support: Helps support healthy appetite signals, fullness & metabolic function
- Lean Muscle Support: Helps preserve muscle, strength & healthy body composition during weight loss
- High-Protein Collagen: Adds 20 g of protein with 5 collagen types to help support daily protein intake
- Skin, Joint & Hair Support: Provides collagen peptides to support skin elasticity, joints, hair & nails
- 3-Part Weight-Loss Support: Combines muscle, protein/collagen & appetite support in one simple daily stack

13 Best Exercises for Love Handles
These 13 exercises do not all train your core in the same way. Some teach you to resist rotation; others strengthen controlled rotation; and others improve lateral stability, dynamic conditioning, or full-body coordination.
Anti-rotation exercises such as the Pallof Press help you resist unwanted twisting. Controlled rotation exercises such as woodchops and band twists develop rotational strength.
Lateral stability movements such as Side-Ups strengthen the side core. While Cross-Body Mountain Climbers and Kick Throughs add dynamic conditioning. Exercises such as Spider-Man Push-Ups engage your core, shoulders, and hips.
No category automatically burns more love-handle fat. Choose exercises based on your ability, equipment, and joint comfort rather than whichever one creates the strongest burn.
Which Exercise Should You Choose?
Use this comparison to find an exercise that matches your current ability and the type of core strength you want to develop.
Swipe sideways to view the full table →
| Exercise | Main purpose | Level |
|---|---|---|
| Woodchops | Controlled diagonal rotation | Intermediate |
| Russian Twists | Controlled seated rotation | Intermediate |
| Side-Ups | Lateral core stability | Beginner–intermediate |
| Cross-Body Mountain Climbers | Dynamic cross-body conditioning | Intermediate |
| Side Plank Reach-Throughs | Lateral stability with rotation | Intermediate–advanced |
| Spiderman Pushups | Full-body core integration | Advanced |
| Rotating Planks | Anti-extension and rotational control | Intermediate |
| Mermaid Crunches | Controlled lateral flexion | Intermediate |
| Crab Bridge Reach-Overs | Full-body integration and rotation | Intermediate–advanced |
| Band Twists | Standing controlled rotation | Intermediate |
| Stability-Ball Torso Rotations | Advanced rotational control | Advanced |
| Pallof Press | Anti-rotation | Beginner |
| Kick Throughs | Dynamic rotational conditioning | Advanced |
From the Coaching Floor:
When a client has poor core stability, I usually start with a plank or Pallof press before adding faster rotational exercises. I want them to control their ribcage and pelvis and resist unwanted movement before I add speed or resistance.
Once they can maintain a stable position without their lower back sagging or their hips twisting, I teach them to breathe and create a 360-degree brace. From there, I can progress them to Pallof Presses, controlled woodchops, and more demanding rotational movements.
Woodchops
Best for:
Rotational strength and full-body coordination
Level:
Intermediate
Equipment:
Dumbbell, medicine ball, plate, or cable
Sets and reps:
2–3 sets of 8–12 per side
Woodchops train your hips, core, and upper body to create and control diagonal rotation. They primarily challenge your obliques and deep core while using your glutes and shoulders to stabilize the movement. This pattern carries over to swinging, throwing, and lifting or turning with an object in everyday life.
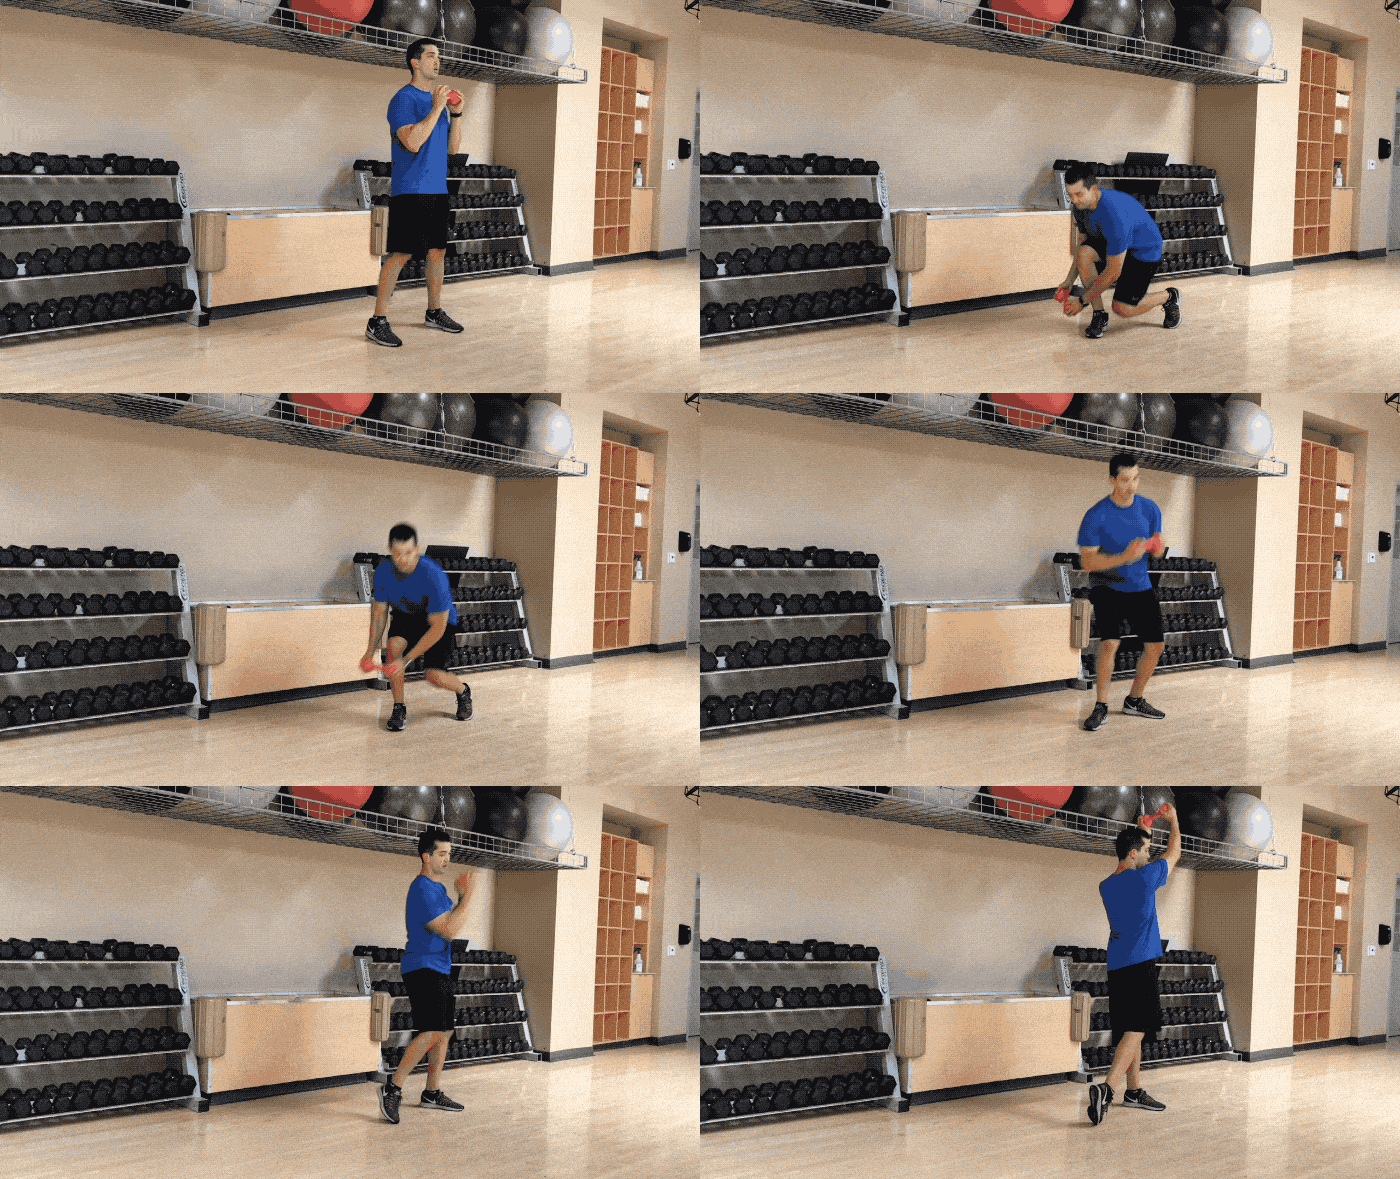
Keep the weight controlled and allow your hips and feet to pivot.
- Stand with your feet slightly wider than shoulder-width apart, grip the dumbbell with both hands, and squat down while rotating your hips and torso to bring the weight to the outside of your left knee.
- Explosively stand up and shift your weight while rotating your hips and torso to the right side.
- Simultaneously drive the dumbbell across your body in a diagonal upward path, finishing with the weight just above your right shoulder and head.
- Smoothly reverse the motion along the exact same diagonal path to return to the starting position outside your left knee, completing all reps on one side before switching.
You should feel: A smooth, rhythmic transfer of power from the ground up through your legs and a strong contraction across your entire torso, particularly in the obliques.
You should not feel: Any sharp twisting or strain in your lower back. The rotation must be driven by your hips and feet pivoting, not by twisting your lumbar spine.
Make it easier: Perform a shorter woodchop without the squat, or use a lighter weight and smaller range of motion while still allowing your hips and feet to turn.
Make it harder: Use a slightly heavier weight, add a pause at the top, or slow the return while keeping the movement controlled.
Make sure the rotation is generated from your feet and hips. To do this safely, allow your back foot to pivot on the floor (imagine squashing a bug with the ball of your foot) as you turn; this protects your knees and allows your hips to fully power the movement.
- Using only your arms and shoulders instead of driving the movement through your legs and hips
- Keeping your feet planted while rotating your torso
- Moving too fast and losing control of the return
Russian Twists
Best for:
Controlled rotation and core endurance
Level:
Intermediate
Equipment:
Bodyweight, dumbbell, plate, or medicine ball
Sets and reps:
2–3 sets of 8–12 per side
Russian Twists train your obliques and abdominal muscles to control side-to-side rotation while maintaining a stable, leaned-back position. This helps develop rotational core strength and the ability to transfer force between your upper and lower body during lifting, sports, and everyday turning movements.

Keep your chest lifted and rotate your torso under control instead of swinging only your arms.
- Sit with your knees bent and heels resting on the floor, then lean back slightly while keeping your chest lifted.
- Hold your hands together or position a light weight in front of your chest.
- Brace your core and rotate your ribcage and shoulders toward one side without collapsing through your lower back.
- Return through the center and repeat on the opposite side, moving slowly enough to maintain control.
You should feel: Your obliques and abdominal muscles working to rotate your torso and hold the leaned-back position.
You should not feel: Sharp lower-back pain, neck strain, or your spine collapsing into a rounded position.
Make it easier: Keep both feet planted, use no weight, sit more upright, and shorten the rotational range.
Make it harder: Lean back slightly farther, extend your arms, pause briefly on each side, or add a light weight while maintaining control.
Rotate your torso, not just the weight. Keep your eyes following your hands so your shoulders and ribcage turn together, but stop before you lose your posture or feel strain in your lower back.
- Swinging the arms while barely rotating the torso
- Rounding the lower back as fatigue builds
- Moving too quickly or forcing a larger range than you can control
Side-Ups
Best for:
Lateral core strength and side-body control
Level:
Beginner to intermediate
Equipment:
Bodyweight or an exercise mat
Sets and reps:
2–3 sets of 8–12 per side
Side-Ups strengthen the obliques and surrounding core muscles through controlled lateral movement. They help you maintain better control between your ribcage and pelvis, which supports carries, lunges, walking, running, and everyday tasks that require you to stabilize your torso from side to side.
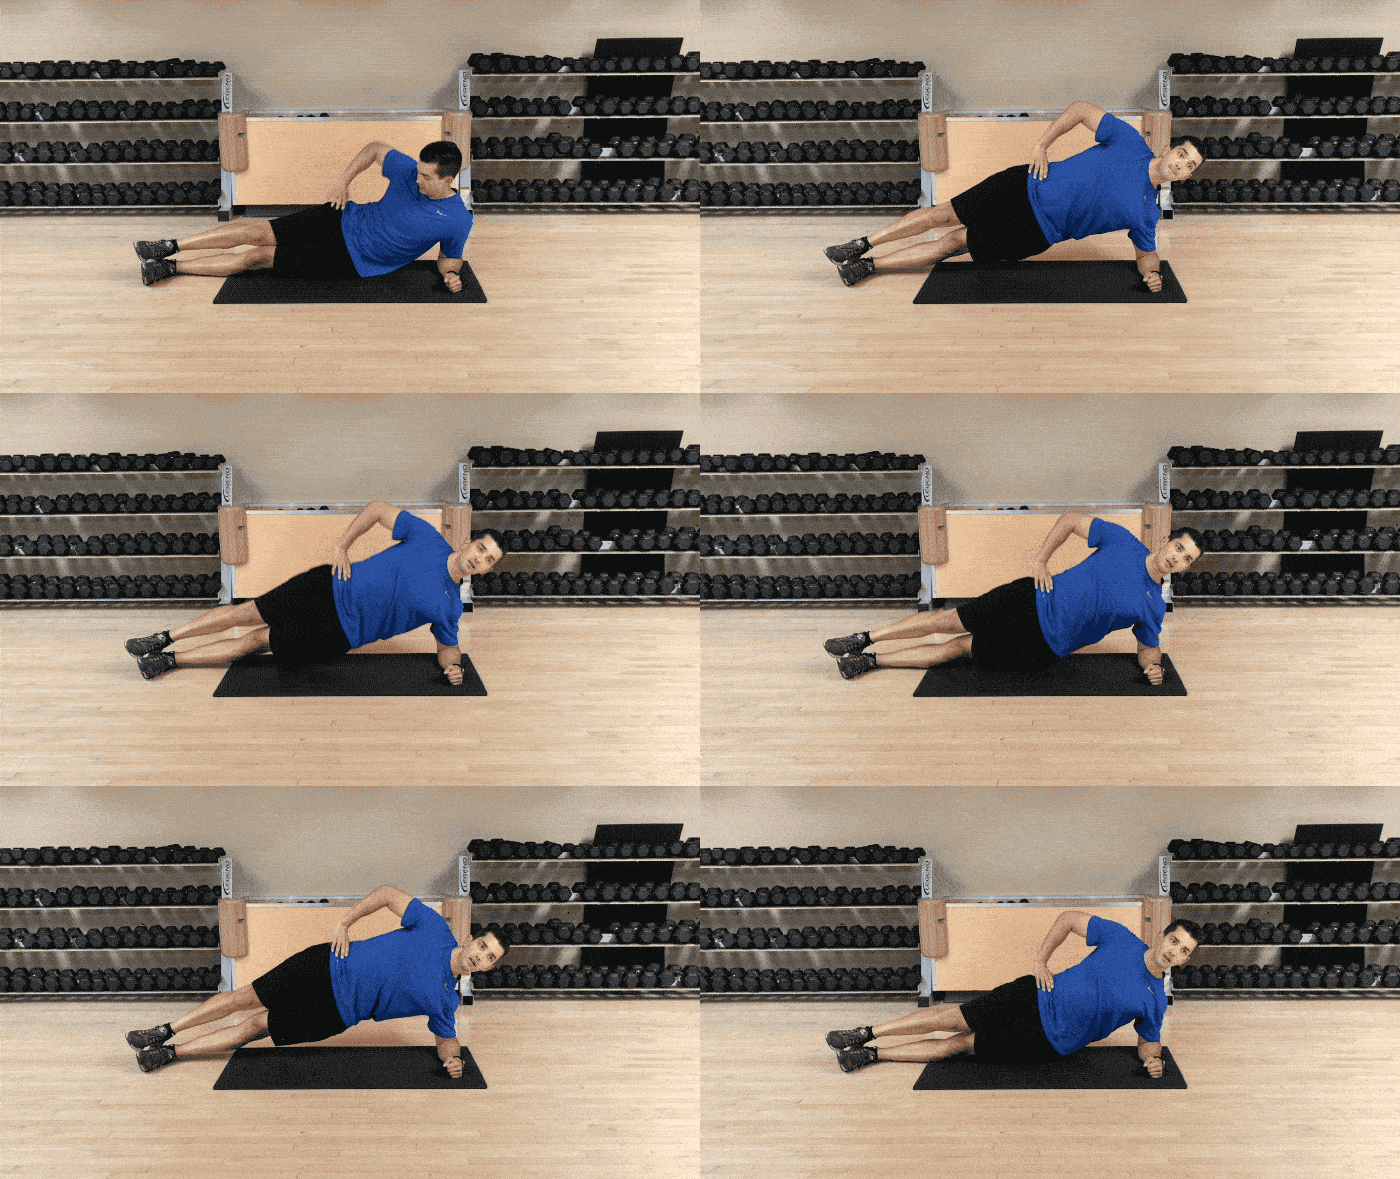
Lift through your side core and keep your torso stacked instead of rolling forward.
- Lie on your side with your legs stacked and your body arranged in a straight line.
- Position your lower arm comfortably and place your upper hand lightly behind your head or across your chest.
- Tighten your side core and lift your upper torso toward your hip in a smooth, controlled motion.
- Pause briefly, lower without collapsing, and complete all repetitions before switching sides.
You should feel: The obliques along the side of your waist contracting as your ribcage moves toward your hip.
You should not feel: Sharp lower-back pain, pulling in your neck, or your body twisting forward to complete the repetition.
Make it easier: Bend your knees, shorten the range of motion, or place your bottom hand on the floor for additional support.
Make it harder: Keep your legs straight, slow the lowering phase, pause at the top, or hold a light weight against your chest.
Think “ribcage toward hip,” not “pull with the neck.” Keep your shoulders and hips stacked so your obliques remain the main driver of the movement.
- Pulling on the head or neck
- Rolling the shoulders or hips forward
- Using momentum instead of controlling the lift and return
Cross-Body Mountain Climbers
Best for:
Dynamic core conditioning and cross-body control
Level:
Beginner to intermediate
Equipment:
Bodyweight
Sets and reps:
2–3 sets of 20–30 total reps
Cross-Body Mountain Climbers combine a high plank with diagonal knee drives, challenging your abs and obliques while your shoulders and hips stabilize the body. They work well as a warm-up, conditioning exercise, or workout finisher because they train core control while raising your heart rate.
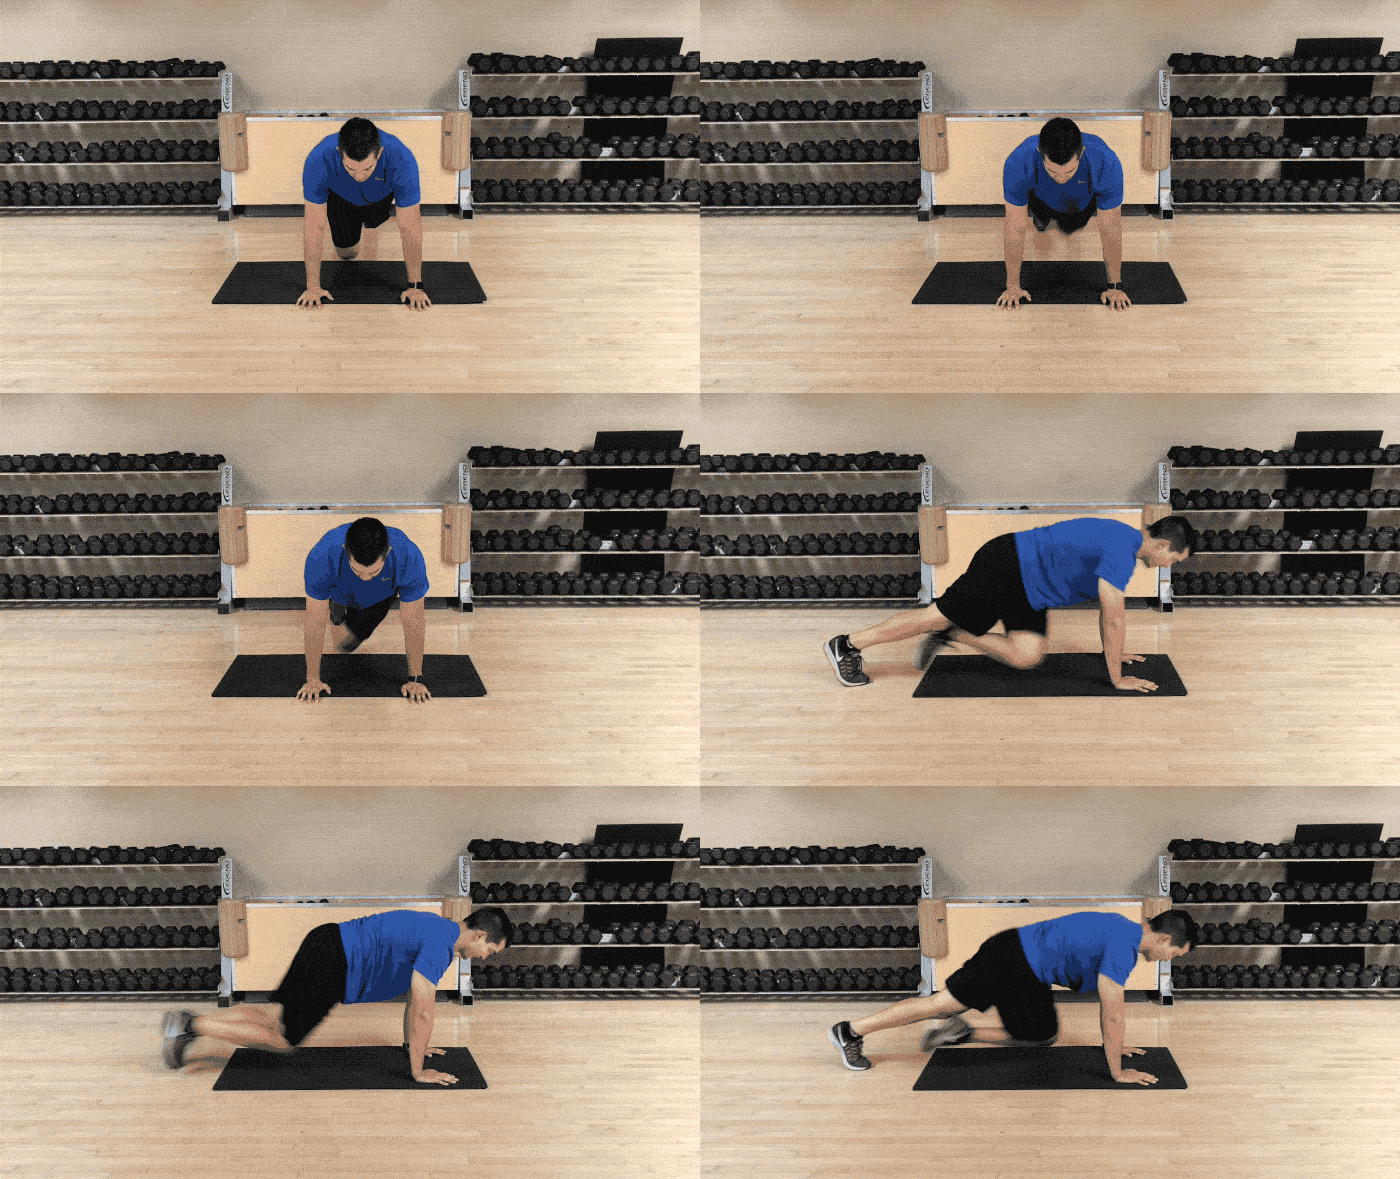
Keep your shoulders steady and drive each knee across under control instead of bouncing through the movement.
- Start in a high plank with your hands under your shoulders, legs extended, and body in a straight line.
- Brace your core and drive one knee across your body toward the opposite elbow.
- Return that foot to the starting position and repeat with the other leg.
- Continue alternating sides at a pace that allows you to keep your shoulders and hips controlled.
You should feel: Your abs, obliques, hip flexors, and shoulders working while your heart rate gradually increases.
You should not feel: Pinching in your lower back, sharp wrist pain, or your hips bouncing uncontrollably from side to side.
Make it easier: Slow the pace, shorten the knee drive, or place your hands on a bench or other elevated surface.
Make it harder: Add a brief pause with each knee drive, increase the pace without losing control, or wear a light weighted vest.
Control the crossover before adding speed. Keep your ribs pulled down and think about drawing the knee diagonally under your torso rather than sprinting your feet.
- Letting the hips sag or bounce from side to side
- Placing the hands too far in front of the shoulders
- Moving so quickly that the knee drive and core control disappear
Side Plank Reach-Throughs
Best for:
Lateral stability with controlled rotation
Level:
Intermediate
Equipment:
Bodyweight or an exercise mat
Sets and reps:
2–3 sets of 6–10 per side
Side Plank Reach-Throughs combine side-plank stability with controlled upper-body rotation. Your obliques, glutes, and shoulder stabilizers work together to keep your hips lifted while your ribcage turns, making this a useful exercise for trunk control and rotational coordination.
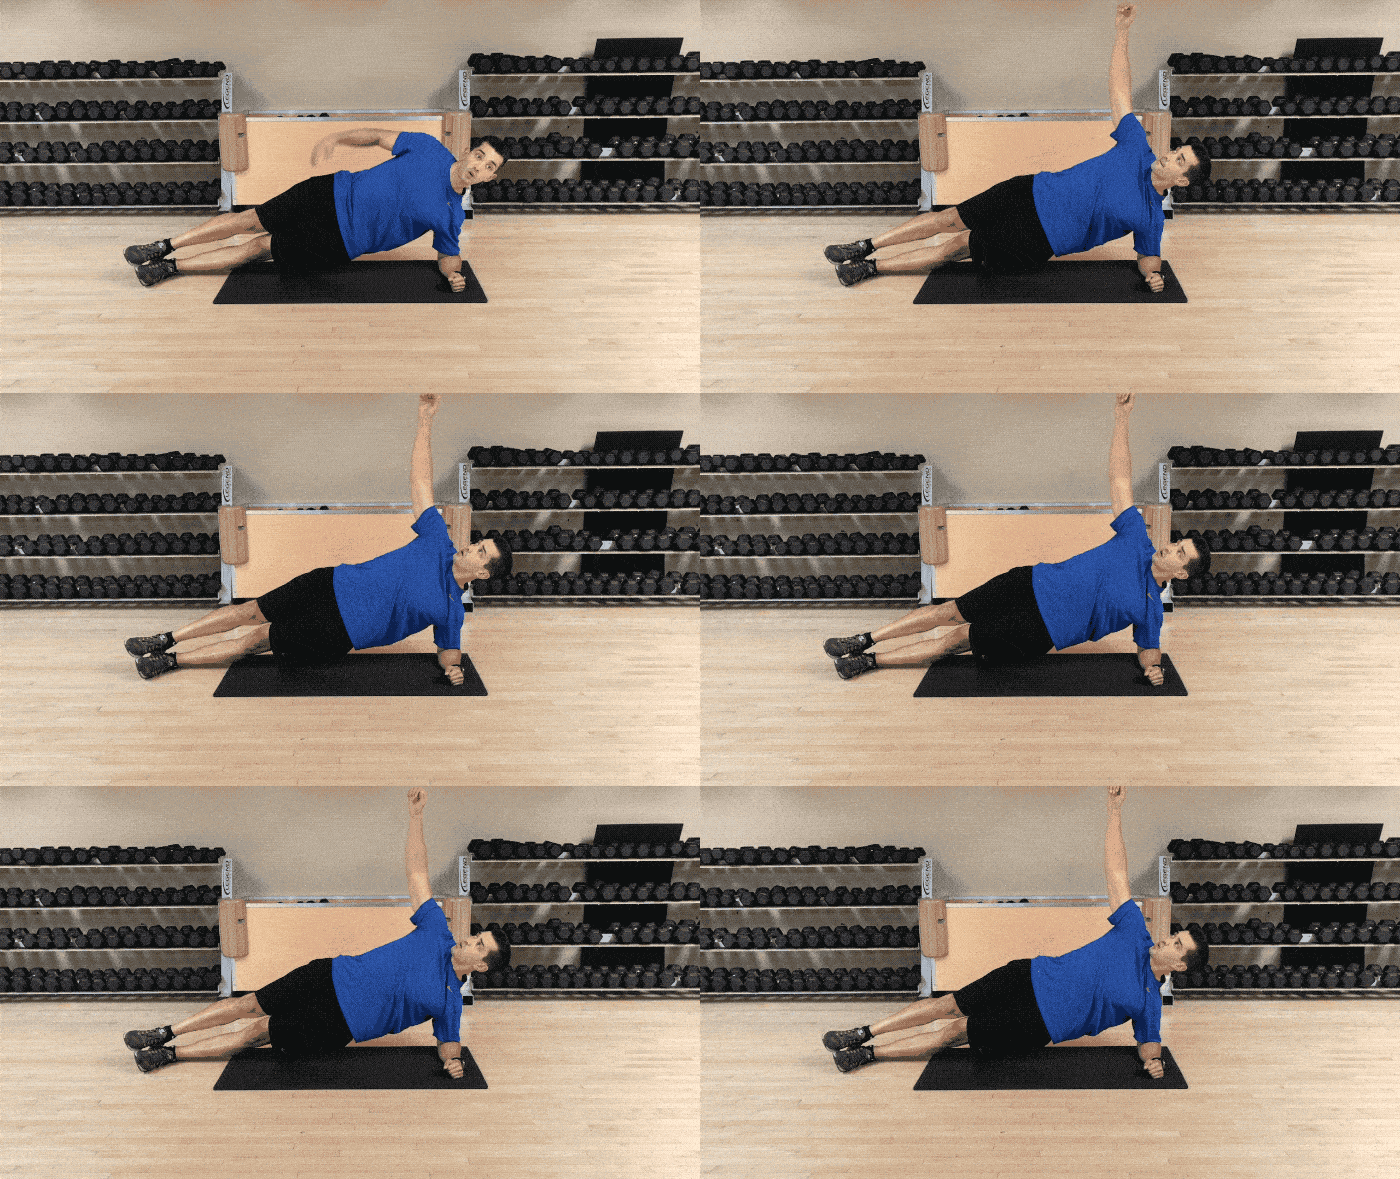
Keep your hips lifted and rotate through your upper torso instead of twisting through your lower back.
- Begin in a side plank with your elbow under your shoulder, feet stacked or staggered, and hips lifted.
- Extend your top arm toward the ceiling while keeping your shoulders and hips stacked.
- Rotate your ribcage and reach the top arm underneath your body without letting your hips collapse.
- Reverse the motion with control, complete the repetitions, and then switch sides.
You should feel: Your obliques, glutes, and supporting shoulder working to keep your body stable as your upper torso rotates.
You should not feel: Sharp shoulder pain, lower-back pinching, or your hips dropping toward the floor.
Make it easier: Place your bottom knee on the floor, shorten the reach-through, or practice holding a basic side plank first.
Make it harder: Keep both legs straight, slow the rotation, pause in the threaded position, or hold a very light dumbbell.
Keep your pelvis steady while your ribcage rotates. The goal is controlled upper-body movement over a stable base, not reaching as far as possible.
- Letting the hips sag during the reach-through
- Shrugging or collapsing into the supporting shoulder
- Forcing the rotation through the lower back
Spiderman Pushups
Best for:
Full-body strength and core integration
Level:
Intermediate to advanced
Equipment:
Bodyweight
Sets and reps:
2–3 sets of 5–8 per side
Spiderman Pushups combine an upper-body push with a same-side knee drive, forcing your chest, shoulders, triceps, hips, and core to work together. They build pushing strength while challenging you to resist unwanted rotation and maintain control through the entire body.
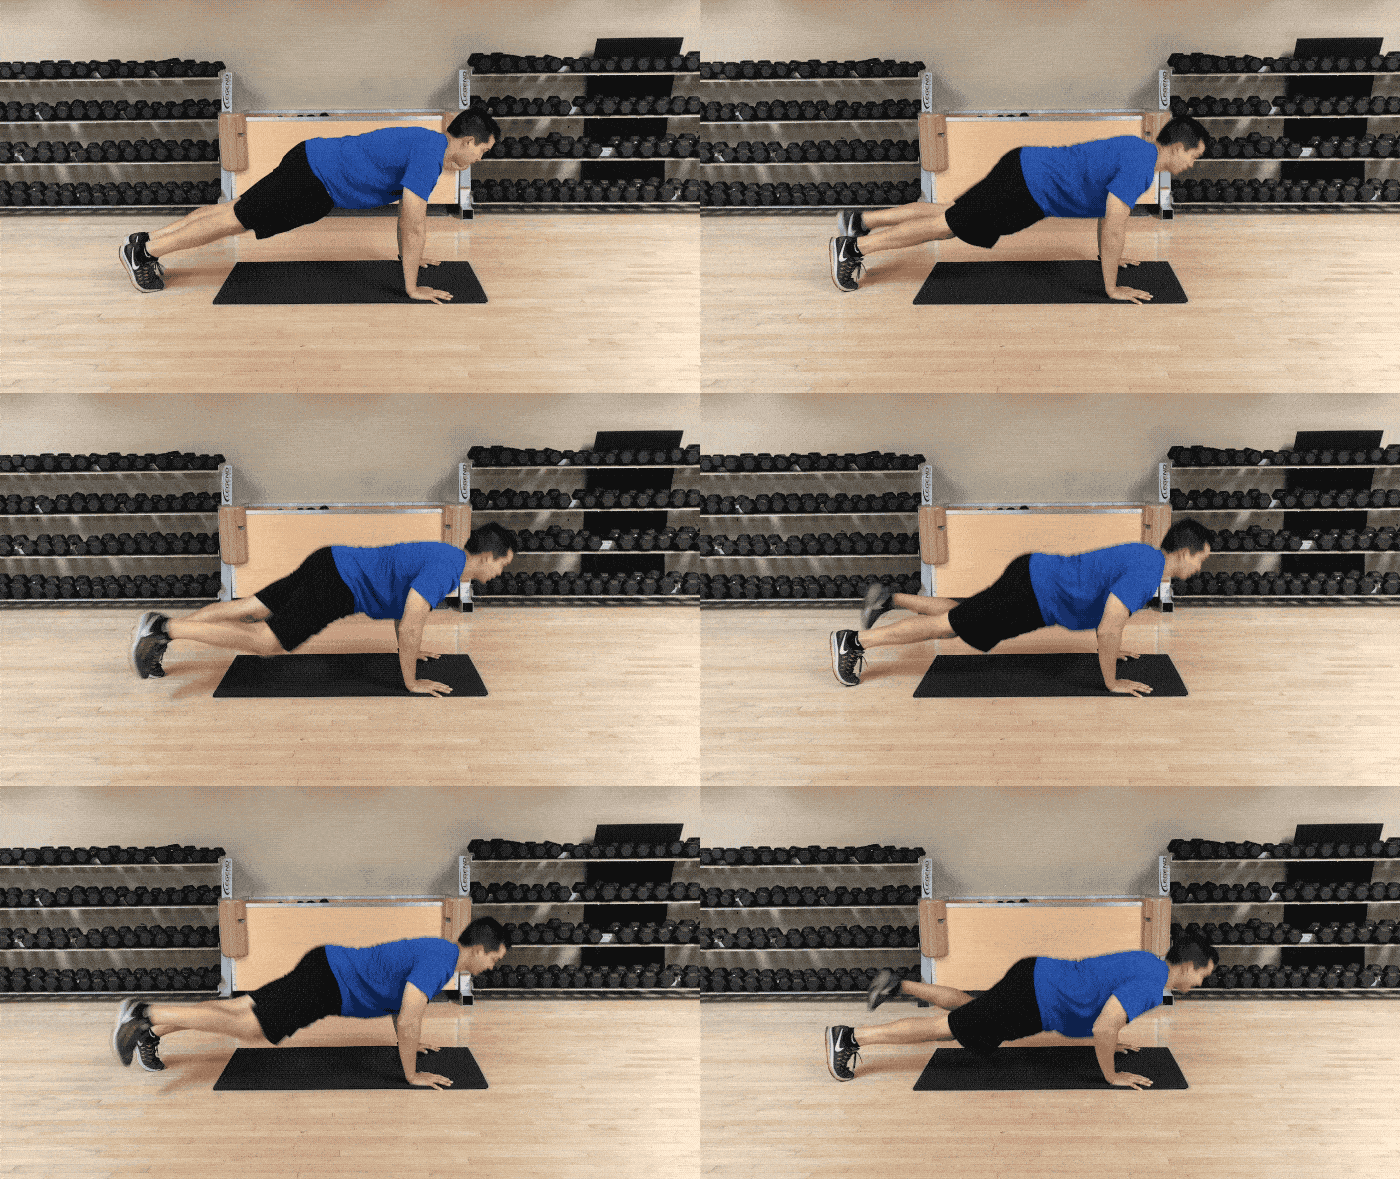
Keep the pushup controlled and bring the knee forward without twisting your hips open.
- Start in a strong pushup position with your hands under your shoulders, body straight, and core braced.
- Lower your chest while bringing one knee toward the outside of the same-side elbow.
- Press back to the top as you return the leg to the starting position.
- Repeat on the opposite side while keeping your hips as level as possible.
You should feel: Your chest, triceps, shoulders, abs, and hip flexors working together through the repetition.
You should not feel: Your lower back sagging, sharp wrist or shoulder pain, or your hips twisting excessively.
Make it easier: Perform the exercise with your hands on an elevated surface, shorten the pushup range, or practice the knee drive without the pushup.
Make it harder: Slow the lowering phase, pause near the bottom, elevate your feet, or hold the knee near the elbow briefly.
Keep the pushup quality first. Bring the knee forward only as far as you can without losing your plank position or allowing your hips to rotate open.
- Allowing the hips to twist open during the knee drive
- Flaring the elbows excessively
- Letting the lower back sag as fatigue builds
Rotating Planks
Best for:
Rotational control and total-core endurance
Level:
Intermediate
Equipment:
Bodyweight or an exercise mat
Sets and reps:
2–3 sets of 6–10 per side
Rotating Planks challenge your core to maintain alignment as you move between a front plank and side-plank position. Your obliques, deep abdominal muscles, glutes, and shoulders work together to control the rotation and prevent your hips or lower back from collapsing.
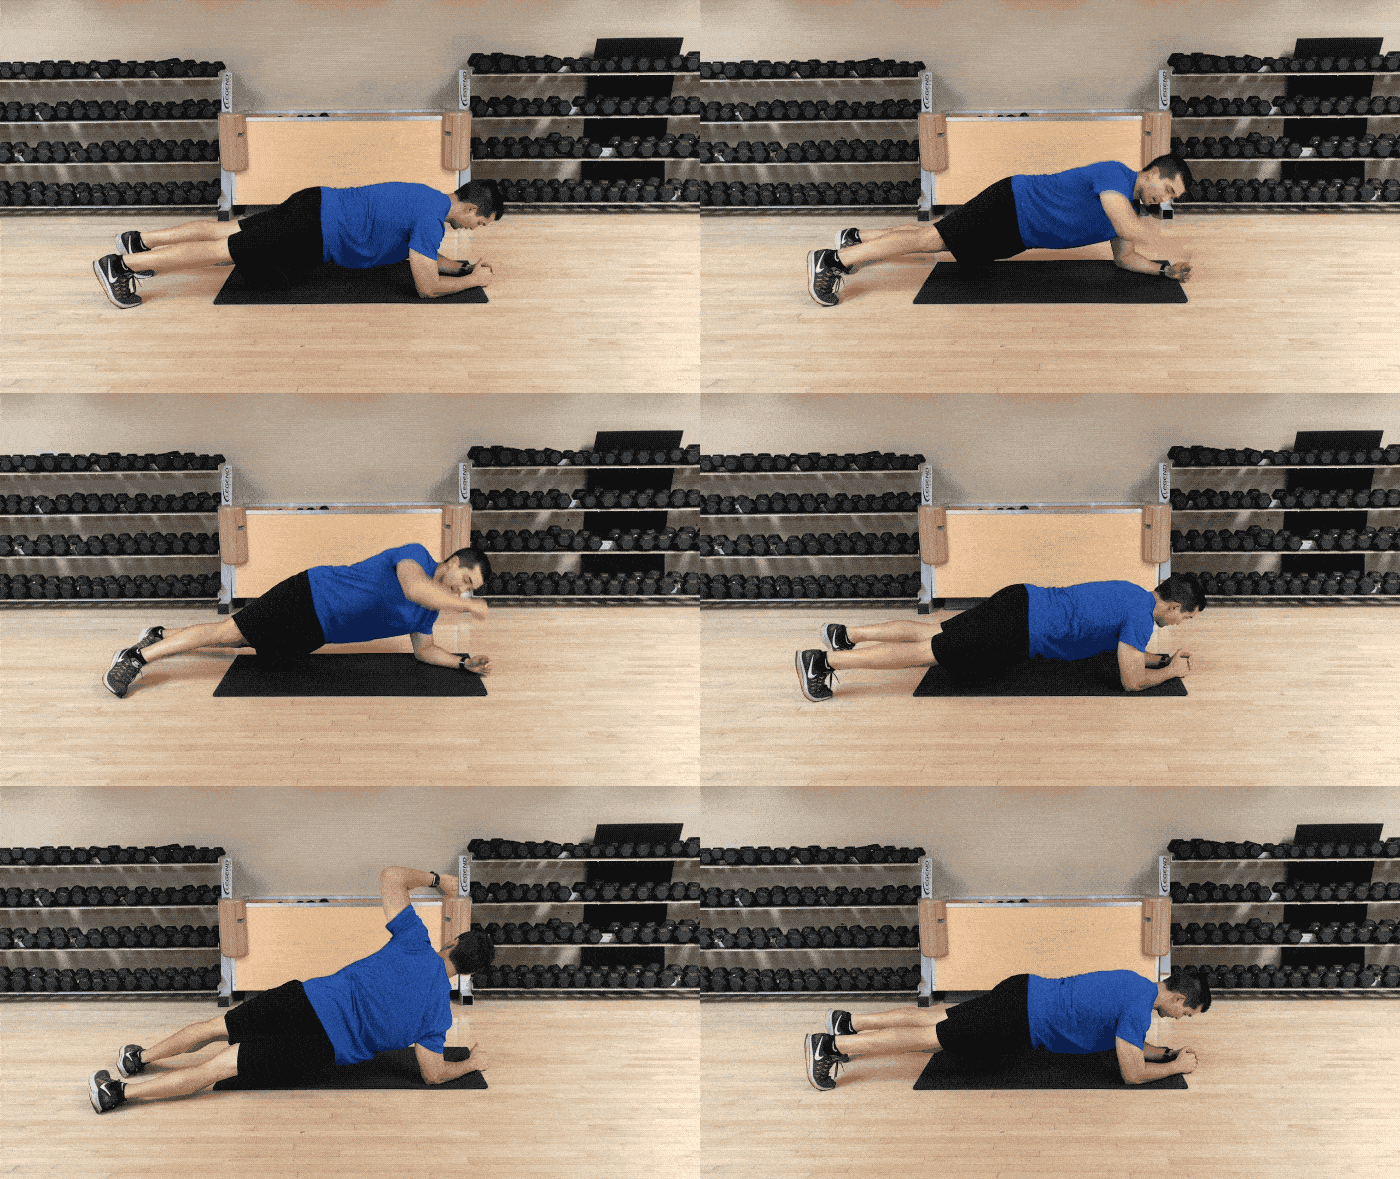
Move slowly between positions and keep your body long instead of swinging your hips through the rotation.
- Begin in a forearm plank with your elbows under your shoulders, legs extended, and core braced.
- Rotate onto one forearm and the sides of your feet as you turn into a side plank.
- Return through the center plank without allowing your hips to sag.
- Rotate toward the opposite side and continue alternating with control.
You should feel: Your obliques, deep core, glutes, and shoulders working to keep your body stable through each rotation.
You should not feel: Lower-back pinching, sharp shoulder discomfort, or uncontrolled wobbling as you change sides.
Make it easier: Hold a standard forearm plank, reduce the rotational range, or perform the movement with one knee down.
Make it harder: Slow the transition, pause in each side plank, extend the top arm, or briefly lift the top leg.
Turn your ribcage and shoulders as one unit. Keep your hips lifted and avoid throwing them from side to side to create momentum.
- Dropping the hips during the center plank
- Moving too quickly and using momentum
- Shrugging or collapsing into the supporting shoulder
Mermaid Crunches
Best for:
Lateral core strength and oblique control
Level:
Beginner
Equipment:
Bodyweight or an exercise mat
Sets and reps:
2–3 sets of 10–15 per side
Mermaid Crunches isolate the obliques through controlled side bending while the hips remain stacked and still. They are a useful beginner exercise for learning to shorten the distance between the ribcage and hip without relying on momentum or pulling through the neck.

Lift through your side core and keep your hips stacked instead of pulling with your neck.
- Lie on your side with your legs stacked or slightly bent, your bottom arm positioned comfortably, and your top hand resting lightly behind your head.
- Brace your core and lift your upper torso toward your top hip by shortening the side of your waist.
- Pause briefly at the top without pulling on your head or rolling your hips backward.
- Lower slowly, complete all repetitions on one side, and then switch sides.
You should feel: The obliques along the upper side of your waist contracting as your ribcage moves toward your hip.
You should not feel: Neck strain, sharp lower-back pain, or your hips rocking forward and backward.
Make it easier: Shorten the range of motion, bend your knees, or place your bottom hand on the floor for additional support.
Make it harder: Keep your legs straighter, slow the lowering phase, pause longer at the top, or hold a light weight against your chest.
Think “ribcage toward hip,” not “head toward knee.” Keep your top hand light and your neck relaxed so the movement comes from your obliques.
- Pulling on the head or neck
- Rocking the hips instead of keeping them stacked
- Using momentum rather than controlling the lift and return
Crab Bridge with Overhead Reach
Best for:
Hip extension, shoulder mobility, and full-body coordination
Level:
Intermediate
Equipment:
Bodyweight
Sets and reps:
2–3 sets of 6–10 per side
Crab Bridge with Overhead Reach combines hip extension with controlled upper-body rotation and an overhead reach. Your glutes, hamstrings, shoulders, and core work together to lift and stabilize the body, making this a useful warm-up or mobility-strength exercise within a full-body workout.
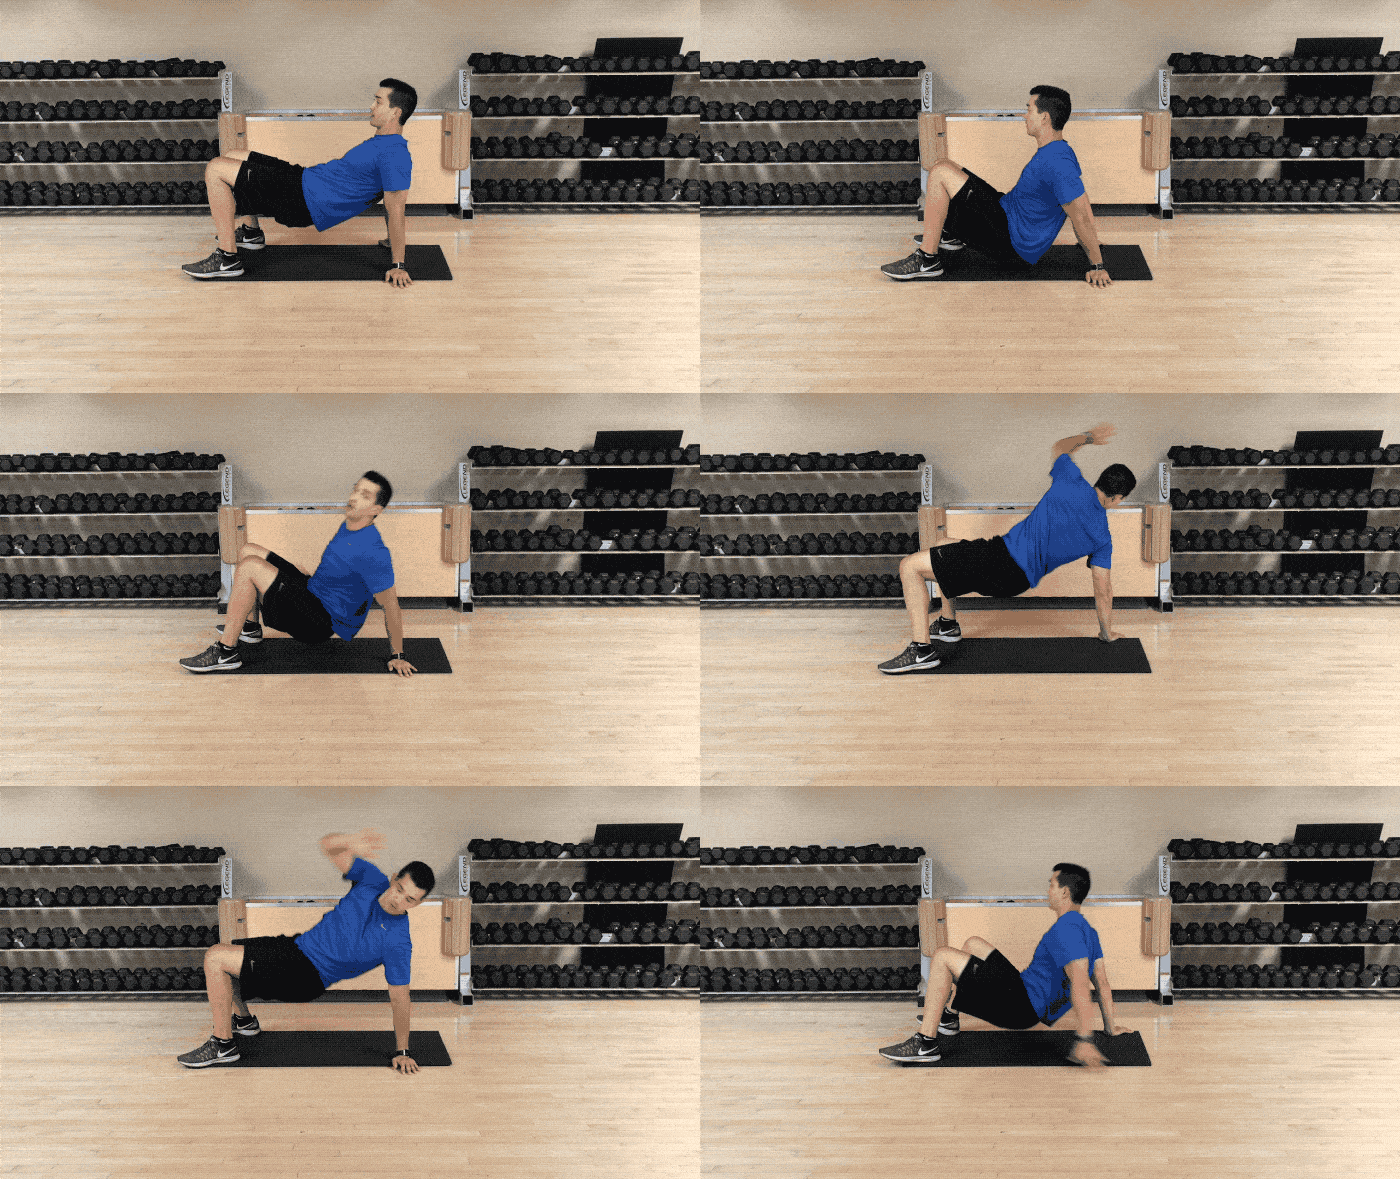
Drive through your feet, squeeze your glutes, and reach overhead without arching through your lower back.
- Sit with your knees bent, feet flat, and hands planted behind you in a comfortable position.
- Press through your feet and supporting hand as you squeeze your glutes and lift your hips.
- Reach the opposite arm up and overhead while allowing your upper torso to rotate naturally.
- Return with control, lower your hips, and repeat toward the opposite side.
You should feel: Your glutes contracting while your chest, shoulders, lats, and front of the hips open through the reach.
You should not feel: Sharp shoulder pain, pinching in your lower back, or most of the effort coming from arching your spine.
Make it easier: Practice the crab bridge without the overhead reach, lift your hips only a few inches, or reduce the rotational range.
Make it harder: Pause for two to three seconds at the top, slow the return, or reach farther overhead while maintaining glute tension and control.
Push the floor away and finish the lift with your glutes. Create a strong base through your supporting hand and feet before adding the reach.
- Letting the hips sag during the reach
- Arching the lower back instead of squeezing the glutes
- Collapsing into the supporting shoulder
Standing Band Oblique Twist
Best for:
Standing rotational strength and control
Level:
Intermediate
Equipment:
Resistance band and anchor point
Sets and reps:
2–3 sets of 8–12 per side
Standing Band Oblique Twists train your obliques and surrounding core muscles to create and control standing rotation against increasing resistance. They help connect the hips, ribcage, and upper body, making them useful for rotational sports and everyday movements that involve turning or reaching across the body.

Rotate under control and resist the band as you return instead of letting it pull you back.
- Anchor a resistance band around chest height and stand sideways to it with your feet about shoulder-width apart.
- Hold the band with both hands near your chest or with your arms partially extended, then brace your core.
- Rotate your ribcage and shoulders away from the anchor while allowing your hips and feet to turn naturally as needed.
- Pause briefly, then return slowly while resisting the pull of the band before completing all repetitions and switching sides.
You should feel: Your obliques and surrounding core muscles working as your hips and upper torso coordinate the rotation.
You should not feel: Sharp twisting in your lower back, knee discomfort, or the movement coming only from your arms.
Make it easier: Move closer to the anchor, use a lighter band, keep your hands closer to your chest, or shorten the rotational range.
Make it harder: Step farther from the anchor, use a stronger band, extend your arms farther, or pause for two to three seconds at the end position.
Turn your torso as one coordinated unit. Let your hips and feet pivot naturally instead of locking them in place and forcing all the motion through your lower back.
- Swinging the arms without rotating the torso
- Locking the feet and forcing rotation through the lower back
- Letting the band snap the body back to the starting position
Stability-Ball Torso Rotations
Best for:
Rotational control, balance, and core stability
Level:
Intermediate
Equipment:
Stability ball
Sets and reps:
2–3 sets of 8–10 per side
Stability-Ball Torso Rotations challenge your obliques and deep core muscles while the unstable surface forces your hips, shoulders, and trunk to make constant balance adjustments. This makes the exercise useful for developing rotational control, coordination, and body awareness within a larger core workout.
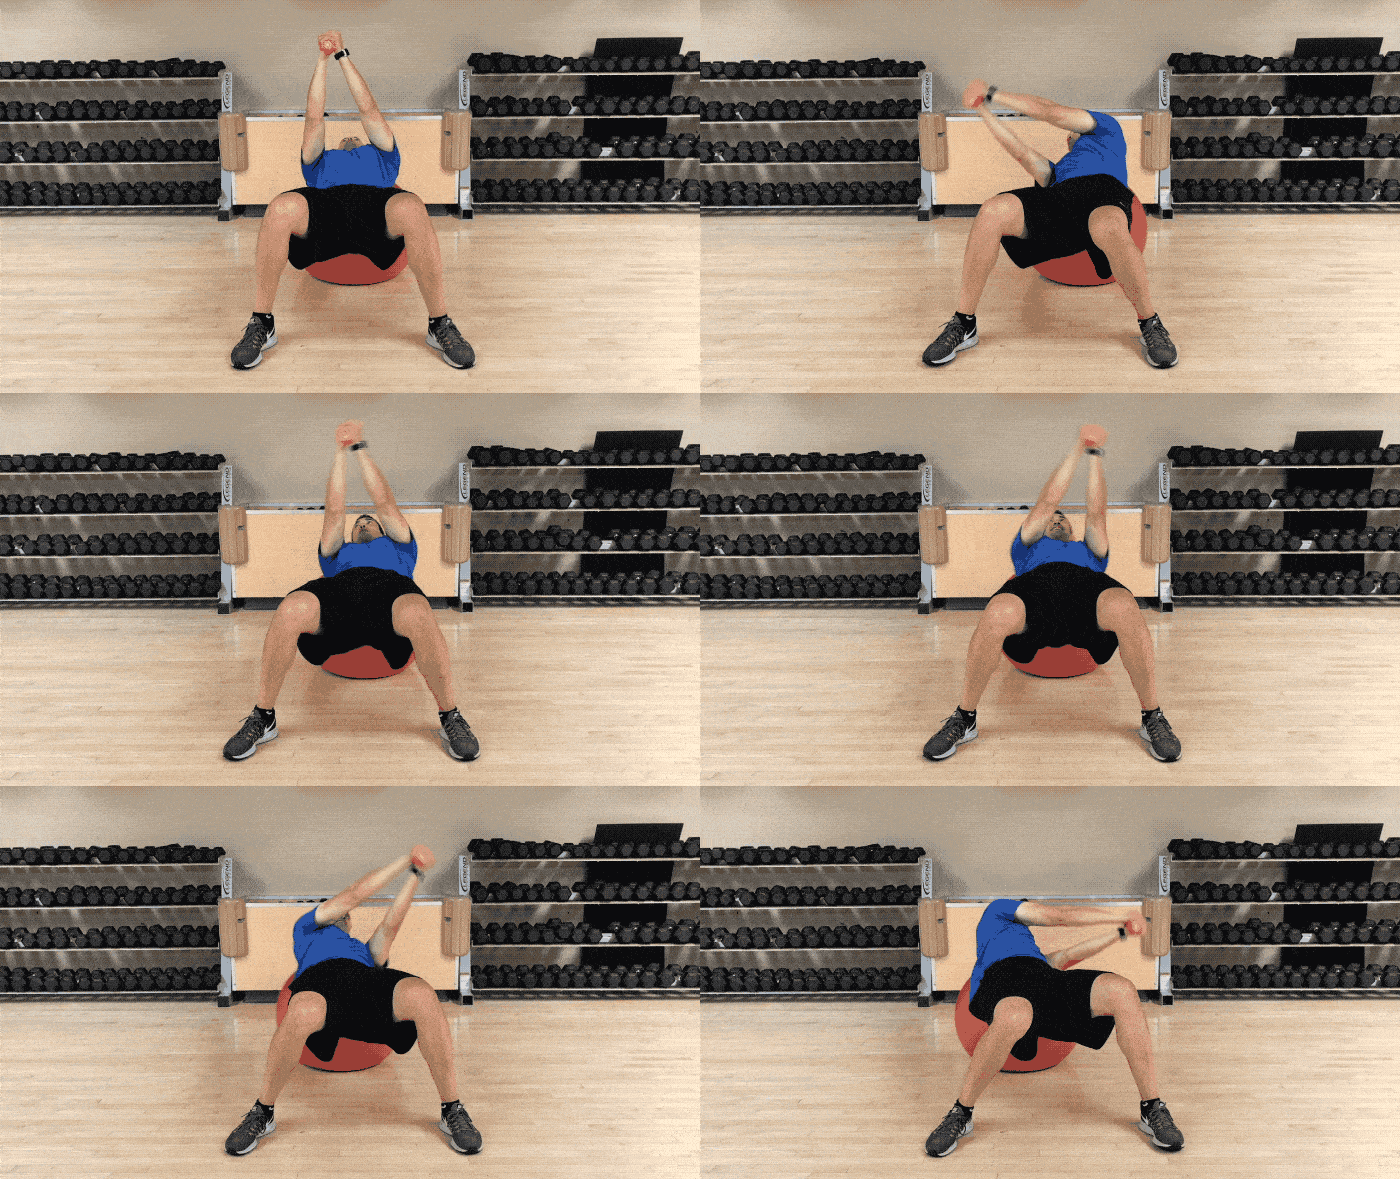
Keep your hips level on the ball and rotate slowly enough to maintain balance.
- Sit on the stability ball, walk your feet forward, and lean back until your upper back and shoulders are supported.
- Plant your feet firmly, lift your hips, and extend your arms toward the ceiling with your hands together or holding a light weight.
- Rotate your shoulders and ribcage toward one side while keeping your hips as level as possible.
- Return through the center with control and repeat toward the opposite side.
You should feel: Your obliques and surrounding core muscles working while your hips, glutes, and shoulders stabilize you on the ball.
You should not feel: Sharp lower-back pain, neck strain, or the ball slipping beneath you.
Make it easier: Widen your stance, use no added weight, and shorten the rotational range until your balance improves.
Make it harder: Bring your feet slightly closer together, extend your arms farther, add a light medicine ball, or pause briefly on each side.
Keep your hips quiet while your upper torso rotates. Use a slow range you can control rather than chasing a larger twist and losing your position on the ball.
- Allowing the hips to swivel or drop during the rotation
- Pushing the head forward instead of keeping the neck relaxed
- Using too much weight or rotating beyond a controllable range
Pallof Press
Best for:
Anti-rotation strength and trunk stability
Level:
Beginner
Equipment:
Resistance band and anchor point
Sets and reps:
2–3 sets of 8–12 per side
The Pallof Press trains your core to resist rotation while your arms move away from your body. Your obliques, deep abdominal muscles, glutes, and upper back work together to keep your ribcage and pelvis aligned against the band’s pull.
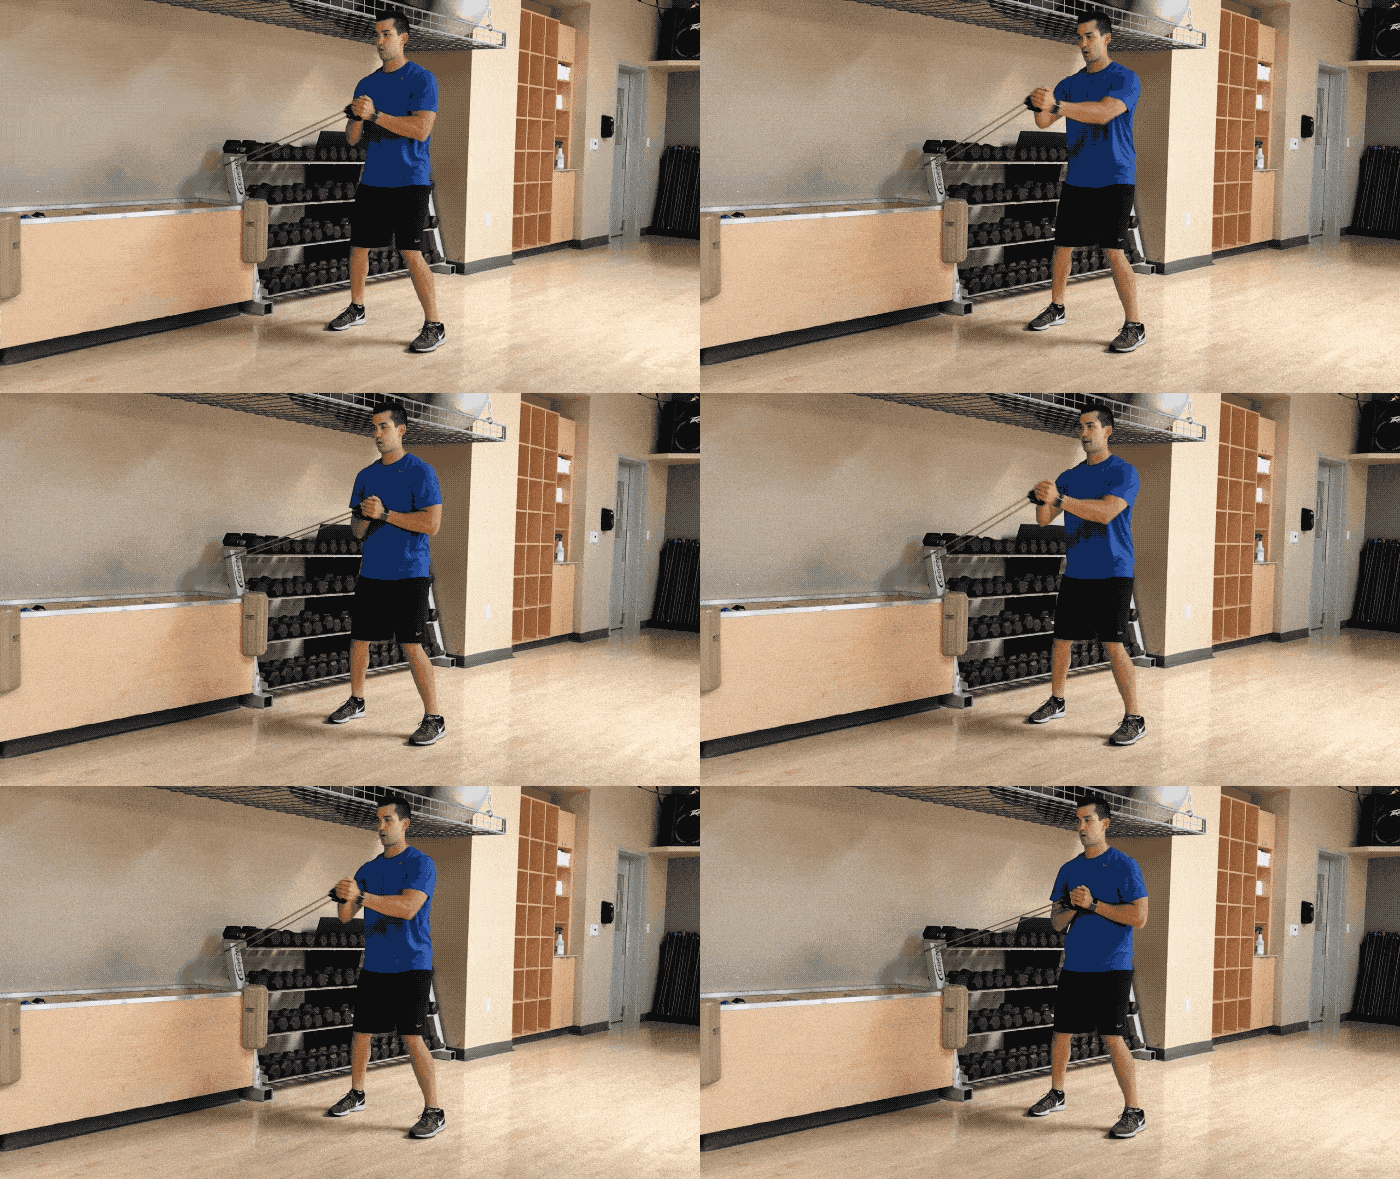
Keep your shoulders and hips square as you press the band straight forward.
- Anchor a resistance band around chest height and stand sideways to it with your feet about shoulder-width apart.
- Hold the band at the center of your chest, soften your knees, and brace your core.
- Press your hands straight forward without allowing your shoulders or hips to rotate toward the anchor.
- Pause briefly with your arms extended, then return your hands to your chest with control before switching sides.
You should feel: Strong tension through your obliques and entire midsection as you resist the band pulling you sideways.
You should not feel: Sharp lower-back discomfort, twisting through your hips, or the movement coming only from your arms.
Make it easier: Move closer to the anchor, use a lighter band, widen your stance, or shorten the arm extension.
Make it harder: Step farther from the anchor, use a stronger band, pause longer with your arms extended, or perform the press from a split stance.
Exhale gently as you press and keep your body still. Think of your torso as a solid column while only your arms move away from your chest.
- Allowing the torso to rotate toward the anchor
- Leaning away from the band instead of staying centered
- Using too much resistance and losing the square hip and shoulder position
Kick Throughs
Best for:
Dynamic core conditioning and full-body coordination
Level:
Intermediate to advanced
Equipment:
Bodyweight
Sets and reps:
2–3 sets of 6–10 per side
Kick Throughs combine a weight-bearing plank position with cross-body rotation, challenging your obliques, shoulders, hips, and abdominal muscles at the same time. They develop coordination and core control while also raising the heart rate, making them useful as a demanding full-body conditioning movement.
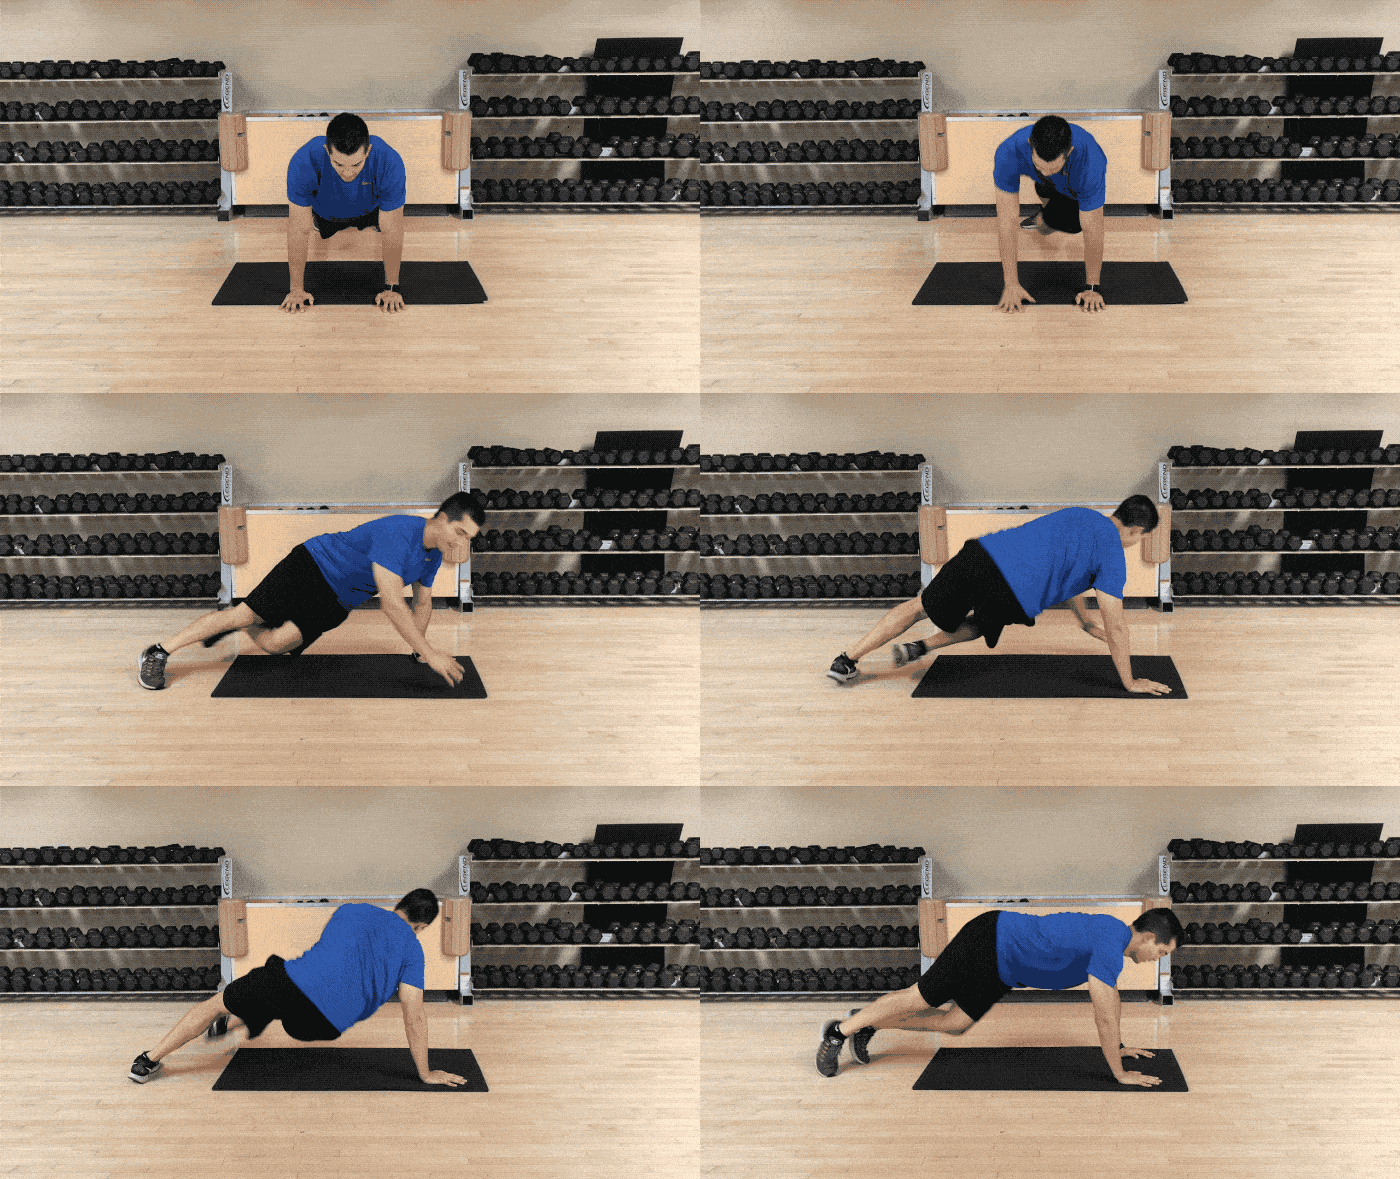
Push the floor away and keep your hips controlled as the leg moves underneath your body.
- Start in a high plank or bear-plank position with your hands under your shoulders and your core braced.
- Lift one hand and rotate your torso as you kick the opposite leg underneath your body toward the side.
- Keep your supporting shoulder active and extend the leg only as far as you can without losing control.
- Reverse the movement to return to the starting position, then repeat toward the opposite side.
You should feel: Your obliques, shoulders, hips, and abdominal muscles working together to support and rotate your body.
You should not feel: Sharp shoulder pain, lower-back pinching, or your supporting arm collapsing beneath you.
Make it easier: Slow the movement, shorten the kick-through range, begin from a bear-plank position, or keep both hands down while practicing the leg motion.
Make it harder: Add a pause with the leg extended, slow the return, increase the range gradually, or perform the repetitions at a quicker pace without losing control.
Push the floor away through your supporting hand. Keep the shoulder strong and let the rotation come from coordinated movement through your hips and torso instead of collapsing toward the floor.
- Dropping the hips during the kick-through
- Collapsing into the supporting shoulder
- Moving too quickly and losing control of the return
Beginner and Joint-Friendly Substitutions
Use these lower-impact substitutions whenever an exercise feels too difficult, causes discomfort, or makes it hard to maintain proper form.
| Current exercise | Easier or lower-impact option |
|---|---|
| Jumping Jacks | Step jacks |
| Woodchops | Bodyweight diagonal reach |
| Cross-Body Mountain Climbers | Elevated slow knee drives |
| Side-Ups | Bent-knee side plank |
| Spiderman Pushups | Incline Spiderman plank |
| Russian Twists | Pallof Press |
| Running in Place | Brisk marching |
| Rotating Planks | Elevated plank rotation |
| Mermaid Crunches | Side-lying knee tuck |
Pain is not required for the workout to be effective. Choose the version that allows you to maintain control without sharp pain. Mild muscular effort is expected, but stop or switch exercises if you feel pinching, stabbing, or worsening joint pain.
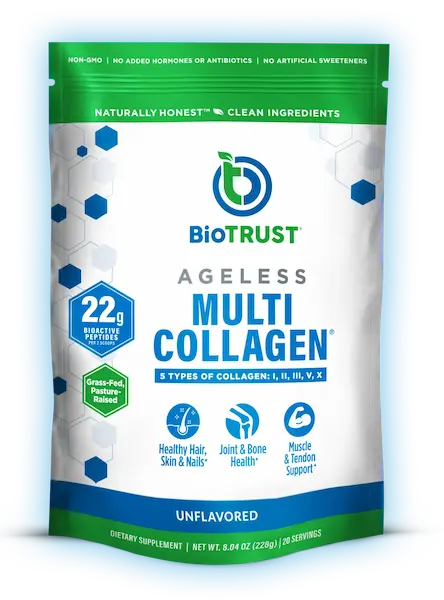
If joint comfort is what limits your training, recovery support matters as much as choosing the right exercise variation. BioTRUST Ageless Multi Collagen provides five collagen types designed to support cartilage, tendons, ligaments, and joint mobility.
Powered by 5 Types of Bioactive Naturally Hydrolyzed Collagen Peptides for Full-Body Support (Odorless & Flavorless)
- Comprehensive Collagen Blend: Types I, II, III, V & X to boost skin elasticity, joint & bone strength
- Hydrolyzed Peptides: 10 g per serving for rapid digestion & max absorption
- Skin, Hair & Nails: Promotes smoother, more youthful skin, glossy hair & strong nails
- Gut & Joint Care: Supports healthy connective tissue & gut lining
- Zero Taste or Smell: Dissolves instantly in hot or cold drinks—no clumps, no fuss
How to Progress This Workout
Progress After 2-4 Weeks
Do not make an exercise harder just because a few weeks have passed. Progress when you can complete the current version with good control, consistent technique, and no sharp pain.
Start by changing one variable at a time. The goal is to make the workout slightly more challenging without sacrificing form.
Maintain good posture, deliberate control, and a steady tempo.
Complete all prescribed repetitions or time with clean form.
Match that performance across two workouts before progressing.
Add a small amount of resistance, time, range, or total volume.
Before I add weight or move someone to a harder variation, I make sure they can perform the current exercise without relying on momentum, losing their posture, or rushing through the difficult part.
If their hips twist during a Pallof Press, their lower back sags during a plank, or their shoulders collapse during a pushup, adding resistance usually reinforces the mistake. I regress the exercise until they can control it, then build from there.
For loaded exercises, I often use double progression. If the target is 8–12 reps, the client keeps the same resistance until they can complete 12 clean reps for every set across two workouts. Then we increase the load slightly and return to the lower end of the range.
How This Fits Into Your Week
This circuit works best as part of a balanced weekly plan, not as your only workout. Use it once or twice per week alongside full-body strength training, walking, and recovery days.
| Day | Activity |
|---|---|
| Monday | Full-body strength workout |
| Tuesday | Walking or moderate cardio |
| Wednesday | Love-handles circuit |
| Thursday | Recovery or light activity |
| Friday | Full-body strength workout |
| Saturday | Walking, cardio, or an optional short core session |
| Sunday | Rest or light movement |
You do not have to follow these exact days. Rearrange the schedule around your work, family responsibilities, and recovery needs. The main goal is to avoid placing every hard session back-to-back.
Try to leave at least one recovery day between demanding full-body workouts. The love-handles circuit can be used as a standalone home session, a short finisher after strength training, or an additional core-and-conditioning workout on a separate day.
For the full-body sessions, use your Metabolic Resistance Training guide as the main strength component. That will train your legs, glutes, back, chest, and shoulders while the love-handles circuit provides more focused core work.
If you are sore, unusually fatigued, or your technique is getting worse, replace the optional Saturday session with walking or recovery. More training only helps when you can recover from it.
Will Oblique Exercises Make Your Waist Wider?
Oblique exercises can add muscle around the sides of your waist, but moderate bodyweight and band work is unlikely to suddenly create a dramatically blocky midsection.
The greater concern is high-volume, progressively overloaded side bending or rotational work performed specifically to maximize oblique growth.
Research shows that lighter resistance can stimulate just as much muscle growth as heavy weights when sets are performed with high effort (near muscular failure). Therefore, your total training volume and progressive overload (rather than the tool you choose) determine how much your obliques grow.14
For a smaller-waist goal:
Prioritize
- Pallof presses (anti-rotation)
- Side planks (anti-lateral flexion)
- Side-ups
- Controlled plank rotations
- Full-body strength training
- Moderate rotational volume
Use less emphasis on
- High-volume heavy side bends
- Rapid weighted twisting
- Excessive direct oblique volume
These movements prioritize ‘anti-movement’ patterns (resisting rotation and lateral bending). Your core’s primary biological role is to prevent movement rather than create it.
Isometric exercises like planks and Pallof presses recruit the transversus abdominis (TVA). This is the deepest abdominal layer that wraps horizontally around your midsection. It acts like a strong, natural weight belt (like a “corset” muscle) that draws the abdomen inward and narrows the waistline.
This builds structural bracing and trunk stability without subjecting your spine to the high shear stress of heavy, repetitive bending. To help strengthen and stabilize the muscles supporting the entire region, you can pair these movements with the best lower back pain exercises.
COACHING TIP:
For my general fat-loss clients, I mostly focus on creating an energy deficit to get rid of midsection fat. Most think doing side bends or twists will “burn off” the fat, but “abs are made in the kitchen.” I avoid heavy oblique isolation exercises with them. Mostly rely on compound movements to build core strength. And use the love handle exercises here to tone and tighten the area.
Your overall proportions matter too. Developing your shoulders, back, glutes, and legs can create a more X-shaped frame. This can make your waist appear narrower even before its circumference changes.
What Love Handle Exercises Can & Cannot Do
Targeted lateral core exercises (such as side bends or twists) cannot selectively burn or ‘spot-reduce’ fat from your waist.9
Exercise scientists have confirmed that contracting a specific muscle may slightly increase blood flow and fat mobilization in the surrounding tissue. But that local effect is far too small to produce meaningful visible fat loss on its own.
For instance, six weeks of abdominal training has also been shown to improve muscular endurance without reducing abdominal fat. Proving that sit-ups strengthen the muscles rather than burn localized belly fat.10
STUDY SAYS:
A 2007 study published in the American Journal of Physiology-Endocrinology and Metabolism found that performing single-leg resistance exercises in healthy, fasted men stimulated local blood flow and fat breakdown in the tissue directly overlying the active muscle, resulting in an additional 0.6 to 2.1 milligrams of fat mobilized per 100 grams of tissue over 30 minutes. While this proves that localized “spot lipolysis” is a real biological event, the actual calorie-burning effect is far too microscopic to translate into visible spot reduction on your waist or thighs.11
Lipolysis is the release of stored fat from a fat cell. Fat oxidation means using fatty acids for energy. A side exercise may slightly increase local lipolysis, but that does not mean enough of the released fat will be burned to visibly shrink your love handles.
Simply mobilizing a fatty acid from a fat cell does not guarantee your body will burn it. If systemic energy demands are low, those mobilized fatty acids are simply re-esterified. This means they circulate and get stored right back in the same fat cells.12
But that doesn’t make core exercises pointless. Core training with love-handle exercises develops the muscles underneath them. They strengthen your abs and obliques, improve bracing and trunk control, and develop the muscle underneath the fat.
Very heavy, high-volume side bending may build more oblique size, but moderate core training is unlikely to suddenly widen your waist.
Cardio is not your only option, and HIIT is not mandatory. Resistance training helps preserve muscle during weight loss, while walking and other sustainable cardio support energy expenditure and fitness.13
HIIT can be time-efficient, but it is not mandatory. Walking and moderate cardio may be easier to recover from and sustain, and they can still contribute meaningfully to fat loss.
Sweating more around your waist does not burn more local fat. Sweat belts trap heat around your waist and can make that area sweat more. But any immediate change is temporary water loss (not fat loss), and it’ll return after you replace the fluid.
Use these exercises to strengthen your core, then combine them with full-body training, regular movement, and a sustainable calorie deficit to slim down the love handles.
What Actually Reduces the Fat Over Your Love Handles?
Love handles can go away, but it takes more than losing weight on the scale. You need to lower your overall body fat percentage while keeping the muscle underneath.
- Reduce the fat covering the area. Run a caloric deficit consistently. This does more than anything else on this list.
- Strengthen your core. Train your obliques and surrounding core muscles. You won’t burn fat directly off them, but you build the shape underneath. So there’s something worth revealing once the fat comes off.
- Build your full body. Adding muscle elsewhere like shoulders, back, legs, changes your proportions and can make your waist look narrower even before it fully leans out.
- Accept your anatomy. Your rib cage, pelvic structure, skin, and natural fat distribution determine the final shape. No universal body fat percentage guarantees your love handles disappear. A male bodybuilder might need to hit 2.5% body fat just to lean out his lower body. A female bikini competitor can look her best at 21%.
TRAINER JOSH TAKE
I’ve helped many clients slim their waistline and reach a point where they feel much happier with how they look. There is often plenty of progress to be made by losing body fat, building muscle, and improving the habits that matter most.
The problem is when a slimmer waist turns into a six-pack-or-nothing goal. Visible abs usually require far more consistency, hunger, food restriction, and lifestyle sacrifice than most people expect. Some clients can reach that point, but many are not willing or able to maintain everything it takes long-term.
I’d rather help a client build a leaner, stronger body they can sustain than push so hard for the last bit of definition that they burn out, abandon the plan, and regain the weight. Keep improving, but choose an endpoint you can actually live with.
Your nutrition still does most of the remaining work. Keep a moderate calorie deficit you can actually sustain (going too aggressive backfires by spiking hunger and tanking your energy and training). Aim for roughly 1.6-2.2g of protein per kilogram of bodyweight (use my free protein calculator to find your number) and build meals around fiber-rich carbs to stay full. Pair that with full-body strength training and regular walking or cardio.
Getting enough protein can become harder when a calorie deficit reduces your appetite. The BioTRUST GLP-1 Companion Stack adds convenient protein and muscle-support ingredients, making it one option to consider when you want to lose fat without neglecting lean mass.
A 3-part daily stack designed to support people using GLP-1 medications or losing weight naturally. It combines muscle, protein, collagen, and appetite support to help you maintain a healthier body composition as you lose weight.
- Natural GLP-1 Support: Helps support healthy appetite signals, fullness & metabolic function
- Lean Muscle Support: Helps preserve muscle, strength & healthy body composition during weight loss
- High-Protein Collagen: Adds 20 g of protein with 5 collagen types to help support daily protein intake
- Skin, Joint & Hair Support: Provides collagen peptides to support skin elasticity, joints, hair & nails
- 3-Part Weight-Loss Support: Combines muscle, protein/collagen & appetite support in one simple daily stack
Why Love Handles Can Be Stubborn
Love handles are simply subcutaneous fat over your obliques at the sides of your waist, softer and more pinchable than the deeper visceral fat in your abdomen. How noticeable they are, and how fast they shrink, comes down mostly to genetics, hormones, and your overall body fat level.
For a lot of people, especially men, this is one of the last areas to lean out. That is not a sign your plan has stopped working, it is just how your body prioritizes where it releases fat from first. For the fuller explanation of why this area lags and how to speed it up, see How to Get Rid of Side Fat.
From the Coaching Floor:
You know the feeling. The scale moves, your face thins out, and your jeans fit differently everywhere except right there, at the sides of your waist. A lady came to me saying she trained 6 days a week (some days twice) and ate clean. Her stomach and legs responded, but her love handles didn’t.
I told her she was actually doing too much. She needed rest. So she pulled back on lifting entirely and cut her routine down to walking about 3 miles a day for a few weeks. The stubborn fat on her hips disappeared along with 5 pounds she hadn’t been able to shift while training hard.
Sometimes the answer is less, not more. Before assuming your plan has stalled, look at your weight trend, waist measurement, and consistency over 2-4 weeks, not one day’s mirror check.

I am 60 and started to study nutrition and fighting age wirh every thing I have and can get my fingers on. Need to lose 78 lbs and will be turning back the hands of time naturally and at a cost that the average person can financial do. With Trainer Josh I know I can achieve my goals. I hope to blog and write about my journey… At 60 age isn’t the only thing moving on and forward. It’s me!!
Thanks Patricia!