

If you’ve been avoiding sleeveless tops because you’re self-conscious about your arms, you’ll probably want to know which exercises actually work to get rid of them.
It’s frustrating when you’re making an effort but still don’t feel comfortable wearing your favorite tank top or dress. And choosing from the endless arm workouts online can leave you confused about where to start.
With over 20 years of personal training experience, I’ll walk you through these proven at-home flabby arm exercises and show you how to put them together into an effective workout.
The goal is to build stronger, firmer-looking arms so you’ll feel more confident going sleeveless. Body fat and loose skin can also affect their appearance, but these arm exercises will help to strengthen, tone, and tighten them
Start the workout – See all 10 exercises
Workout at a Glance
Equipment: A pair of dumbbells, a sturdy seat, floor space, and a timer for the Cobra hold only.
Frequency: 2–3 total sessions per week, with a rest day between sessions. Choose one workout per session.
Start with Workout A: Close Grip Push-ups (3 × 12–20), Overhead Triceps Extension (3 × 15–25), Lying Tricep Extensions (3 × 15–20), and Cobra Press Hold (3 × 30 seconds).
10 Best Exercises For Flabby Arms
Jump to an Exercise
For most of these exercises, all you’ll need is a pair of dumbbells.
Choose a dumbbell weight that’s challenging but won’t make your form suffer. For women new to these exercises, I suggest starting with a pair of 6-8 pound dumbbells.
Use that as a starting point but not a hard rule. The right weight should let you complete all the prescribed reps with good control and form while also finishing with roughly 2-3 reps left in the tank.1
If you could easily do several more reps, move up in weight. But if your form starts breaking down before you finish the set, then go lighter. If you can easily perform several more reps than prescribed, it’s time to increase the resistance.
Don’t have dumbbells? Heavy water bottles or household jugs can work in a pinch.
You can also use resistance bands with handles to do these exercises. Research suggests elastic resistance bands can produce similar strength gains to conventional resistance training when the exercises are challenging.2
If you’re exercising on a hard floor, a thick exercise mat can make kneeling variations and lying tricep extensions more comfortable. The Gaiam Essentials 10mm mat is one cushioned option that rolls up for storage. Keep it flat and check that it stays put. For push-ups, use a firmer surface if the soft foam makes your hands feel unstable.
Don’t rush the reps. Lower the weight under control instead of letting it drop. This increases the time your muscles spend under tension and makes it harder to cheat the movement with momentum.3
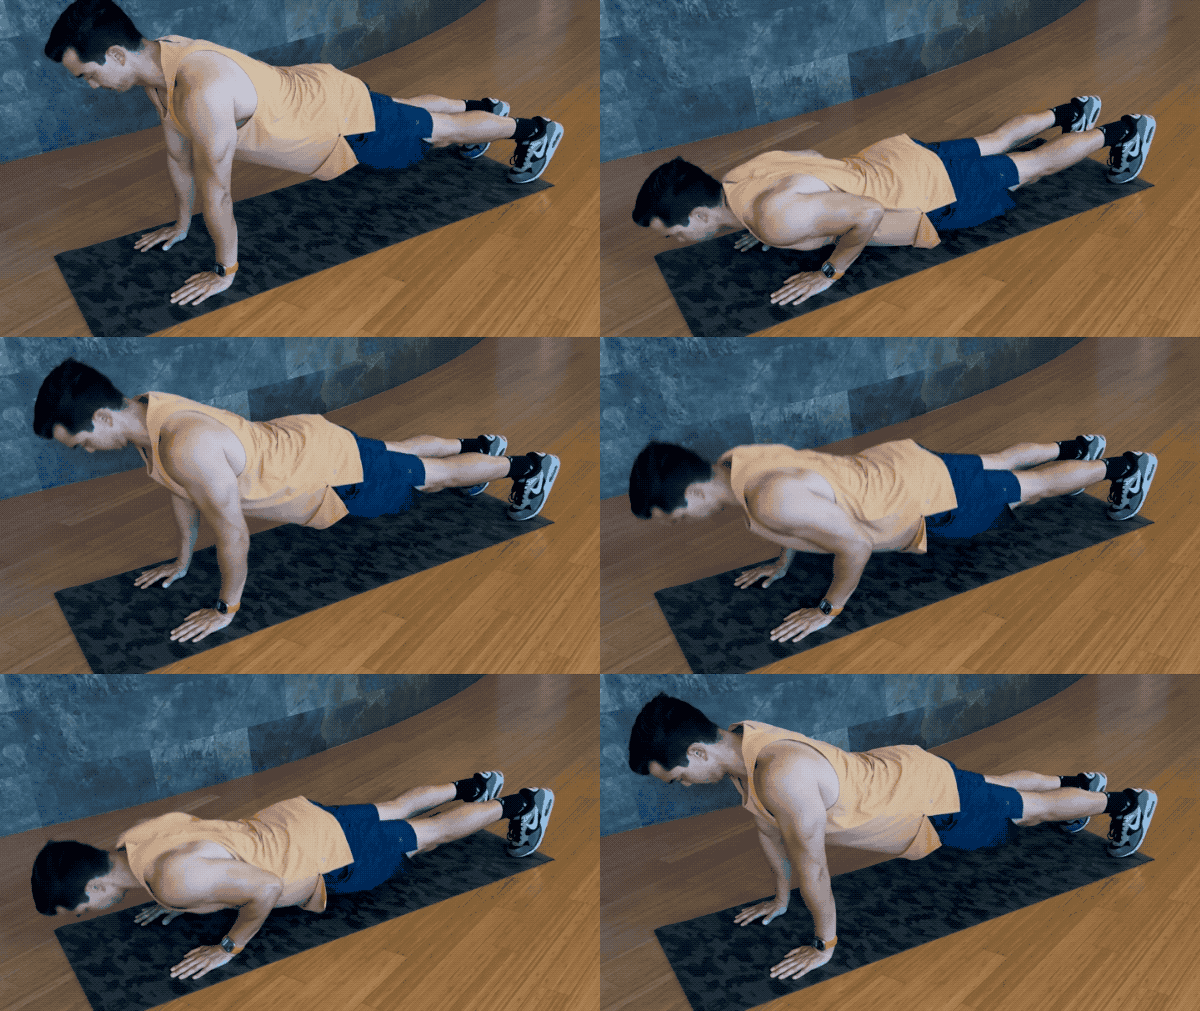
Close Grip Push-ups
Why it works
This narrow-hand push-up trains your triceps, chest, and shoulders as you press away from the floor. Your trunk stays braced to keep your body moving as one unit.
How to do it
- Start in a high plank with your hands under your shoulders, shoulder-width apart or slightly narrower. Tighten your abs and glutes to keep your body straight.
- Bend your elbows and lower under control, keeping them close to your sides without squeezing them against your ribs. Stop at a depth you can control comfortably.
- Press through your palms to straighten your arms, lifting your chest and hips together.
- Finish in a steady plank before starting the next repetition.
Effort in the back of your upper arms, chest, and braced trunk.
Stop if you feel sharp pain or pinching in your wrists, elbows, shoulders, or lower back.
Use the kneeling version shown below.
Try the diamond push-up as another option if its hand position is comfortable. It isn’t a required progression.
Modified Close-Grip Pushups:
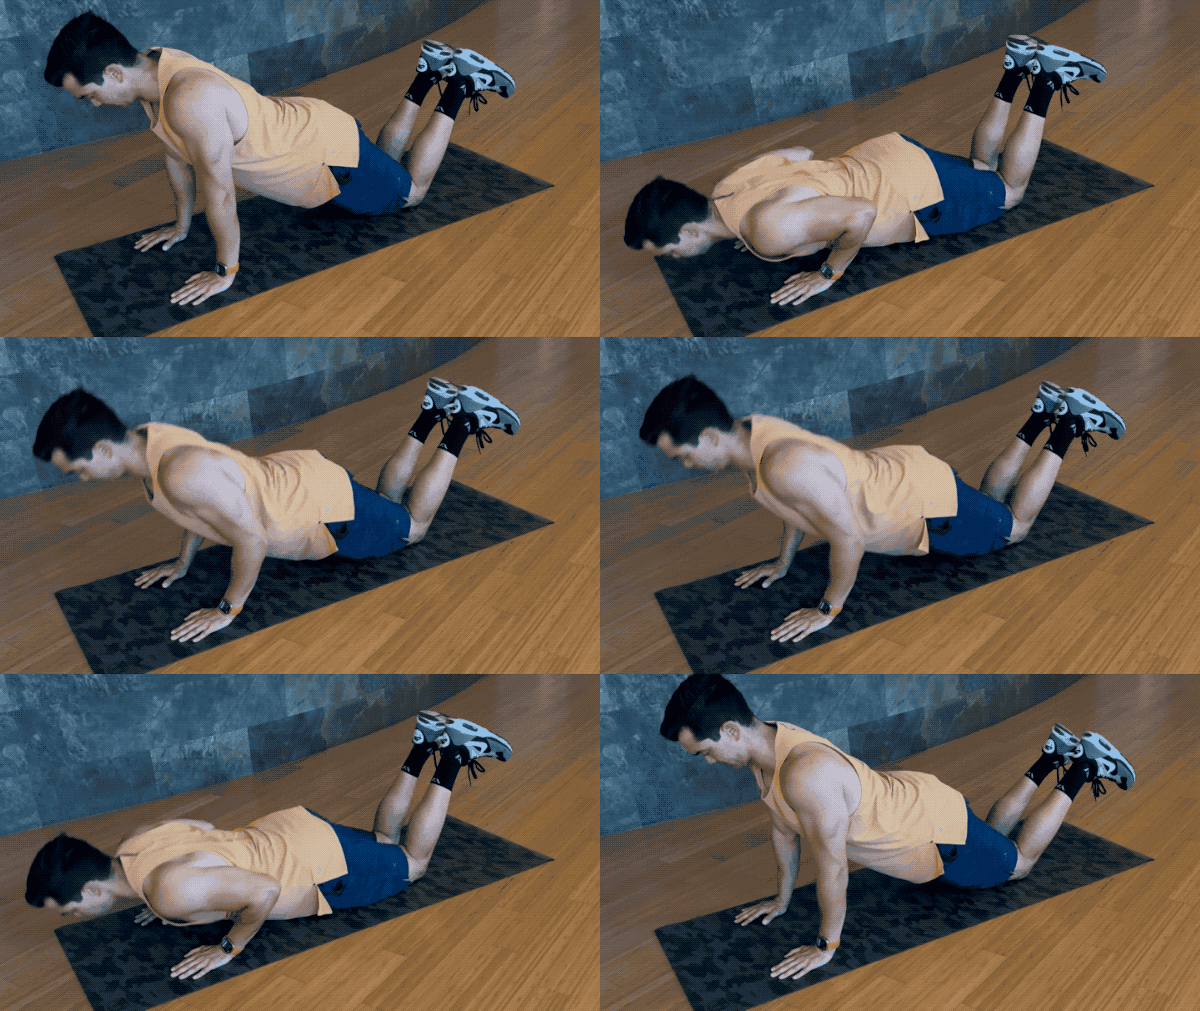
Think arrow rather than T: let your elbows point back at an angle instead of straight out to the sides.
Common mistakes
- Letting your hips sag or your head drop.
- Rushing the lowering phase.
- Forcing your chest to the floor after you lose control.
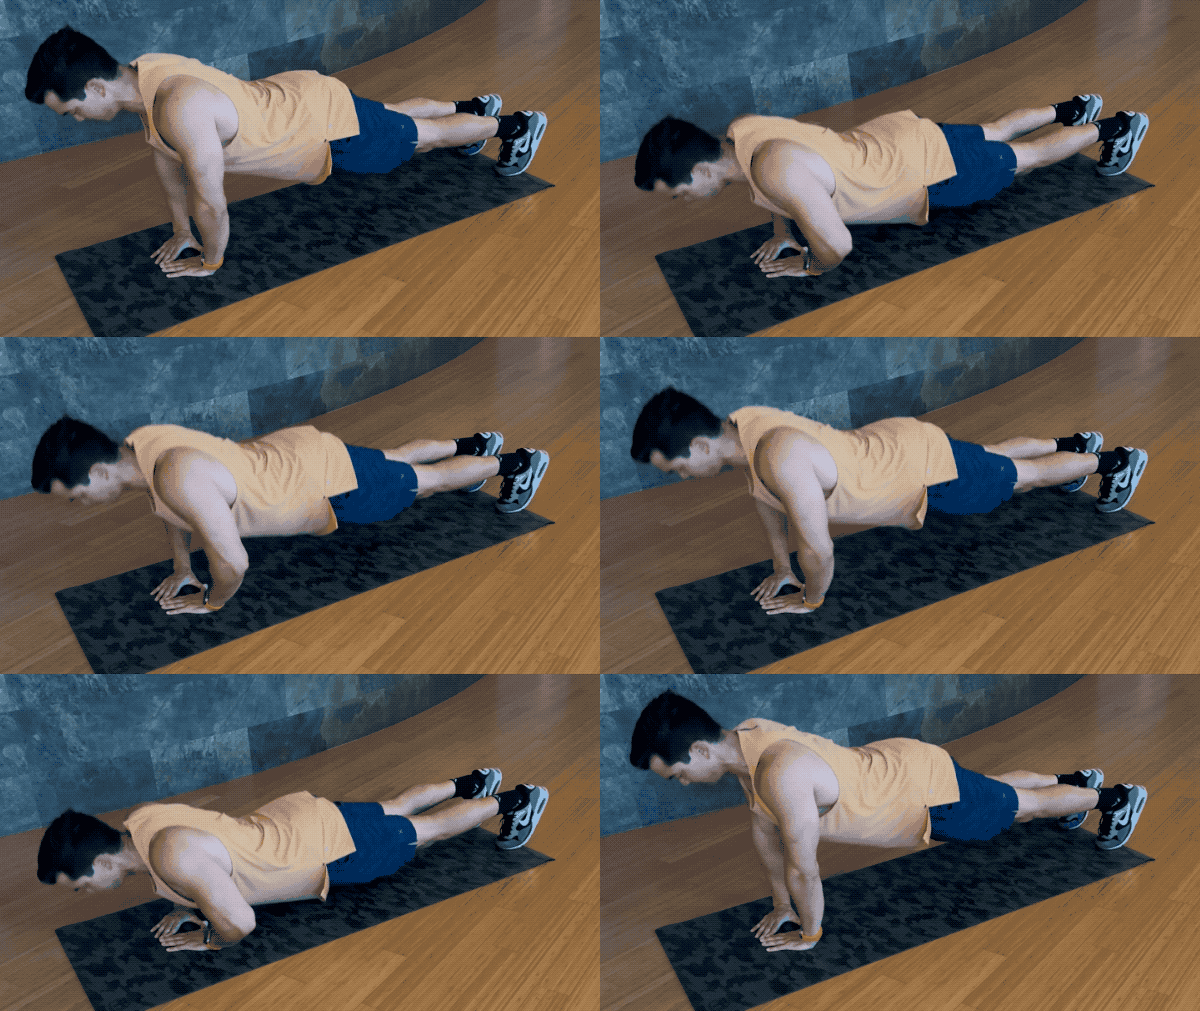
Diamond Push-ups
Why it works
This is another narrow-hand push-up option for your triceps, chest, and shoulders. You don’t need to add it on top of every other push-up in your workout.
How to do it
- Start in a high plank with your hands close together under your chest. Your thumbs and index fingers can form a diamond, but they don’t have to touch.
- Brace your abs and glutes, then lower your chest towards your hands with your elbows close to your sides.
- Stop at a comfortable depth, then press through your palms to straighten your arms.
- Keep your chest and hips moving together and return to a steady plank.
Effort in your upper arms and chest, with your trunk working to hold position.
Stop for sharp pain or pinching in your wrists, elbows, or shoulders, or strain in your lower back.
Use the kneeling modification shown below.
If you can control the full version comfortably, try it with your feet on a low, sturdy step.
Modified Kneeling Diamond Push-ups:
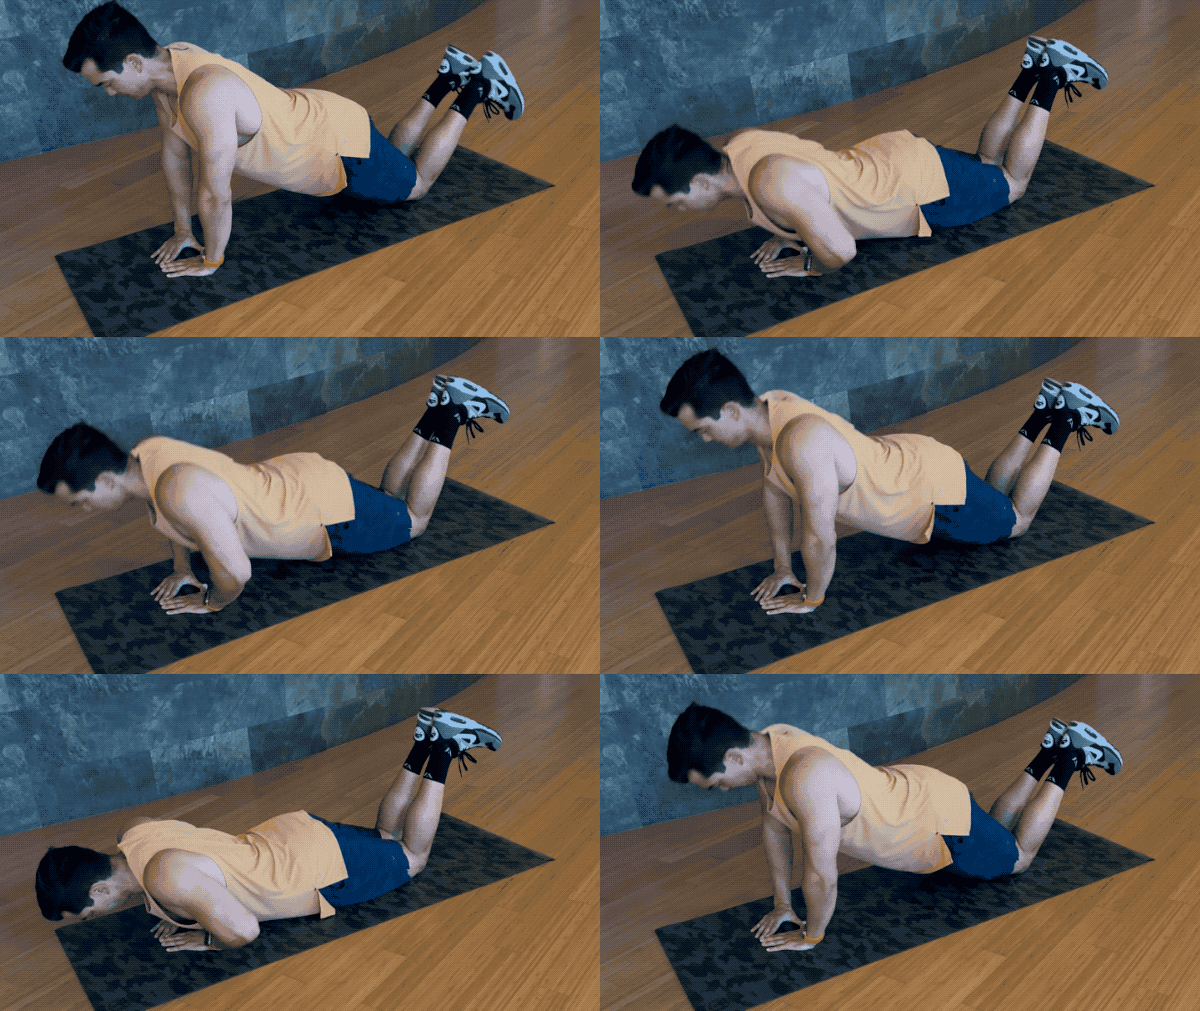
Don’t force a perfect diamond. Move your hands slightly apart if touching them feels awkward; stop if discomfort continues.
Common mistakes
- Letting your hips sag.
- Flaring your elbows straight out to the sides.
- Forcing an uncomfortable hand position.
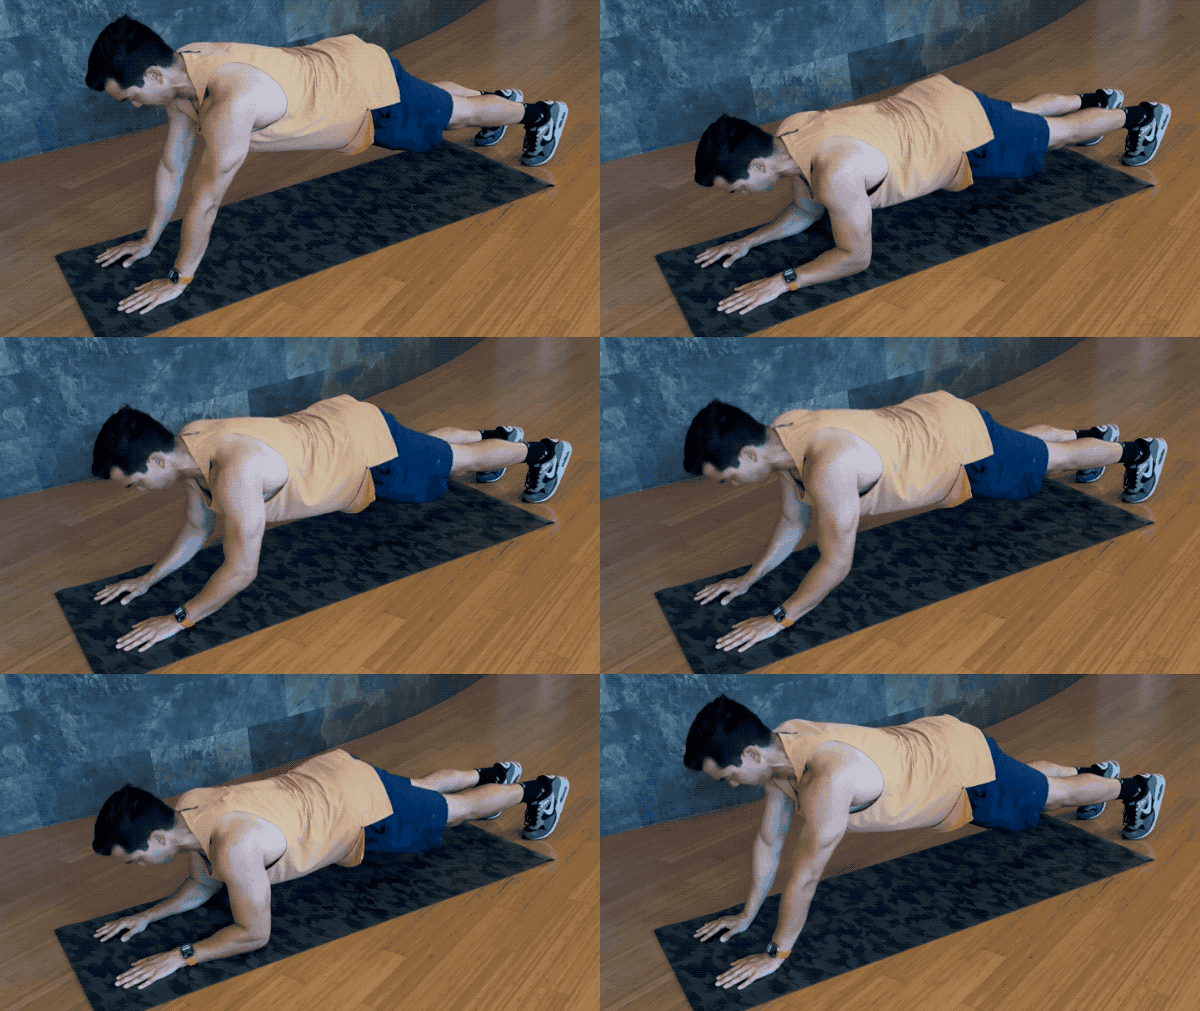
Triceps Floor Press (Bodyweight)
Why it works
This floor-based movement uses your body weight as you bend and straighten your elbows. Keep your trunk steady as your forearms lower to the floor and you press back up.
How to do it
- Start in the push-up position with your hands farther forward, roughly in line with your head. Keep your body straight.
- Bend your elbows to lower your elbows and forearms towards the floor under control.
- Once your forearms reach the floor, press through your hands and straighten your elbows to return to the top.
- Keep your chest and hips moving together. Use the kneeling version below if needed.
Effort in the back of your upper arms and your braced trunk.
Stop for sharp pain in your wrists, elbows, or shoulders, or strain in your lower back.
Use the existing kneeling version shown below.
Move from the kneeling version to the full version when you can maintain control comfortably.
Modified Kneeling Triceps Floor Press
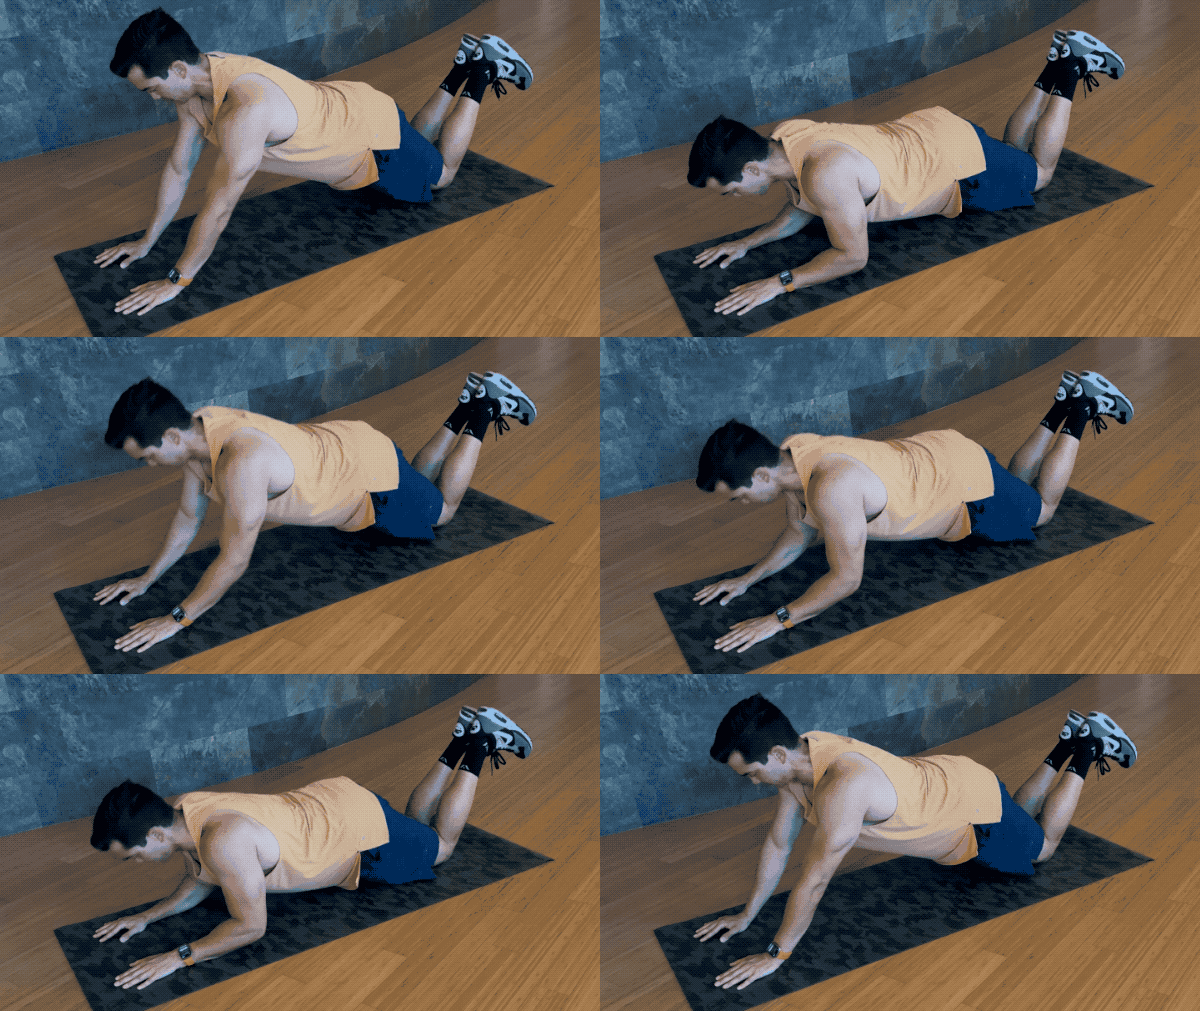
Brace your abs and glutes before you lower so your hips stay in line with the rest of your body.
Common mistakes
- Dropping onto your forearms.
- Letting your hips sag.
- Rocking your body to get back to the top.
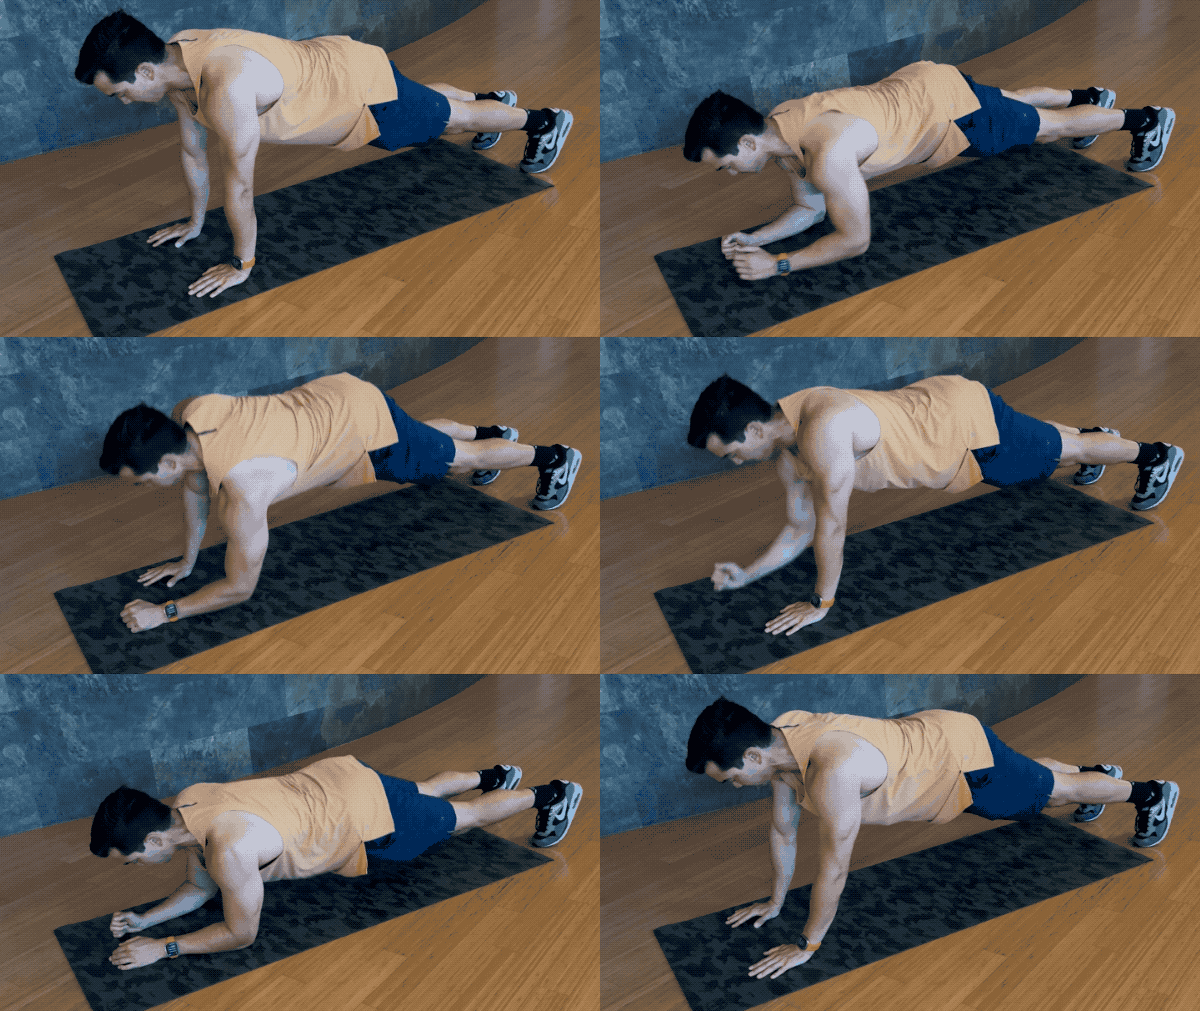
Plank-to-Pushups
Why it works
Moving between a high plank and a forearm plank combines pressing with the effort of keeping your trunk steady. Each arm takes a turn leading the movement.
How to do it
- Start in a high plank with your hands a little wider than shoulder-width and your feet hip-width apart.
- Lower one forearm to the floor, then the other, keeping your hips as steady as you can.
- Plant one hand, then the other, and press back into a high plank.
- Going down to both forearms and returning to both hands counts as one complete repetition. Switch the leading arm on the next repetition.
Effort in your arms and shoulders, with your abs and glutes holding position.
Stop for pinching or pain in your lower back, wrists, or shoulders.
Perform the same down-and-up sequence from your knees.
Try the movement with your feet on a low, sturdy step if you can keep your hips controlled.
Plant your pressing hand under your shoulder rather than reaching far ahead of it.
Common mistakes
- Rocking your hips from side to side.
- Always leading with the same arm.
- Dropping quickly onto your elbows.
Pike Push-ups
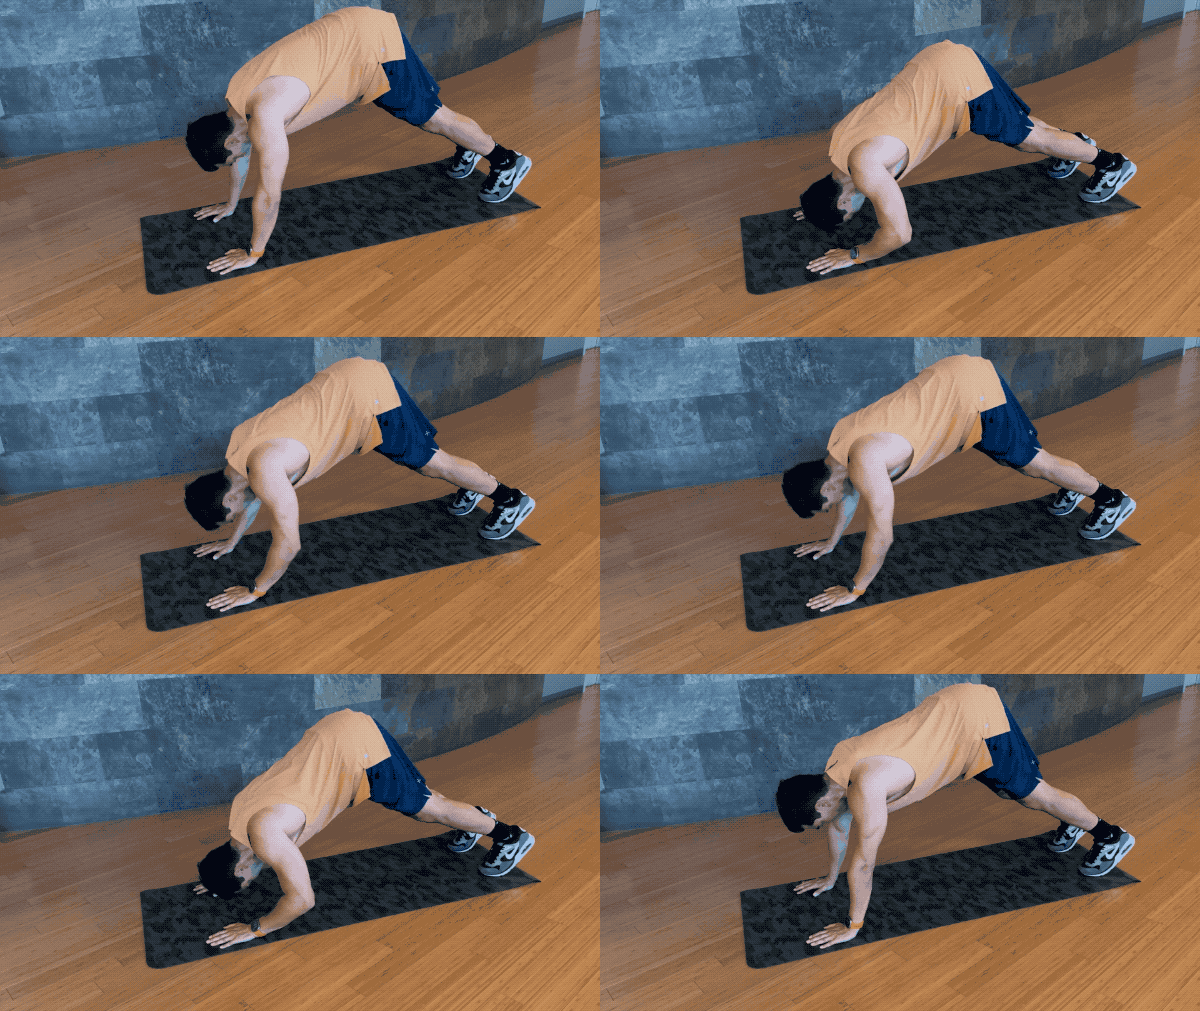
Why it works
Raising your hips changes the push-up into a more shoulder-focused press. This is a demanding option, not the default starting exercise for everyone.
How to do it
- Start with your hands shoulder-width apart and hips raised in an inverted V.
- Keep your back long and your head in line with your upper body.
- Bend your elbows and lower your head towards the floor slightly in front of your hands, only as far as you can control comfortably. Keep your weight supported through your hands and feet.
- Press through your hands to straighten your arms and return to the starting position.
Effort in your shoulders and the back of your upper arms.
Stop for sharp pain or pinching in your shoulders, wrists, or neck.
Bend your knees slightly if keeping your legs straight makes the setup difficult.
Place your feet on a low, sturdy step while keeping the same controlled pressing motion.
Look towards your feet rather than craning your neck forward. Your head doesn’t need to touch the floor, and it shouldn’t support your weight.
Common mistakes
- Letting your hips drop into a regular push-up.
- Reaching forward with your chin.
- Lowering farther than you can press back from.
Cobra Press Hold
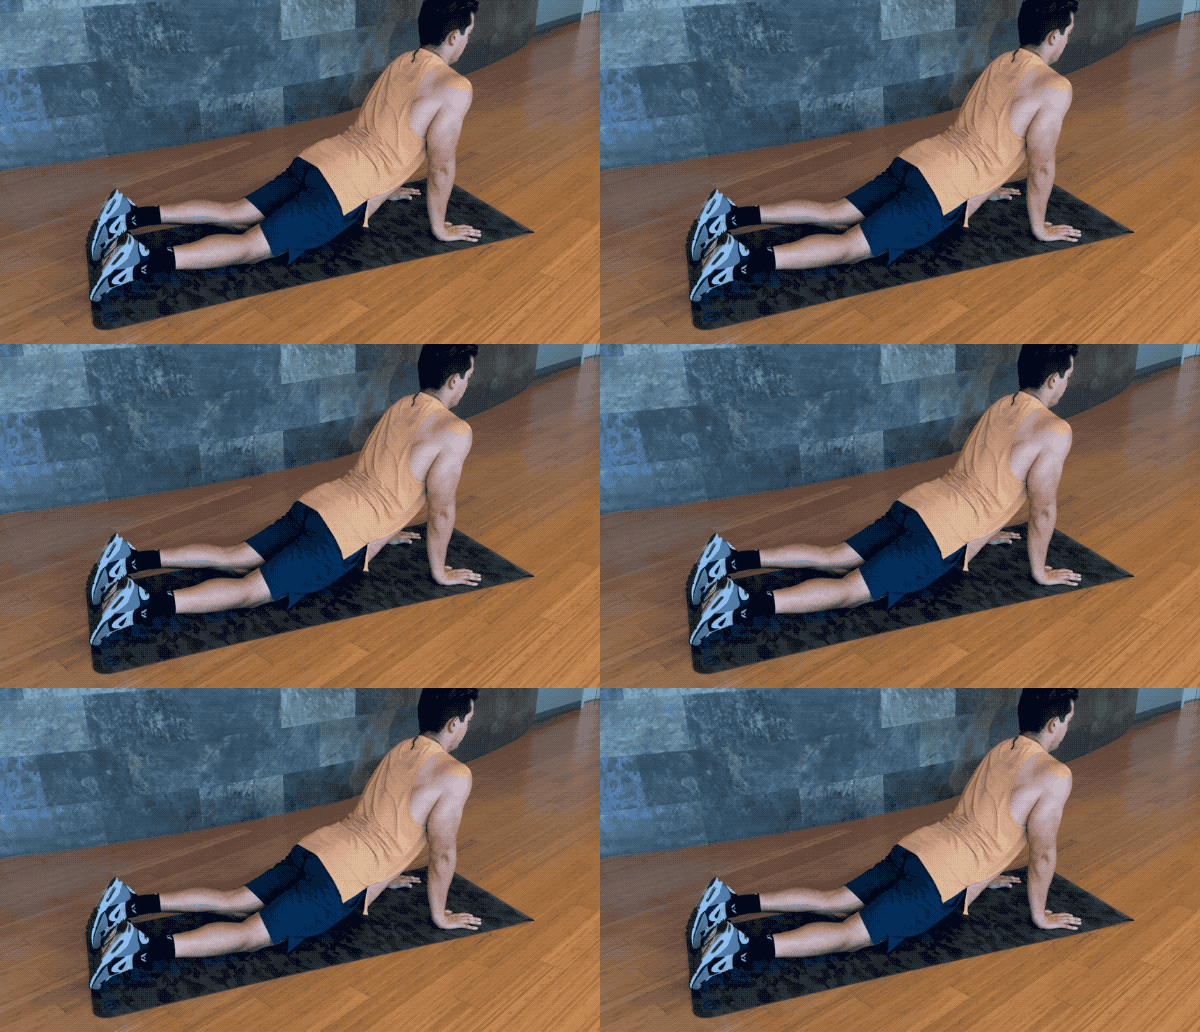
How to do it
- Start by lying face down on the floor with your hands under your shoulders.
- Push through your hands to lift your chest off the ground, extending your arms while keeping your hips and legs on the floor.
- Hold the top position, keeping your chest lifted and shoulders back, engaging your lower back muscles.
- Lower your chest back to the ground in a controlled manner when you finish the hold.
Stop for pinching in your lower back or pain in your wrists or shoulders.
Keep your neck in line with your upper body instead of tipping your head back to look at the ceiling.
Common mistakes
- Craning your neck back.
- Letting your shoulders shrug towards your ears.
Dumbbell Kickbacks

Why it works
With your body hinged forward, you straighten your elbows to lift the dumbbells behind you. Keeping your upper arms steady makes the movement easier to control.
How to do it
- Stand with your knees slightly bent and lean forward, holding a dumbbell in each hand with your palms facing in.
- Keep your upper arms close to your torso and roughly parallel to the floor. Bend your elbows so the weights hang below them.
- Straighten your arms behind you while keeping your upper arms steady.
- Slowly bend your elbows to return to the starting position.
Effort in the back of your upper arms as you straighten your elbows.
Stop for pinching or strain in your lower back, or pain in your shoulders, elbows, or wrists.
Use lighter dumbbells so you can hold the hinged position without rocking.
Pause briefly with your arms straight before lowering the weights.
Keep your wrists quiet. Don’t flick them at the top to finish the movement.
Common mistakes
- Swinging your torso to lift the weights.
- Letting your upper arms drop towards the floor.
- Rushing the return.
Overhead Triceps Extension
Workout dose: See the selected workout: 3 sets of 15–25 reps.
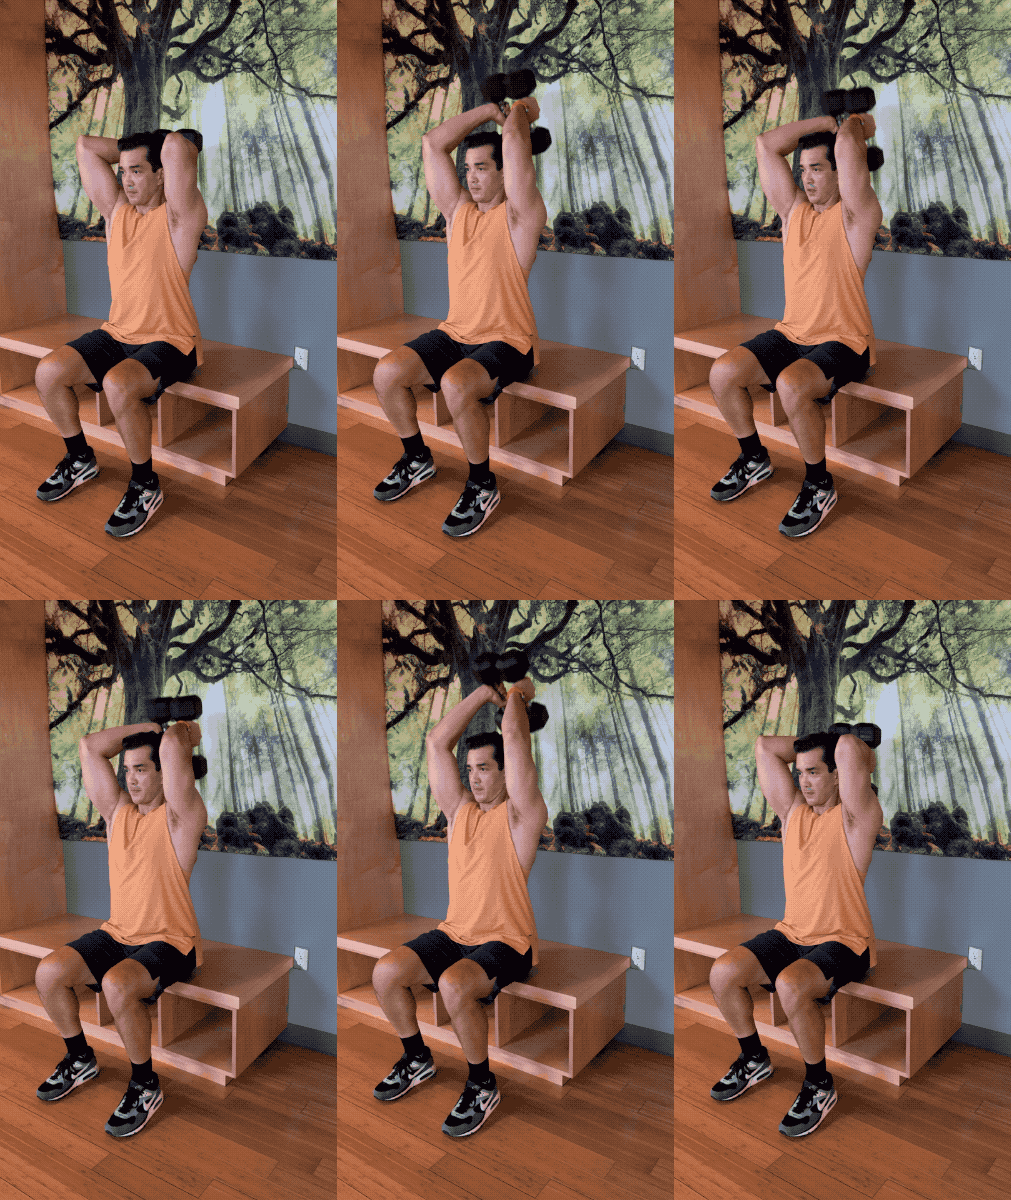
Why it works
With your upper arms overhead, your triceps work to straighten your elbows. The seated setup lets you concentrate on controlling the weights behind your head.
How to do it
- Sit upright with your feet planted, holding a dumbbell in each hand as shown. Raise the weights overhead.
- Keep your upper arms reasonably steady, with your elbows pointing generally forward. Don’t force them against your ears.
- Bend your elbows to lower the dumbbells behind your head through a comfortable range.
- Straighten your elbows to lift the weights back overhead without leaning back.
Effort in the back of your upper arms; a deep stretch isn’t required.
Stop for pinching or pain in your elbows or shoulders, or strain in your lower back.
Use lighter dumbbells while keeping the same seated setup.
Keep your abs gently braced and your ribs from lifting as the weights lower behind your head.
Common mistakes
- Swinging your upper arms forward and backward.
- Leaning back to lift the weights.
- Forcing the weights lower than feels comfortable.
Lying Tricep Extensions
Workout dose: See Workout A: 3 sets of 15–20 reps; Workout B: 3 sets of 15–25 reps.
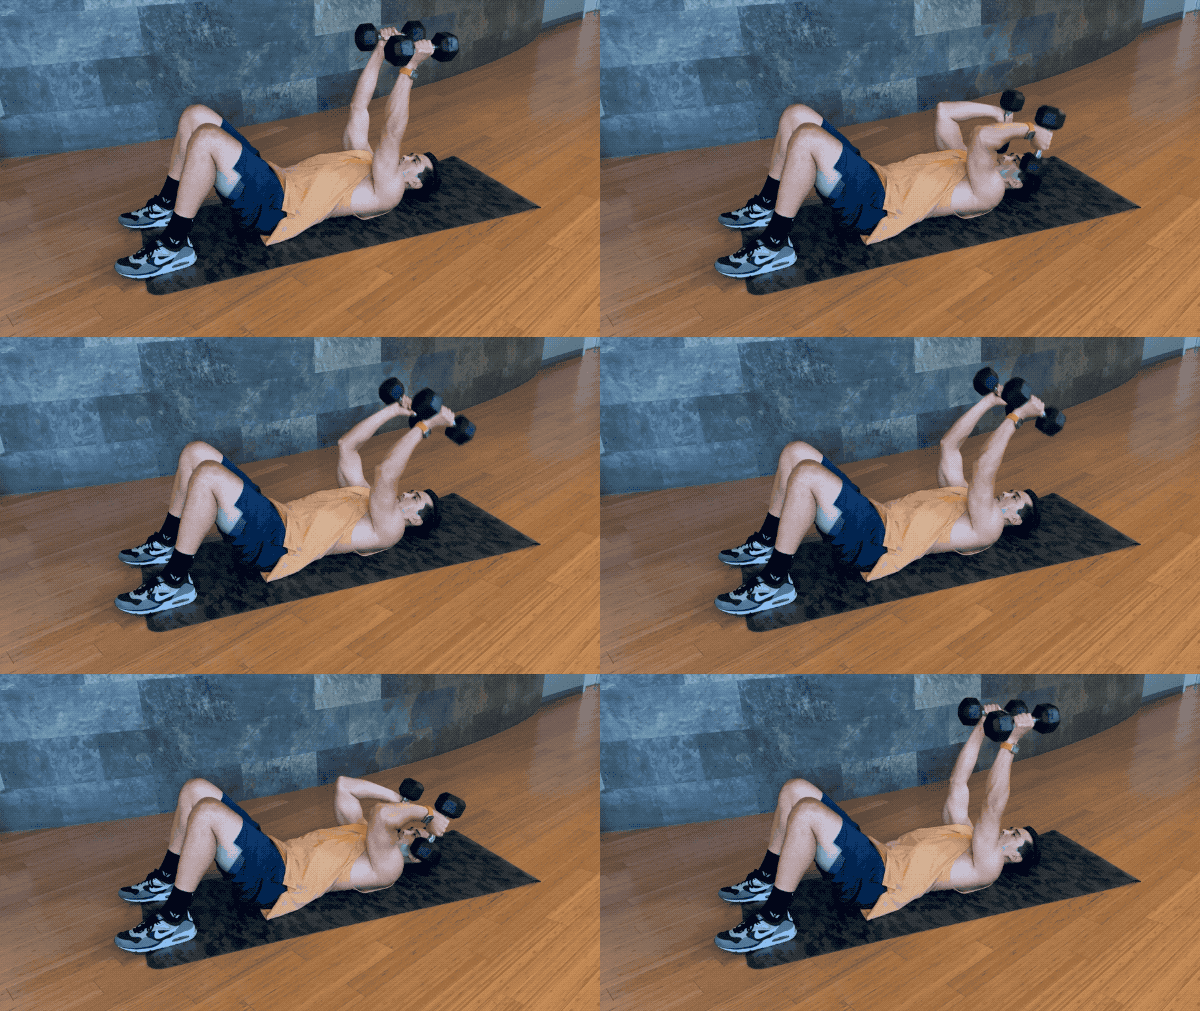
Why it works
Lying on the floor gives you a stable setup for bending and straightening your elbows with dumbbells. Keep the movement controlled rather than using a swing to lift the weights.
How to do it
- Lie on your back on the floor with your knees bent and feet planted. Hold a dumbbell in each hand above your shoulders with your palms facing each other.
- Keep your upper arms steady as you bend your elbows and lower the dumbbells towards the sides of your head, following the demonstrated path.
- Lower only as far as you can control comfortably. Don’t bounce the weights off the floor.
- Straighten your elbows to raise the dumbbells back to the starting position, keeping your hips on the floor.
Effort in the back of your upper arms as you lower and lift the dumbbells.
Stop for sharp pain in your elbows, wrists, or shoulders, or pinching in your lower back.
Use lighter dumbbells while keeping the floor setup.
Keep your elbows roughly in line with your shoulders without squeezing them into a rigid position.
Common mistakes
- Swinging your upper arms to move the weights.
- Lifting your hips or arching your back to help the lift.
- Dropping the dumbbells quickly towards your head.
Chair Bench Dips
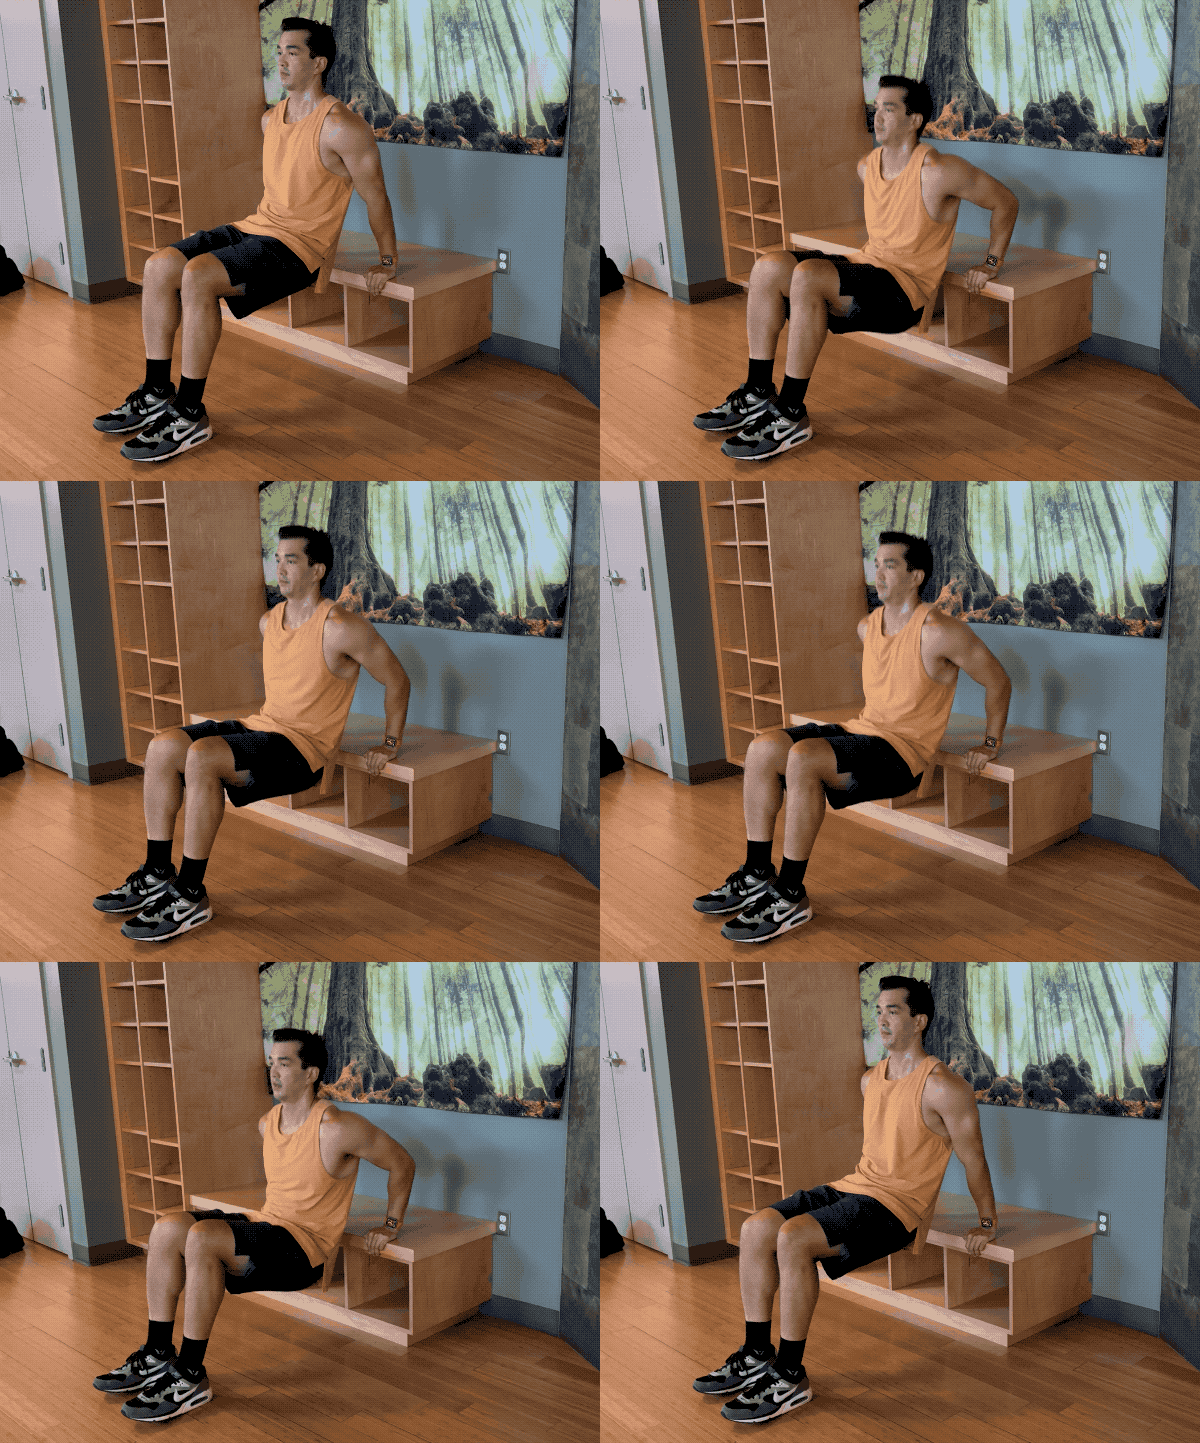
Why it works
This optional exercise uses your arms to lower and raise your body beside a sturdy support. If it feels uncomfortable, choose another listed option you can perform comfortably.
How to do it
- Choose a sturdy chair or bench that won’t tip or slide. Sit at its edge with your hands beside your hips.
- Plant your feet with your knees bent, then move your hips just off the edge while keeping them close to the support.
- Bend your elbows and lower under control only as far as your shoulders feel comfortable. There’s no required depth.
- Press through your palms to straighten your arms and return to the top without shrugging your shoulders.
Effort in the back of your upper arms as you press up.
Stop if you feel sharp pain or pinching in your shoulders, elbows, or wrists.
Keep your knees bent and your feet close to the chair.
Move your feet a little farther out along the floor, only if the movement stays comfortable.
Stay close to the chair as you lower and rise. You don’t need to scrape against it.
Common mistakes
- Drifting your hips far from the support.
- Lowering through shoulder discomfort.
- Hunching your shoulders towards your ears.
A Complete At-Home Workout for Flabby Arms
These triceps-focused workouts train the backs of your arms; they do not train every arm muscle equally or selectively burn arm fat. Start with Workout A. Workout B offers variety. Choose ONE workout per session.
How to train
Use straight sets: finish all sets of one exercise before moving to the next. Choose resistance or a variation that allows controlled reps, finishing rep-based sets with roughly 1–2 repetitions left. Lower under control, approximately 2–3 seconds where applicable. Those effort and tempo cues do not apply to the static hold.
Rest about 1–2 minutes between isolation sets and 2 minutes or longer between demanding push-up/pressing sets when needed. Allow recovery and setup time between exercises.
Choose Your Arm Workout
Workout A
Start hereWorkout B
AlternativeAlternatives to B’s first exercise
Choose one instead of Plank-to-Pushups; do not add these to it.
Weekly schedule
Train 2–3 total sessions weekly, with a rest day between sessions. If alternating, use A/B/A one week and B/A/B the next for three sessions, or A/B for two.
Substitutions
For difficult floor push-ups, use the demonstrated kneeling Close Grip Push-ups or kneeling Diamond Push-ups in the corresponding slot. Substitutions replace a slot; they do not add extra sets. Stop any movement that causes joint pain. Lighter weights, kneeling, or another variation will not automatically resolve pain.
When to make it harder
Add controlled repetitions within each exercise’s own listed range. Once the first work set reaches its upper limit with roughly 1–2 reps left and consistent technique, increase resistance or choose a harder demonstrated variation. Keep subsequent sets manageable; do not force the same rep count. For bodyweight exercises, change leverage or variation rather than adding a prescribed dumbbell increment. Keep the Cobra hold at 30 seconds.
Why Flabby Arms Can Be Toned (and What Exercise Can Change)
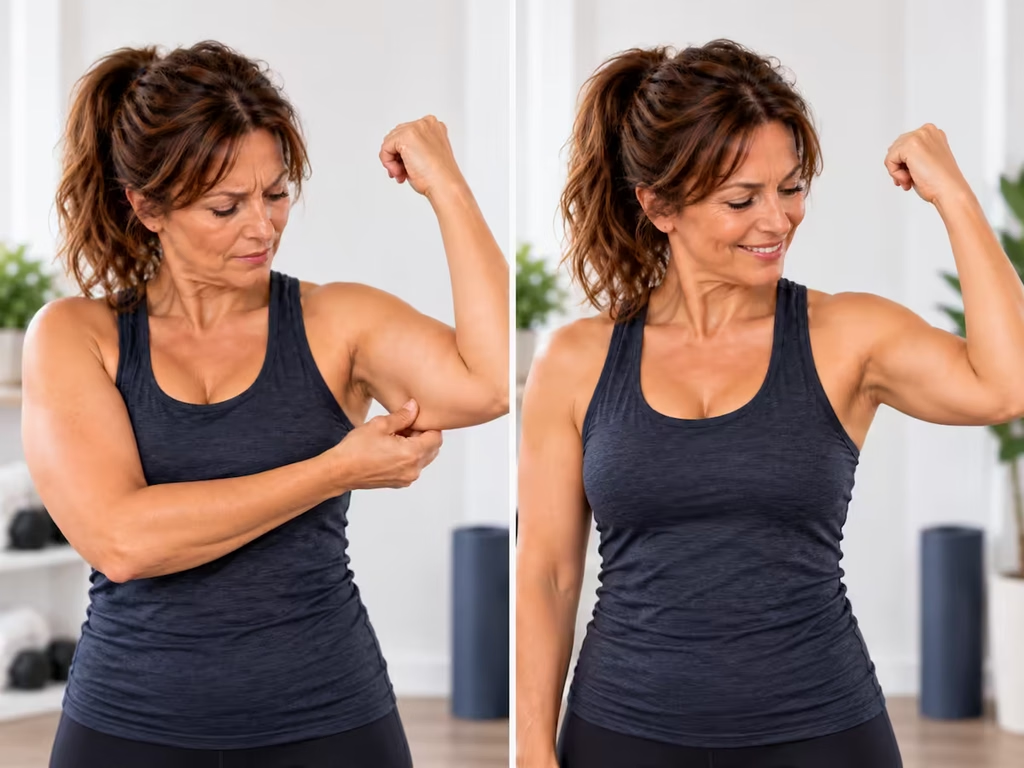
Strength training can help your arms look firmer by building the muscle underneath. But how much their appearance will change also depends on the fat that’s covering the muscle and the elasticity of your skin.
“Toning” isn’t a separate process that requires special exercises. More muscle, less body fat, or a combination of the two can create more definition. But building your arms while shrinking loose skin are different goals.
Three Factors That Affect How Your Arms Look
Less Muscle
Less underlying muscle can mean less shape and definition.
More Subcutaneous Fat
A thicker layer of fat can cover the shape of the muscle underneath.
Reduced Skin Elasticity
Loose skin can hang or appear less firm even when muscle and body fat are addressed.
One factor or a combination can affect your arms. Not everyone has all three.
Stronger can come before firmer-looking. Strength gains and visible changes do not always happen at the same time.
What causes flabby arms?
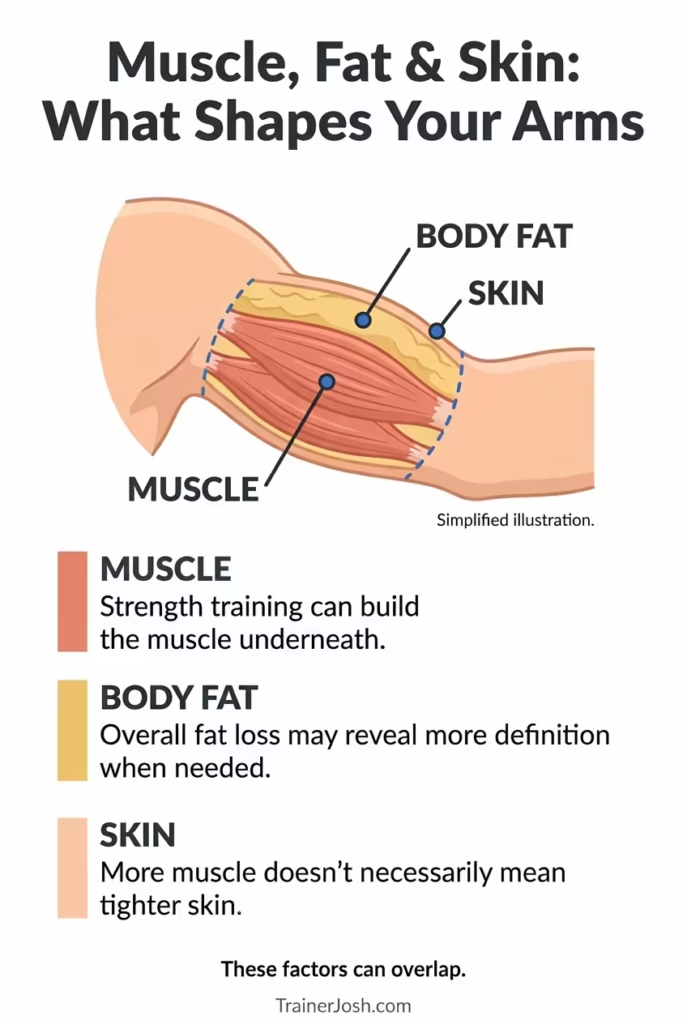
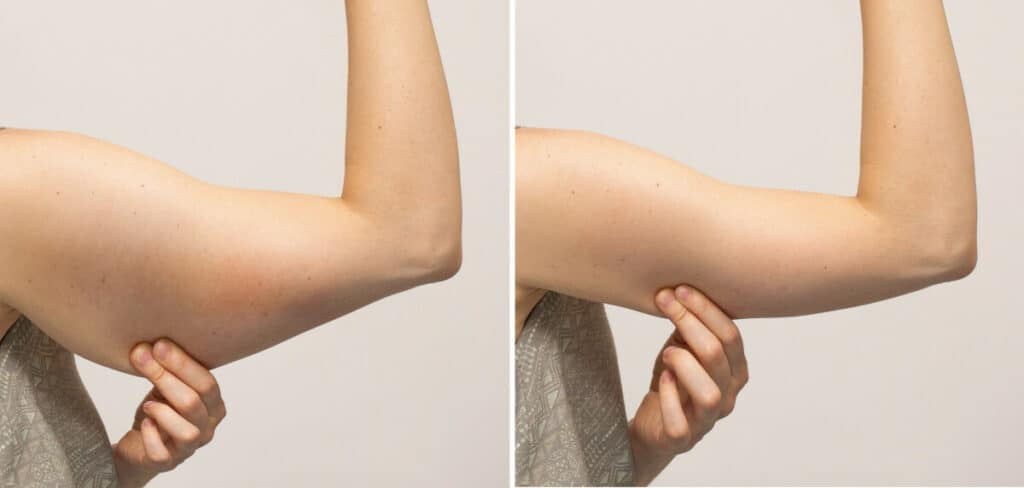
“Flabby arms” describes a soft or loose appearance that can come from less muscle, fat covering the muscle, reduced skin elasticity (or a mix of all three).
- Less underlying muscle. Your biceps and triceps give your upper arms shape. When those muscles are smaller, your arms can look less defined even if you don’t have much body fat. So, if your goal is to get firmer looking arms, then you’ll want to use these exercises to get more muscle.
- The fat layer covering the muscle. You can build stronger arms while that muscle stays hidden beneath body fat. If you have excess fat to lose, overall fat loss can make that muscle definition easier to see.
- Reduced skin elasticity. Skin that has lost elasticity can look loose or hang beneath the upper arm. Aging and substantial weight loss can contribute to this appearance. Muscle growth may improve how filled out the area looks, but it doesn’t mean the skin has regained its elasticity.
And these factors can overlap. Soft-looking arms don’t automatically mean you need to lose weight, and building muscle won’t address every cause.
You may also notice that your weights go up before your arms look different. Early strength gains come partly from your nervous system getting better at activating and coordinating the muscles you’re training.4
So being able to lift more is still progress. Even if you haven’t noticed much of a visual change in your arms yet.
What should I focus on?
What’s affecting your arm appearance?
Not much muscle / little shape?
Prioritize progressive strength training.
Muscle is hidden by excess body fat?
Strength train while pursuing overall fat loss if appropriate.
Mostly loose skin?
Muscle can improve the shape underneath, but exercise does not restore lost skin elasticity.
Where overall fat loss fits
Overall, fat loss makes a lot of sense when excess body fat is part of what’s hiding your arm definition. If you’re already lean and want more shape to your arms, then cutting calories shouldn’t be the automatic next step. Building muscle may be a more relevant goal for you.
When fat loss is appropriate, strength training helps preserve muscle while you lose weight.5 That’s important because a lower number on the scale doesn’t tell you if you’ve lost fat, muscle, or both.
Contracting a muscle can acutely increase blood flow and lipolysis in the subcutaneous fat next to the working muscle.6 But mobilizing nearby fat during exercise isn’t the same thing as losing more fat from the area over time.
Some small studies have found regional fat-loss differences when resistance exercise for a specific area was followed by cardio. But the larger body of evidence hasn’t found a reliable spot-reduction effect from training a specific body part.7
STUDY SAYS:
A small 2017 study published in the Journal of Sports Medicine and Physical Fitness found that inactive women who did upper-body resistance training before cycling lost 12.1% of the fat mass in their arms versus just 4.0% in their legs, while those who did lower-body resistance before arm-ergometer work lost 11.5% of leg fat versus only 2.3% in their arms. This suggests the order and location of your resistance work can steer where your body pulls fat from, not just how much you burn overall.8
Cardio can help you use more energy and support an overall fat loss goal. You don’t need to treat it as a mandatory finish after curls or extensions to burn off nearby fat.
Keep arm training focused on developing muscle and include overall fat loss when it fits your goal.
Getting Rid of Flabby Arms After 50
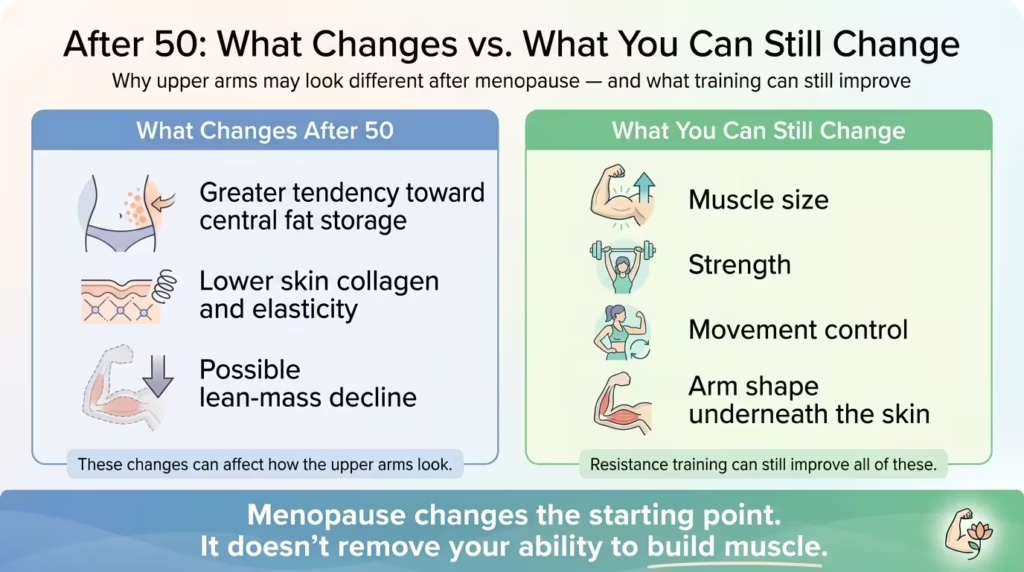
Women in their 50s can have more noticeable, soft, or loose upper arms due to menopause. Menopause doesn’t suddenly make you lose all your muscle. But the hormonal changes that happen during the menopausal transition can affect body composition, fat distribution, and the structure of your skin and connective tissues.9,10
Estrogen helps to promote the more “pear-shaped” fat distribution that’s commonly seen before menopause, with more fat stored around the hips and thighs. As estrogen levels decline during menopause, fat distribution tends to shift toward the trunk and abdominal area.11
Declining estrogen after menopause is associated with reduced collagen synthesis and content in the skin. This can contribute to lower skin firmness and elasticity.12
But it’s a common myth that menopause permanently ruins your ability to build muscle or lose fat. Women in their 50s, 60s, and 70s can still build stronger, more muscular arms with resistance training.
STUDY SAYS:
A 2020 study published in the Journal of Strength and Conditioning Research found that 12 weeks of full-body resistance training in older women improved strength and muscle mass regardless of set volume, with upper-body strength climbing 27-37% and lower-body strength rising 16-22%, alongside lean tissue gains of roughly 8% in both training groups.13
Choose your exercise variations around your current strength, experience, and movement comfort (not just your age).
Choose the Version That Fits You
Choose the variation you can perform comfortably and with good control.
- Getting down to the floor is difficult
- Try an elevated push-up against a sturdy table, counter, or secure surface.
- Standing makes the weight harder to control
- Try a seated version of the exercise.
- Overhead movement bothers your shoulder
- Choose another comfortable triceps exercise instead of forcing the overhead position.
Use a weight that you can control through the movement. As you get stronger, increase the challenge while paying attention to how you recover between sessions.
If an exercise keeps leaving your elbows or shoulders irritated, then reconsider the variation, weight, or amount of work before adding more. You don’t need to do a harder version just because you have completed the easier one once before.
Adequate protein helps support the muscle you’re working to build and maintain, especially as you get older.14 It becomes especially important as you get older because aging muscle tends to be less responsive to smaller amounts of dietary protein.15
Include high-protein foods in your meals. For many older adults, roughly 25–30 grams of high-quality protein per meal is a practical target. Use my free protein calculator to instantly find your daily protein range for building muscle.
For more help choosing foods to go with your training, grab my Flat Belly Foods Cheat Sheet below.
Keep your expectations focused on what training can change. Stronger arms can add shape and fullness to them, even if the loose skin stays. That loose skin doesn’t mean your workouts aren’t working.
Track if you can lift more, control the exercises better, and progress to a more challenging variation along with any improvements you see in the mirror.
What If Your Arms Get Stronger but Still Look Flabby?
Your arms can get stronger before they look different. Your arms can get stronger before they look different. Early strength gains come partly from your nervous system getting better at activating and coordinating the muscles you’re training.16
How long does it take to get rid of flabby arms?
Visible results don’t follow one fixed timeline. Research can detect muscle growth within the first several weeks of consistent resistance training, but how quickly your arms look different also depends on how much muscle you’re starting with, the amount of fat covering it, and your skin’s elasticity.
Skin elasticity is one of the factors you can’t strength train your way around. Ageless Multi Collagen provides five complementary collagen types that support skin elasticity and connective tissue, which can be a useful add-on if loose skin is part of why your arms still look soft even as they get stronger.
Powered by 5 Types of Bioactive Naturally Hydrolyzed Collagen Peptides for Full-Body Support (Odorless & Flavorless)
Before switching your routine, check your workouts:
Before You Change Your Routine
Run your training through this 3-step progress audit.
Sessions
Have you actually completed the workouts you planned?
Count completed sessions instead of only looking at how many weeks have passed.
Technique
Are you using the same controlled range of motion?
A heavier dumbbell isn’t necessarily progress if you have to swing your body or shorten the movement to lift it.
Progression
Are your reps, weight, or control improving?
Compare your workouts. Look for more controlled reps with the same weight or a heavier weight for the same reps.
If these are improving, your program is likely working even before your arms look different.
If you’re getting stronger but your arms still look the same, the limiting factor may not be your workout. Body fat or loose skin can still affect how much of that new muscle definition you can see.
Building muscle, reducing body fat, and addressing the loose skin will need different actions. More arm exercise won’t necessarily address everything affecting your arms’ appearance.
You also don’t need to feel sore or chase “the burn” to know a workout was effective.17 Neither is not a reliable measure of how much muscle you’re building. Judge your training by completed sessions, controlled reps, and whether you’re getting stronger over time.
If those measures are improving, then you shouldn’t be quick to replace your routine. It might just take more time to see the results you want.
FAQ
What’s the fastest way to get firmer-looking arms?
There’s really no proven shortcut. Build your arm muscles with consistent strength training and gradually increase the challenge. If you have excess body fat to lose, then reducing it while maintaining or building muscle can help reveal more definition. That combination is called body recomposition. If you’re already lean, focus on muscle growth rather than automatically cutting calories. Loose skin can stick around even as your arms get stronger.
Can I tone my arms without dumbbells?
Yes, you can strengthen and build your arm muscles with bodyweight exercises. This includes the push-up variations here in this guide. Choose a version that you can do with control, then increase the challenge as you get stronger. Dumbbells do give you more exercise options, but they aren’t needed to start.
Will arm exercises make my arms bigger?
No, arm exercises won’t make your arms bigger and bulky. They will make them firmer and more defined. What looks like “bulk” is usually from fat over underdeveloped muscle. Women have about 15x less testosterone than men, so big size would take years.18 Skip weights while dieting, and 20-25% of weight loss can come from muscle (leaving arms softer)
Losing arm fat is only half the goal… you also want to hold onto the lean muscle that gives your arms shape. The BioTRUST GLP-1 Companion Stack supports healthy appetite signaling and muscle maintenance, making it a practical companion for a fat-loss plan built around strength training and sufficient protein.
A 3-part daily stack designed to support people using GLP-1 medications or losing weight naturally. It combines muscle, protein, collagen, and appetite support to help you maintain a healthier body composition as you lose weight.

I recommend combining the arm exercises below with high-intensity exercises. High-intensity exercises will elevate your heart rate, body temperature, and blood flow and increase total fat burning. Then, mixing in the below-targeted arm exercises will improve fat burning in your arm area by mobilizing fatty acids from fat cells.19
I’d then recommend adding 20-40 minutes of traditional slow-go cardio afterward. This can be anything from brisk walking, jogging, cycling, swimming, elliptical, etc. The addition of cardio after strength training in the targeted area enhances spot reduction fat loss.20
General Summary
- Arm exercises can build firmer-looking arms, but muscle, fat, and loose skin are different issues. These triceps-focused workouts strengthen the backs of your arms. Building muscle does not mean loose skin will regain its elasticity.
- Lose body fat when excess fat is hiding arm definition. Keep strength training to help preserve muscle. If you’re already lean, building muscle may be more useful than cutting calories. Use my calorie calculator to determine your calorie needs for weight loss.
- Choose one arm workout per session, 2–3 total sessions per week, with a rest day between sessions. Start with Workout A, use B for variety, and finish all sets of one exercise before moving to the next.
- Progress through controlled reps before increasing the challenge. Once your first work set reaches the exercise’s upper rep limit with 1–2 reps left and steady technique, increase resistance or choose a harder variation. Stop movements that cause joint pain.
- Track strength and control, not just soreness. More controlled reps or greater resistance can show progress before your arms look different; visible changes also depend on body fat and skin elasticity.

References
- Currier BS, D’Souza AC, Fiatarone Singh MA, et al. “American College of Sports Medicine Position Stand. Resistance Training Prescription for Muscle Function, Hypertrophy, and Physical Performance in Healthy Adults: An Overview of Reviews.” Medicine & Science in Sports & Exercise. 2026.
- Lopes JSS, Machado AF, Micheletti JK, et al. “Effects of training with elastic resistance versus conventional resistance on muscular strength: A systematic review and meta-analysis.” SAGE Open Medicine. 2019.
- Wilk M, Zajac A, Tufano JJ. “The Influence of Movement Tempo During Resistance Training on Muscular Strength and Hypertrophy Responses: A Review.” Sports Medicine. 2021.
- Sale DG. “Neural adaptation to resistance training.” Medicine & Science in Sports & Exercise. 1988.
- Binmahfoz A, Dighriri A, Gray C, Gray SR. “Effect of resistance exercise on body composition, muscle strength and cardiometabolic health during dietary weight loss in people living with overweight or obesity: a systematic review and meta-analysis.” BMJ Open Sport & Exercise Medicine. 2025.
- Stallknecht B, Dela F, Helge JW. “Are blood flow and lipolysis in subcutaneous adipose tissue influenced by contractions in adjacent muscles in humans?” American Journal of Physiology–Endocrinology and Metabolism. 2007.
- Ramirez-Campillo R, Andrade DC, Clemente FM, et al. “A proposed model to test the hypothesis of exercise-induced localized fat reduction (spot reduction), including a systematic review with meta-analysis.” Human Movement. 2022.
- Scotto di Palumbo A, Guerra E, Orlandi C, Bazzucchi I, Sacchetti M. “Effect of combined resistance and endurance exercise training on regional fat loss.” Journal of Sports Medicine and Physical Fitness. 2017.
- Greendale GA, et al. “Changes in body composition and weight during the menopause transition.” JCI Insight. 2019.
- Calleja-Agius J, Brincat M. “The effect of menopause on the skin and other connective tissues.” Gynecological Endocrinology. 2012.
- Greendale GA, Han W, Finkelstein JS, et al. “Changes in Regional Fat Distribution and Anthropometric Measures Across the Menopause Transition.” Journal of Clinical Endocrinology & Metabolism. 2021.
- Calleja-Agius J, Brincat M. “The effect of menopause on the skin and other connective tissues.” Gynecological Endocrinology. 2012.
- Cunha PM, Nunes JP, Tomeleri CM, et al. “Resistance Training Performed With Single and Multiple Sets Induces Similar Improvements in Muscular Strength, Muscle Mass, Muscle Quality, and IGF-1 in Older Women: A Randomized Controlled Trial.” Journal of Strength and Conditioning Research. 2020.
- McKenna CF, Askow AT, Paulussen KJM, et al. “Postabsorptive and postprandial myofibrillar protein synthesis rates at rest and after resistance exercise in women with postmenopause.” Journal of Applied Physiology. 2024.
- Bauer J, Biolo G, Cederholm T, et al. “Evidence-based recommendations for optimal dietary protein intake in older people: a position paper from the PROT-AGE Study Group.” Journal of the American Medical Directors Association. 2013.
- Škarabot J, Brownstein CG, Casolo A, Del Vecchio A, Ansdell P. “The knowns and unknowns of neural adaptations to resistance training.” European Journal of Applied Physiology. 2021.
- Damas F, Phillips SM, Libardi CA, et al. “Resistance training-induced changes in integrated myofibrillar protein synthesis are related to hypertrophy only after attenuation of muscle damage.” The Journal of Physiology. 2016.
- Handelsman DJ, Hirschberg AL, Bermon S. “Circulating Testosterone as the Hormonal Basis of Sex Differences in Athletic Performance.” Endocrine Reviews. 2018.
how to do exercises for flabby arms?
Hi Namita, be sure to watch the video for all descriptions on the exercises for flabby arms.
Josh
I don’t know how or where to start with firming my flabby out of shape arms.
It has a year and a half since I have exercised at all.
Please help….
Hi Margaret,
If you haven’t worked out a while, and you want to get rid of your flabby arms then I’d recommend picking up some dumbbells and doing the exercises on this page. The hardest part is just going to be getting started because it already sounds like you’re mentally defeated since you haven’t worked out in such a long time. But overcoming the mental internal resistance towards lifting weights again will be the hardest part, but if you put in the work and the exercise then you can expect the results to come too.
Hi Josh, my name is Tammy. I have rotator cuff issues and arthritic in both knees. If I get on the floor I will definitely need help getting up. I go to PT once a week for my shoulder and knees now. I also have severe arthritis in my lower back and scolosis. Is there any other ways to get rid of flabby arms? I’ve been losing weight, 40 lbs so far. My arms just aren’t showing it. Thanks.
Hi Tammy, follow the exercises here on how to get rid of the flabby arms. Also make sure you’re following a proper diet focusing on fat loss. Congrats on losing the 40 pounds and keep going!
please tell me how can i get rid of my flabby arms and I seriously want to lose it.. i don’t know why but my arms r getting fatter day by day …please help me!! i want to get rid of these flabby arms…. please
Hi Suzy, follow the exercises here and also be sure to implement a rapid fat loss diet like the one in The Flat Belly Formula.