

Something changes after 40. You used to be able to roll out of bed, lace up, and go. But now? Your body gives you a different opinion before you even start.
Stiff hips. Cranky knees. That lower back that needs the first few sets just to “wake up.”
You know the warm-up matters. You just don’t know what “right” actually looks like. And that’s exactly where most people get stuck.
The internet tells you to foam roll for ten minutes. Do static stretching. No, wait, dynamic stretching. Cardio first. Actually, skip the cardio. Do five warm-up sets. Do two. No wonder you’re second guessing yourself before you even start.
Here’s what I want you to know: A good warm-up doesn’t have to eat your whole workout window. It doesn’t have to leave you pre-fatigued before you touch a weight or hit a trail.
In this guide, I’ll show you exactly what to do, how long to warm up, and what works best depending on what you’re training for, so you can feel ready to go without wasting half your session getting there.
Quick Answer: The 10 Best Warm-Up Exercises
These 10 exercises cover the major movement patterns and joints most people need to prepare before a workout. You don’t have to do every one each time—pick the movements that match your workout and what feels stiff that day.
If you’d rather not think about it, use my 5-minute full-body routine below.
The 5-Minute “Ground-to-Standing” Warm-Up Flow
Follow these 10 movements in order for one continuous five-minute flow from the floor to standing. This version swaps leg swings for quadruped hip circles so you can progress naturally from ground-based mobility to standing movement.
Your 5-Minute Ground-to-Standing Warm-Up
Start on the floor, gradually work your way to standing, then finish by raising your heart rate so your whole body feels ready to train.
Goal: Feel warmer, looser, more mobile, and ready to train — not tired.
Start supported on the floor to wake up your glutes and core while moving the hips through a controlled range of motion.
How to do it: Lie on your back with your knees bent and feet flat. Drive through your heels to lift your hips until your knees, hips, and shoulders form one straight line.
How to do it: Flip onto your hands and knees. Brace your core and keep your spine neutral. Lift one knee out to the side and draw slow circles for 15 seconds, then switch legs.
How to do it: Stand tall, hinge forward, and place your hands on the floor. Bend your knees slightly if needed. Walk to a tall plank, pause, then walk your hands back and stand.
Now that your hips and core are awake, use bigger standing movements to open tight areas and rehearse the patterns you’ll use during your workout.
How to do it: Step into a deep lunge with your back leg extended and both hands inside your front foot. Rotate toward the front leg, reach that arm to the ceiling, and follow it with your eyes. Return the hand to the floor, then rock your hips back, straighten the front leg comfortably, and pull the toes up to stretch the hamstrings and calves. Return to standing and alternate sides.
How to do it: Step backward with your left leg and lower into a reverse lunge while reaching your left arm straight overhead, palm inward. Step forward and alternate sides.
How to do it: Stand about shoulder-width apart. Bend your knees and hinge at your hips together as you sit down and back to a comfortable depth. Drive to standing with your heels firmly planted.
Finish upright by loosening your shoulders and gradually raising your heart rate so you transition directly into your workout.
Stand tall with your arms extended. Circle forward for 10 seconds, then backward for 10 seconds. Keep your shoulders relaxed.
Stand tall and swing your arms across your chest and back open in a relaxed rhythm. Let your chest gently open as your arms swing back.
Stand with your hands on your hips and feet slightly wider than shoulder-width. Use smooth circles to loosen any remaining hip or low-back stiffness.
Drive your knees upward while naturally swinging the opposite arm. Gradually increase the rhythm without turning it into an all-out effort.
You should finish this routine feeling energized — not fatigued.
Want to See How to Do Each Exercise?
Here’s how to perform all 10 warm-up exercises correctly, including the cues I use with clients, what you should feel, and common mistakes to avoid.
10 Best Warm-Up Exercises (With Coaching Cues That Make Them Work)
This isn’t just a list of movements. Each warm-up exercise below includes the reps, modifications, and coaching details you need to get real preparation from each one. If you train at home or in a cold environment without access to cardio equipment, this full sequence is especially useful for getting your body ready without machines.
March in Place
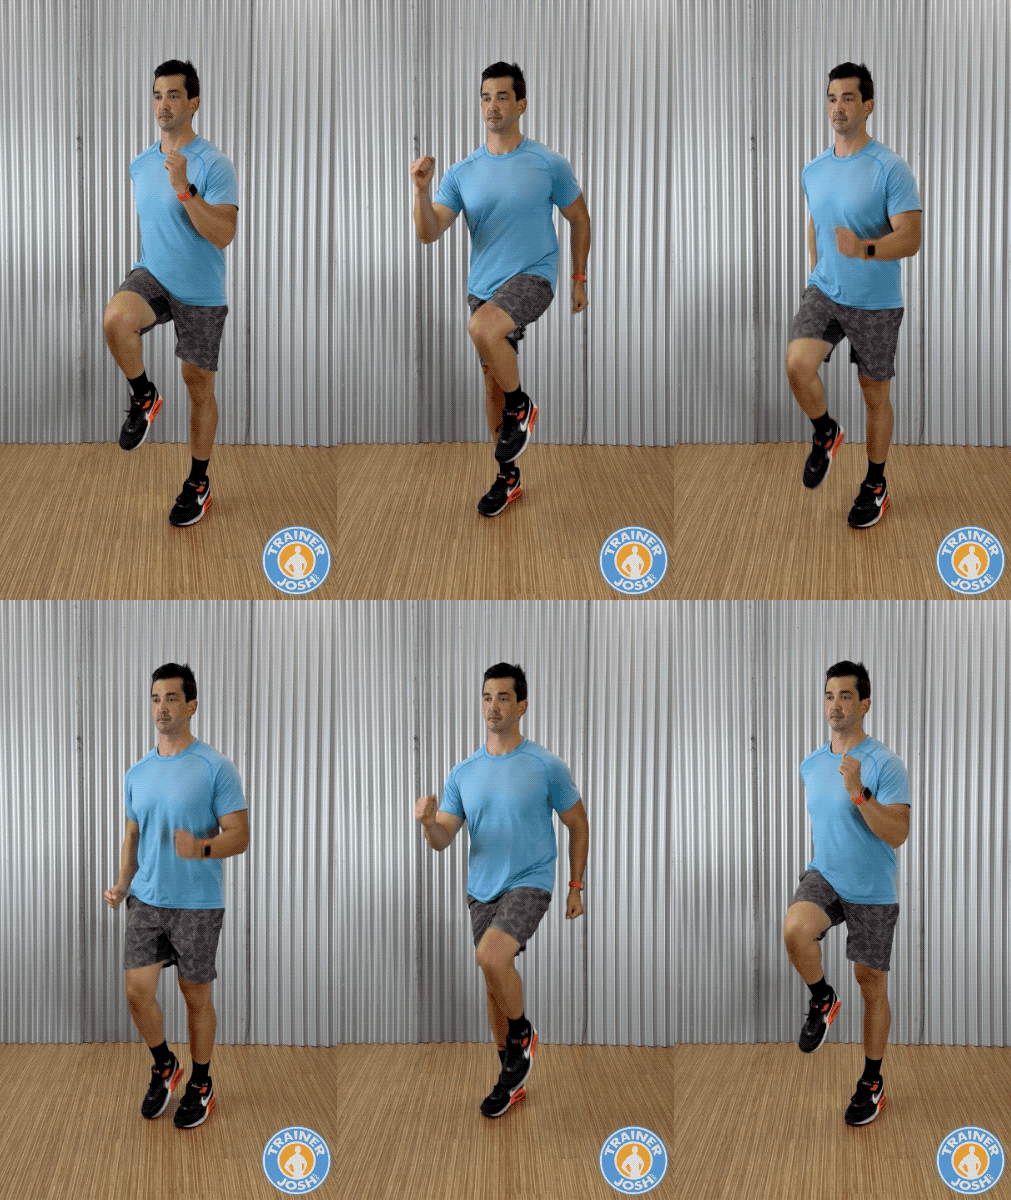
Marching is a low-impact way to warm the whole body and transition into training. The opposite arm-and-leg pattern also rehearses the coordination used in walking and running.
Light warmth, looser joints, and a comfortable rise in breathing while you can still talk.
Sharp joint pain, heavy impact through the feet, or breathlessness that prevents conversation.
March seated in a chair, or keep the knee lift low and the pace slow.
Lift the knees higher and increase the pace while keeping the movement controlled; stop before it becomes fatiguing.
“Start easy and let the height and pace build naturally as your joints loosen up.”
Avoid:
Arm Circles
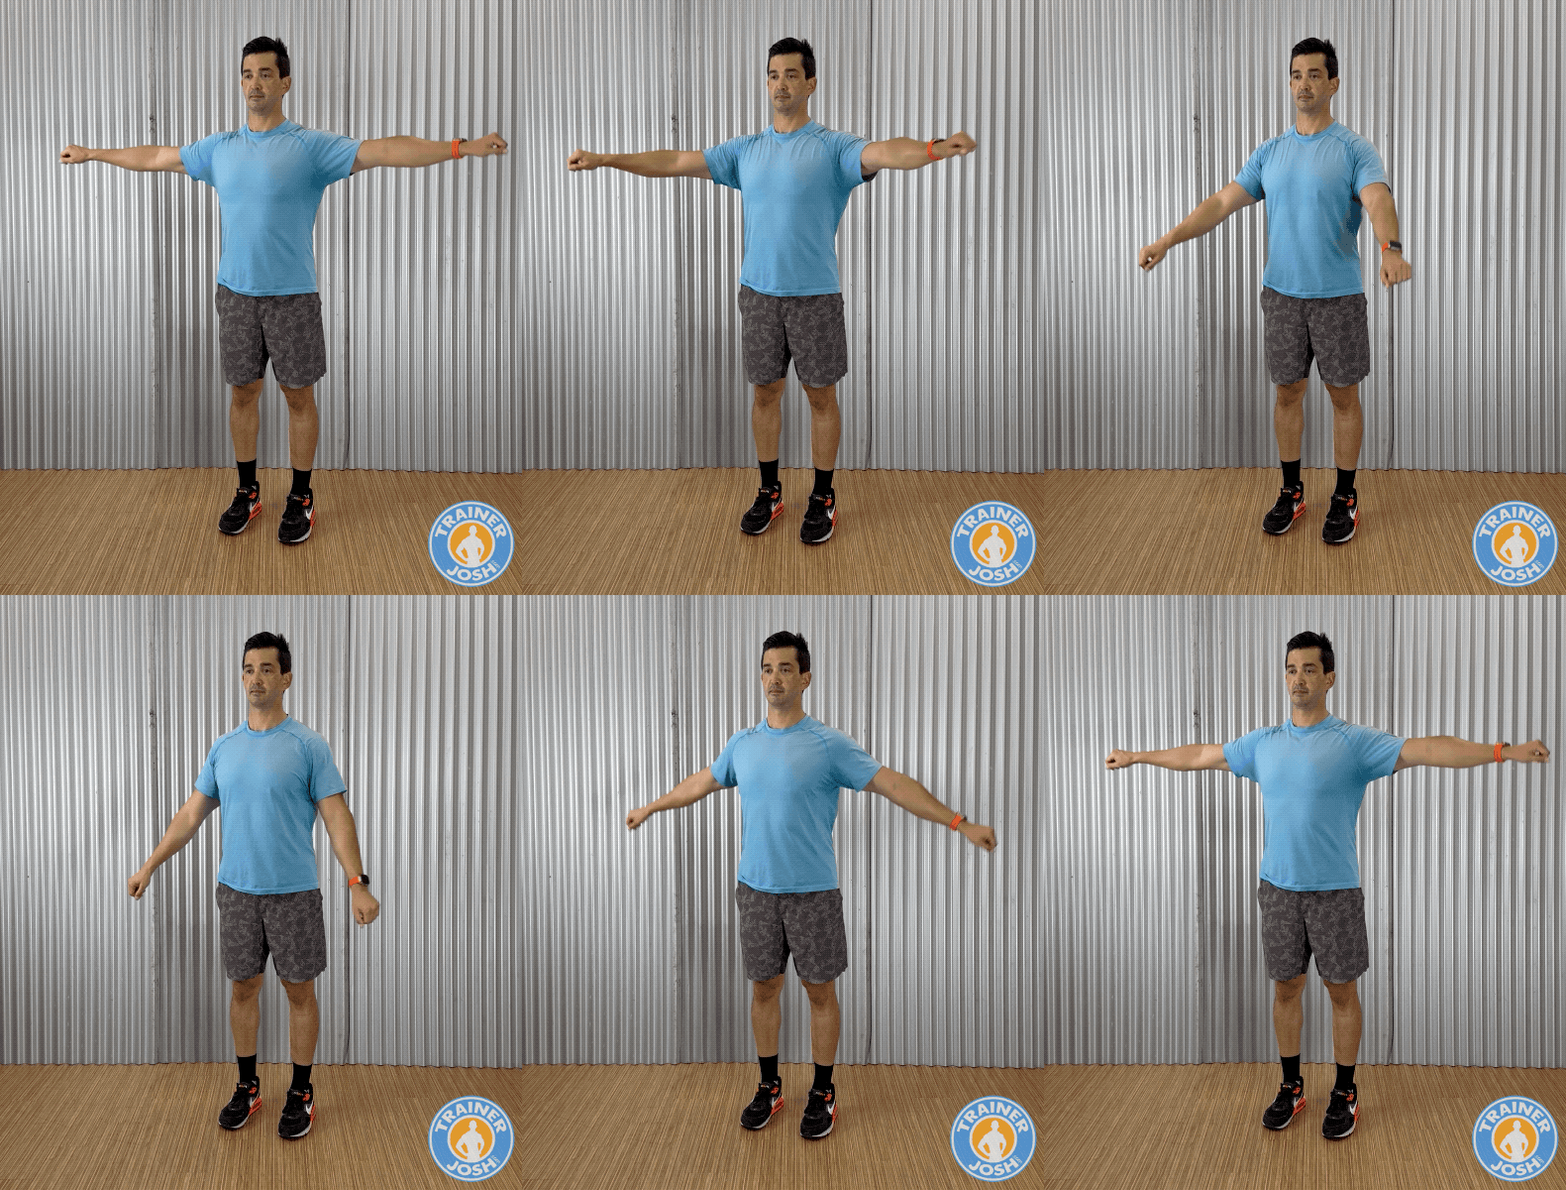
Arm circles prepare the shoulders, chest, upper back, and rotator-cuff area for upper-body training. The gradually increasing circle also lets you explore a comfortable shoulder range before pressing or pulling.
A 2024 review in Arthroscopy, Sports Medicine, and Rehabilitation reported that dynamic warm-ups using active, sport-specific joint movements improve joint mobility, muscle flexibility, and force production while improving neuromuscular activation and joint proprioception in athletes.1
Gradual warmth and easier movement around the shoulders, upper back, and chest.
Sharp shoulder pain, neck tension, or a need to jerk through the circle.
Keep the circles small and slow, stopping before discomfort.
Use the largest comfortable circle and a slightly faster tempo while maintaining strict control.
“Start small and build up. The goal is to prepare the joint, not prove how large a circle you can make.”
Avoid:
Arm Swings
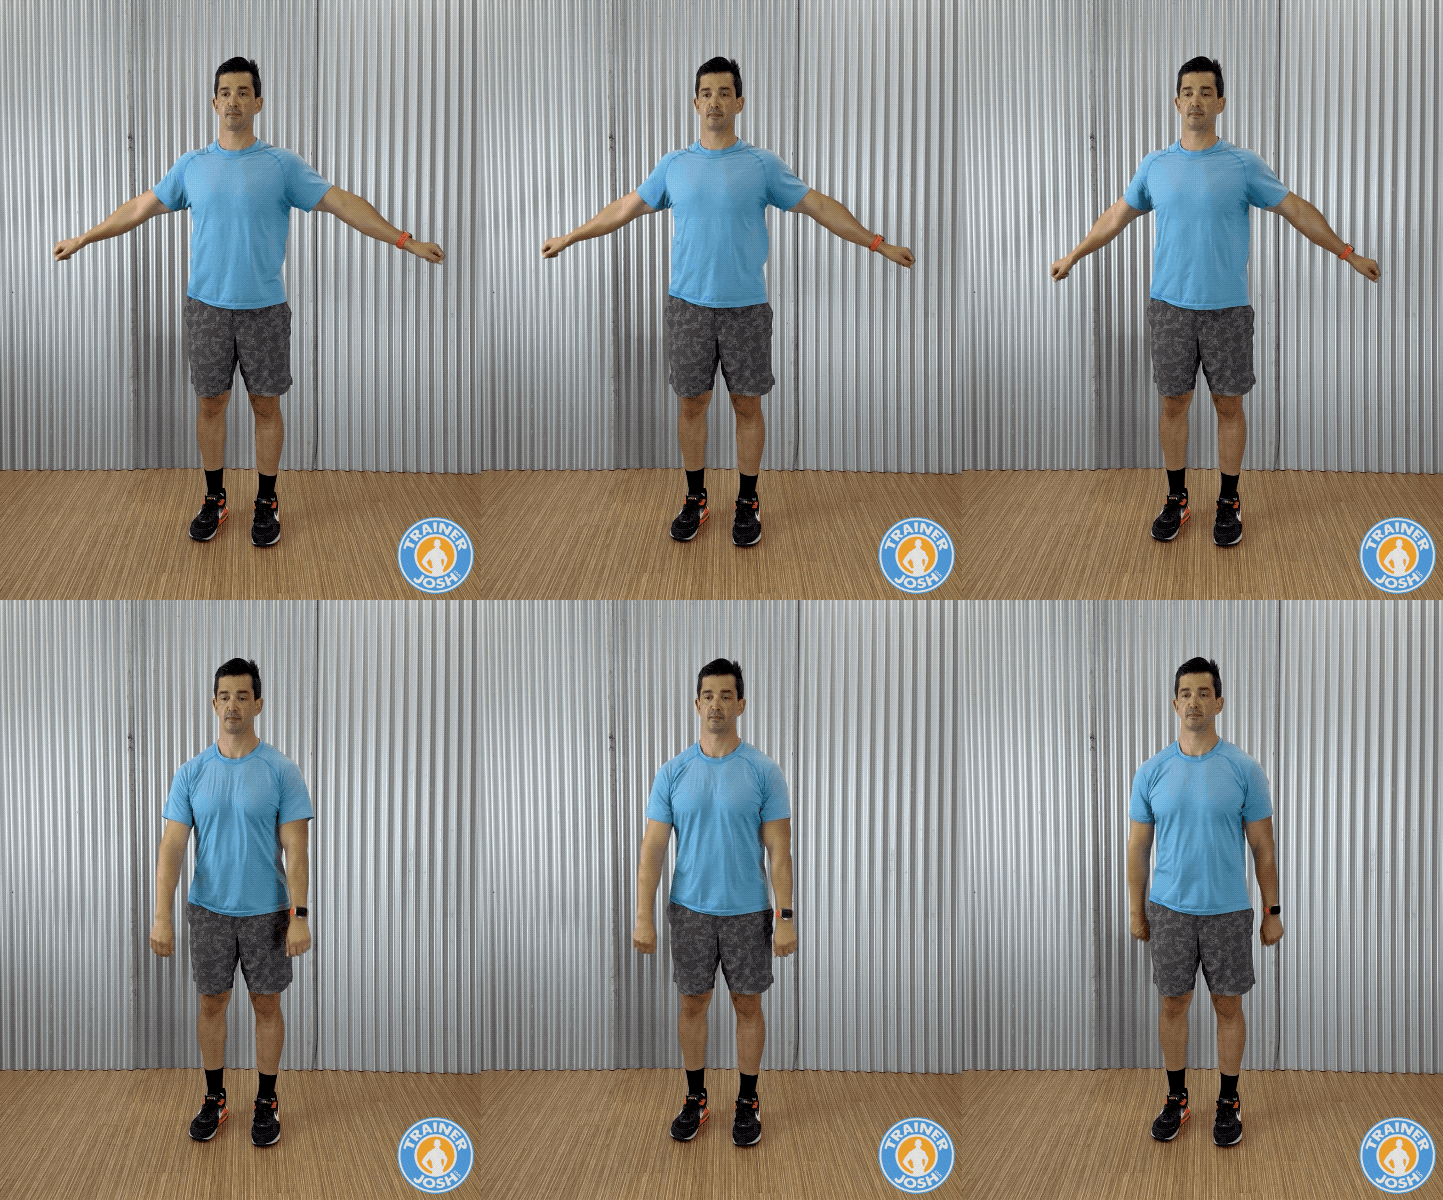
Arm swings dynamically open the chest and upper back while preparing the shoulders for pushing and pulling. They are especially useful after long periods of sitting.
A gentle dynamic stretch across the chest and upper back with increasing shoulder warmth.
Sharp pinching, catching, or an uncontrolled pull at the shoulder.
Slow the pace, use a smaller swing, or perform the movement seated.
Increase the range and pace, or combine the swings with easy marching or side steps without creating fatigue.
“Keep the shoulders down and let the range grow gradually instead of forcing the first few reps.”
Avoid:
Hip Circles
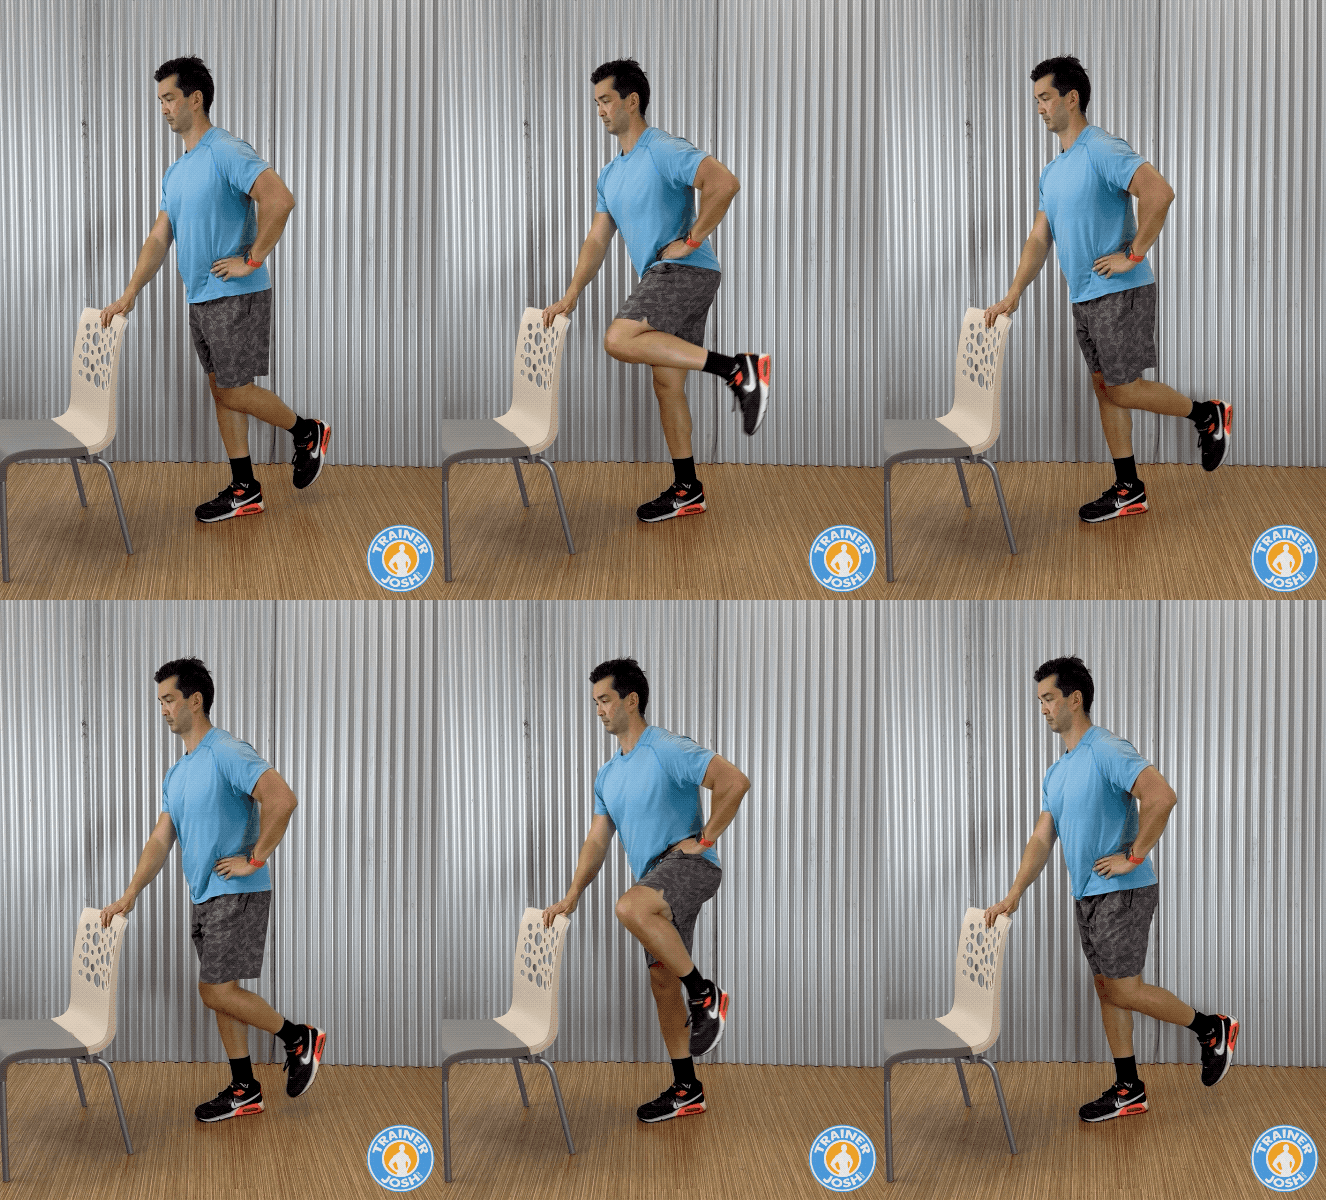
Hip circles move the hips through a controlled circular pattern before lower-body training. They are a practical opener before squats, lunges, walking, or workouts after prolonged sitting.
A 2024 randomized trial in Frontiers in Sports and Active Living found that a 15-minute integrative warm-up combining foam rolling, stretching, glute and core activation, and a loaded squat pattern increased hip flexion range of motion by about 7–9 degrees and significantly improved overhead squat quality scores.2
A gentle warming stretch around the hips, groin, and lower-back area.
Sharp pain, pinching, catching, or strain in the hip joint or lower spine.
Hold a wall or sturdy chair for balance and keep the circles small. You can also perform slow, controlled hip circles on all fours.
Progress toward your largest comfortable circle while staying smooth and controlled.
“Drive the circle from your pelvis. A little torso movement is natural, but the hips should lead.”
Avoid:
Leg Swings
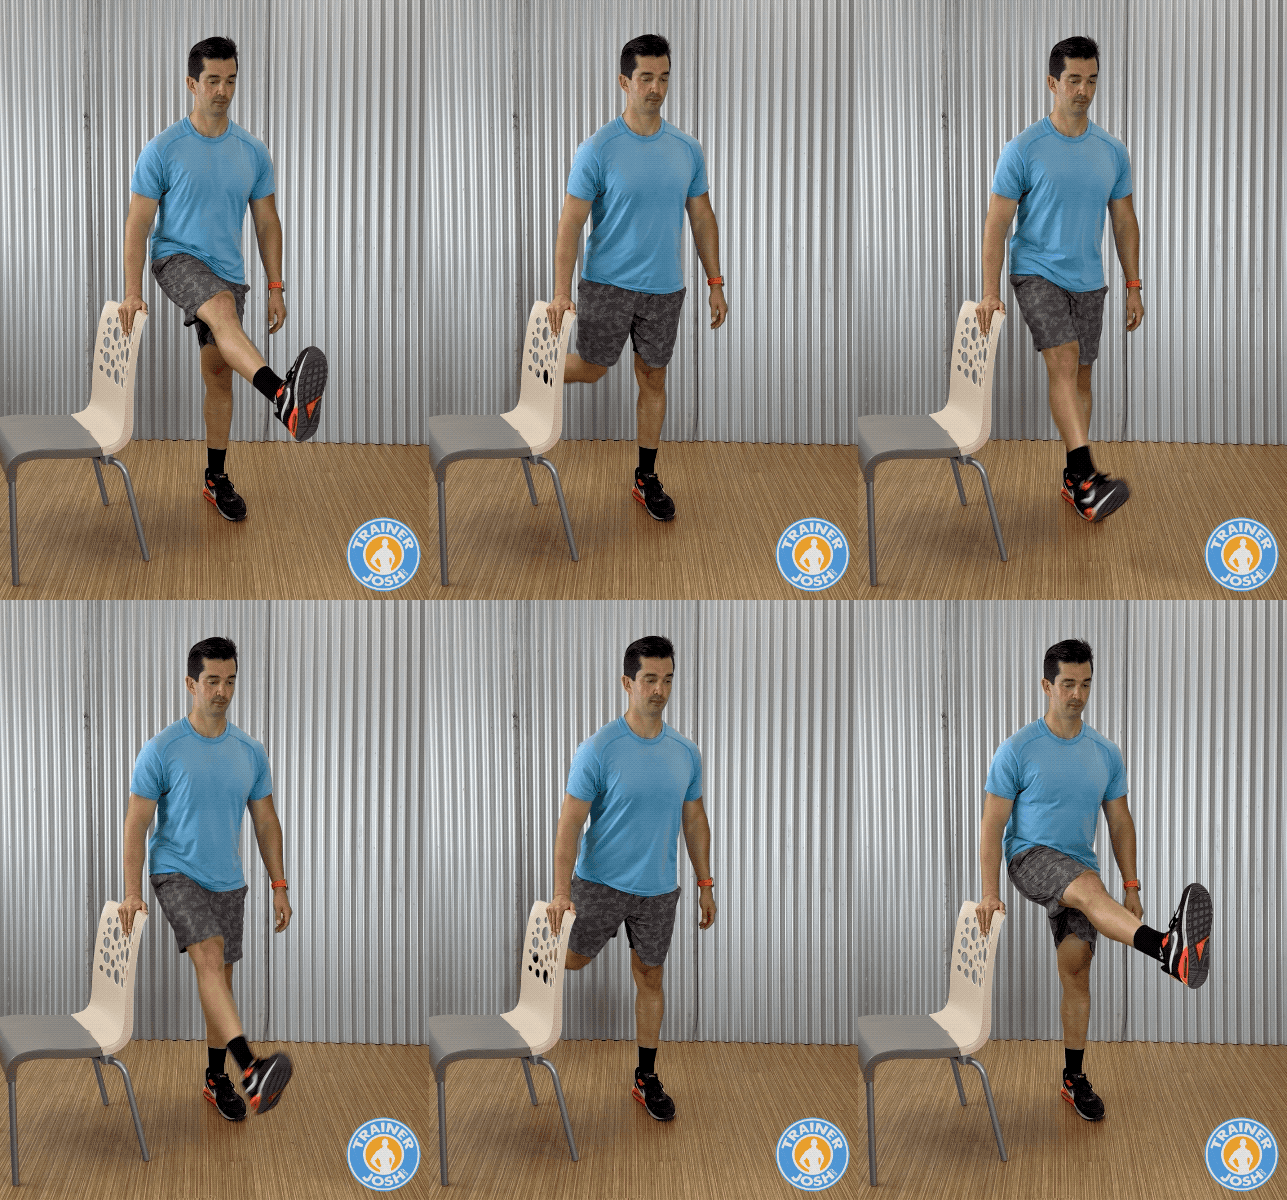
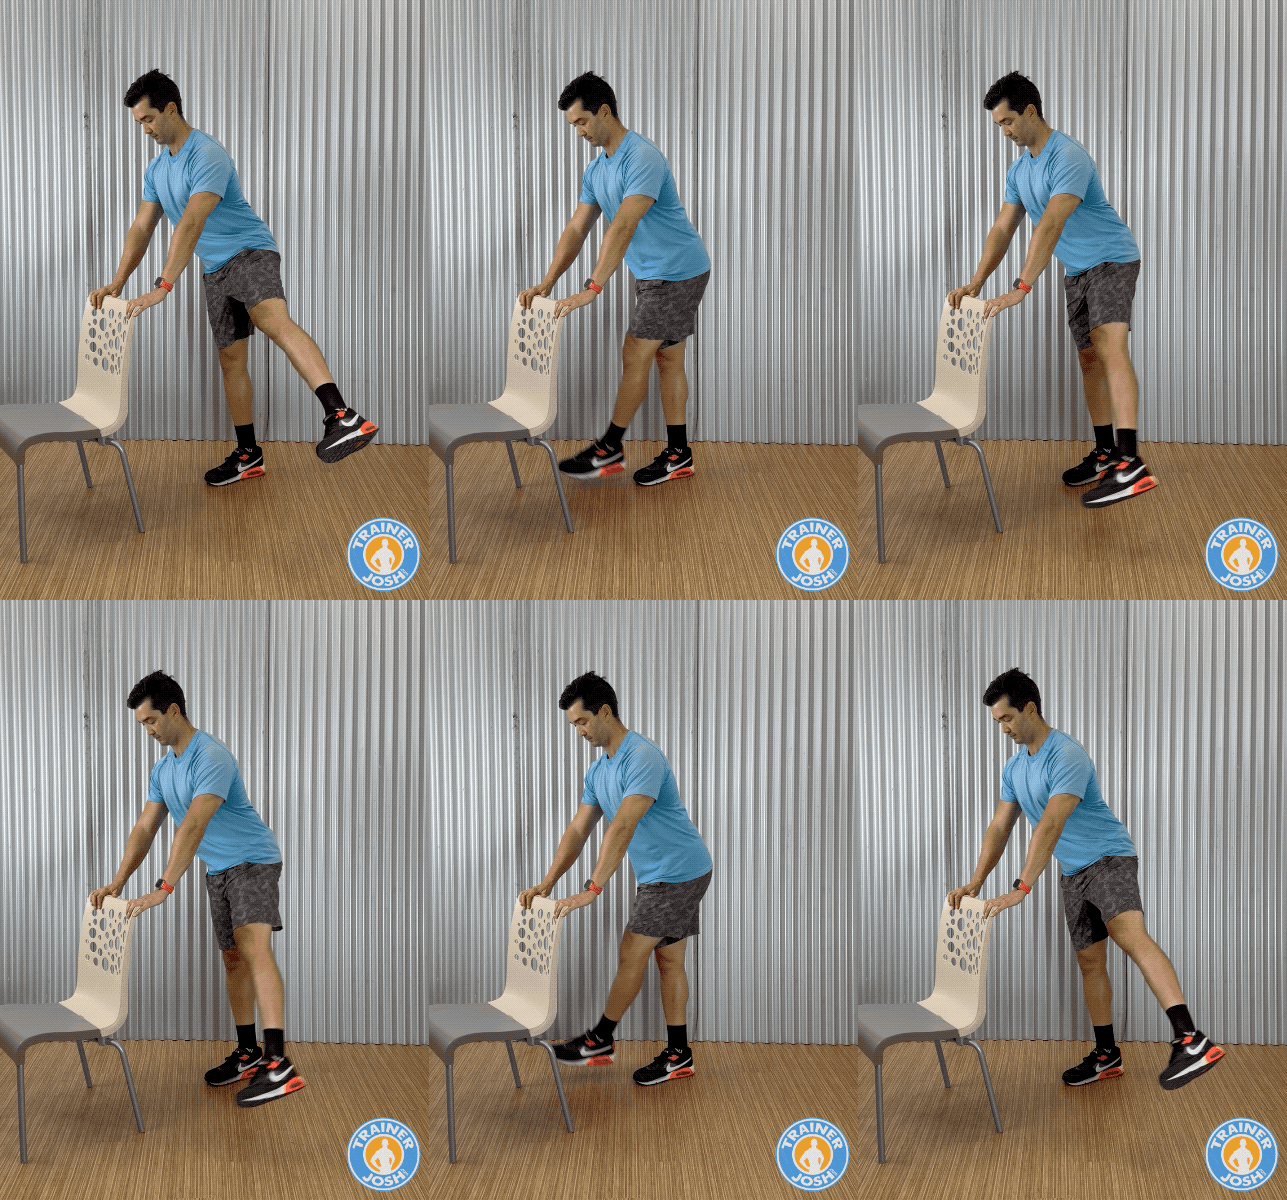
Leg swings prepare the hips through front-to-back and side-to-side motion while dynamically moving the hamstrings, glutes, and hip flexors. They fit well before leg training or running.
A gentle dynamic stretch through the hamstrings and front of the hips as the area warms up.
Sharp pulling in the lower back or pinching inside the hip joint.
Keep holding the wall, use a small swing, or stand on a low step so the moving foot clears the floor.
Remove the hand support only if you can keep the torso stable and the swing controlled.
“Start small, then let the range increase only as the hip loosens. Use both swing directions.”
Avoid:
Bodyweight Squats
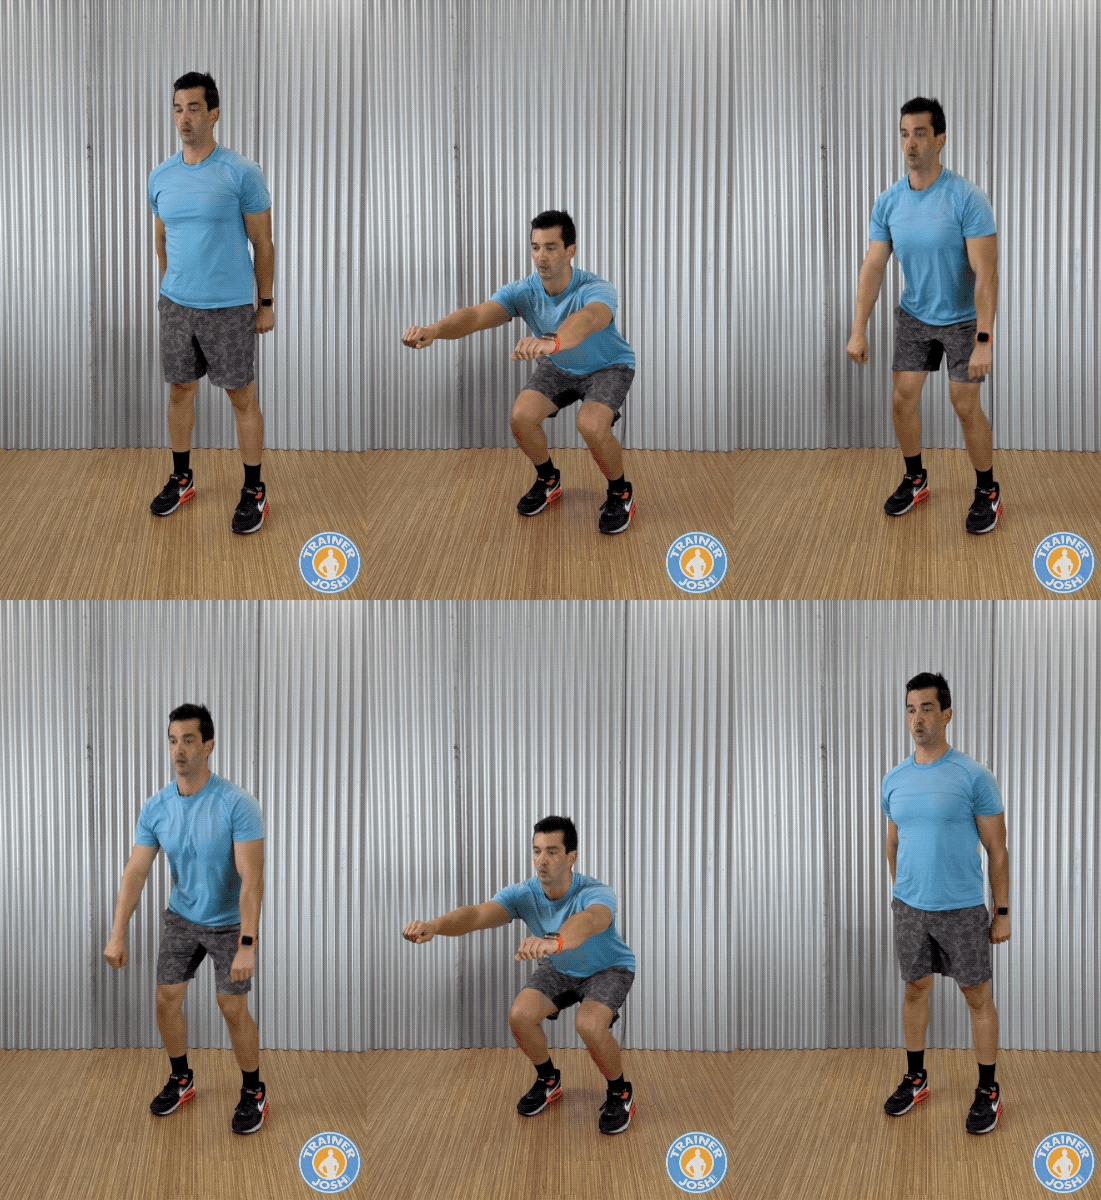
Bodyweight squats rehearse the same lower-body pattern used in loaded squats and many daily movements. They prepare the hips, knees, ankles, thighs, glutes, and core without turning the warm-up into a hard set.
The hips, thighs, and glutes warming up with smooth movement and perhaps a light sweat.
Leg burning, exhaustion, or sharp pain in the knees, other joints, or lower back.
Use a chair or bench for a sit-to-stand or box squat and shorten the range.
Add a brief 1–3 second pause at the bottom while keeping the set well short of fatigue.
“Treat this as movement rehearsal. Keep your chest proud and stop while every rep still looks clean.”
Avoid:
Reverse Lunge with Overhead Reach
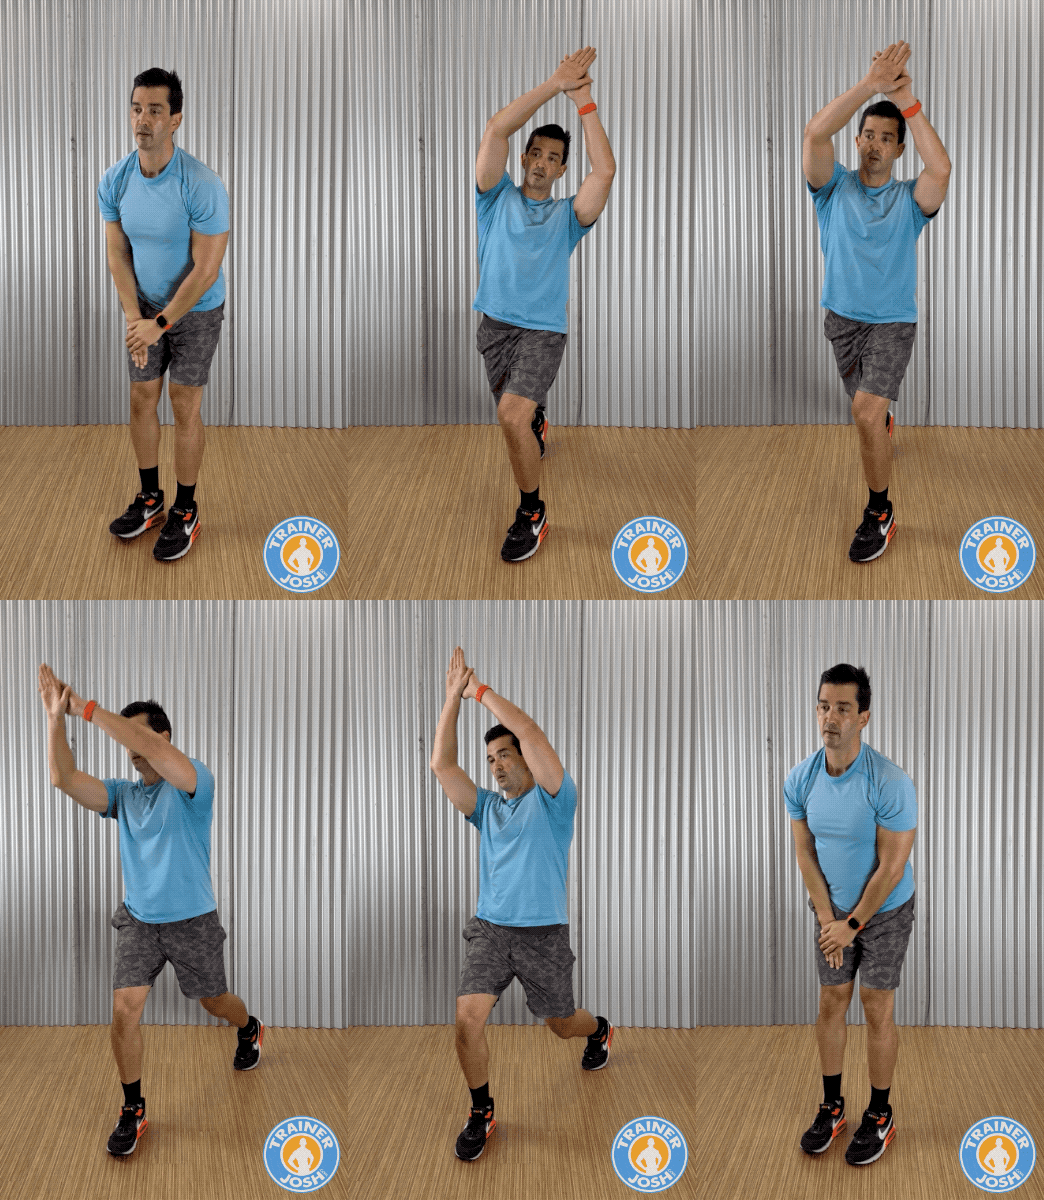
The reverse lunge prepares the lower-body lunge pattern while the rear-leg position opens the hip flexor area. The overhead reach adds an upper-body component without requiring equipment.
The legs working lightly and a gentle opening through the rear hip and upper body.
Sharp knee or hip pain, loss of balance, or a forced overhead position.
Use a smaller step and range, and hold a wall or chair for balance.
Use the full comfortable lunge and reach while keeping the pace controlled and non-fatiguing.
“Step back under control and focus on full hip extension at the rear leg instead of chasing depth.”
Avoid:
Inchworms
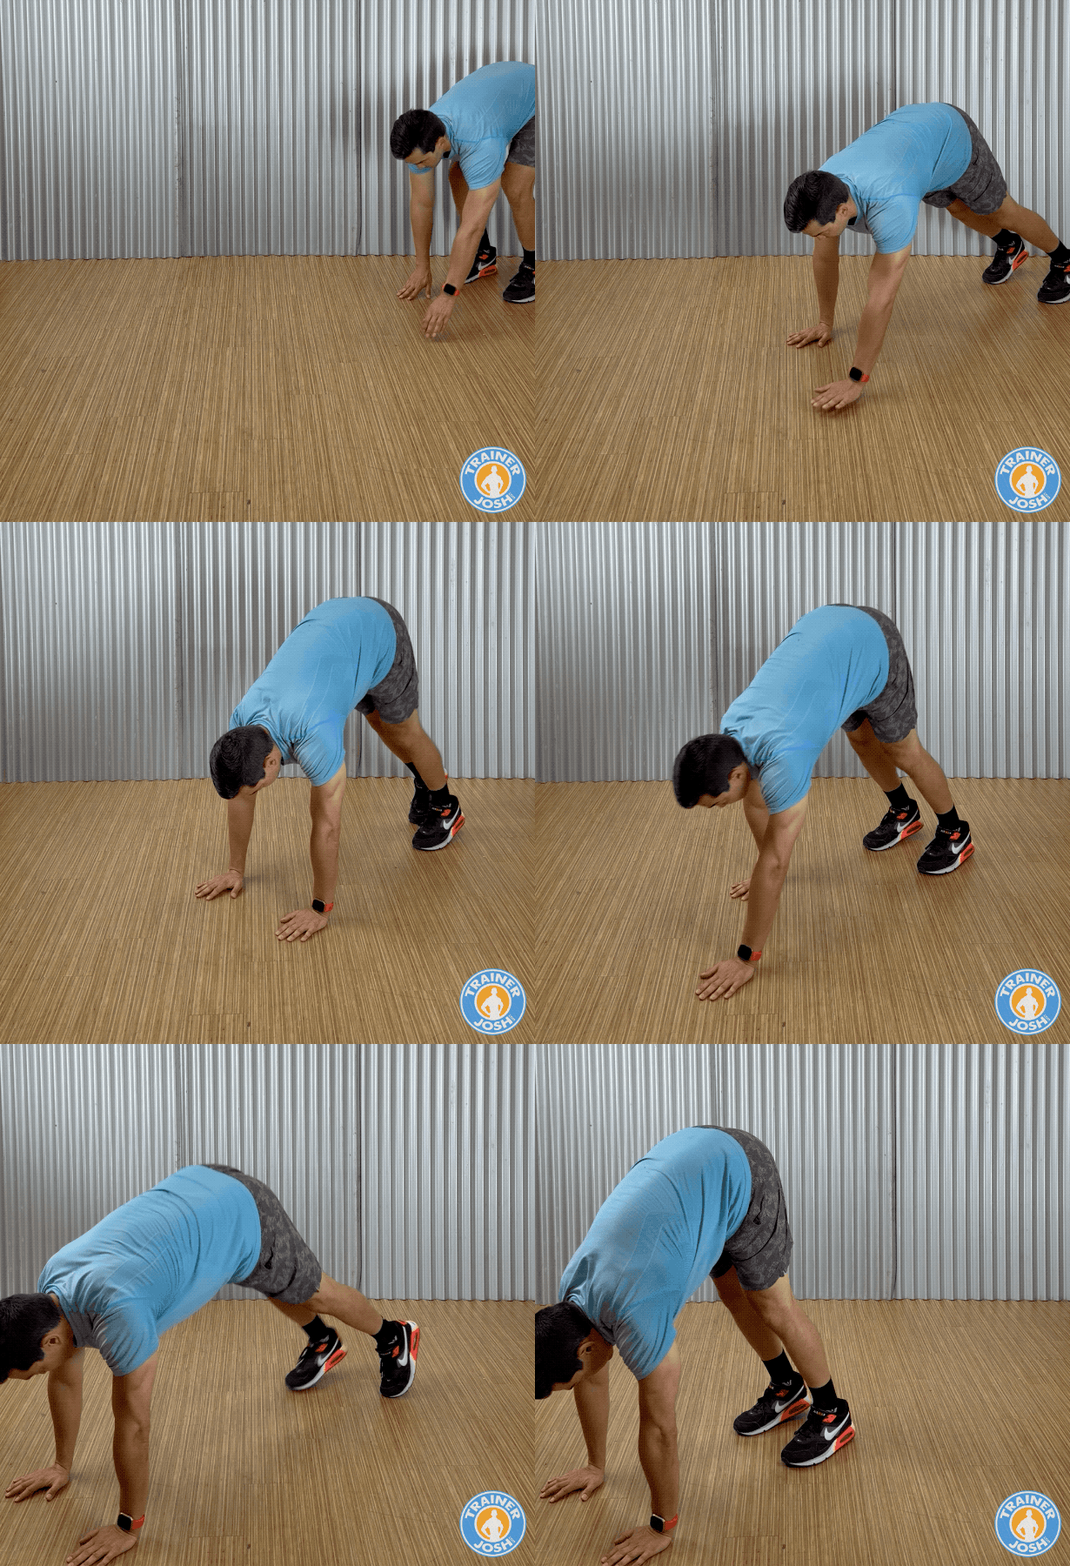
The inchworm combines a hip hinge, hand walk, and push-up position in one full-body drill. It prepares the hamstrings, core, and shoulders together before training.
A dynamic stretch through the hamstrings with the core and shoulders working to support you.
Sharp back or shoulder pain, joint pinching, or a need to rush the hand walk.
Use fewer reps and a shorter hand walk while maintaining control.
Work toward 8 complete reps with a steady push-up position, stopping before fatigue.
“Move from the hips and keep the hand walk deliberate. One clean rep is more useful than a rushed one.”
Avoid:
Glute Bridges
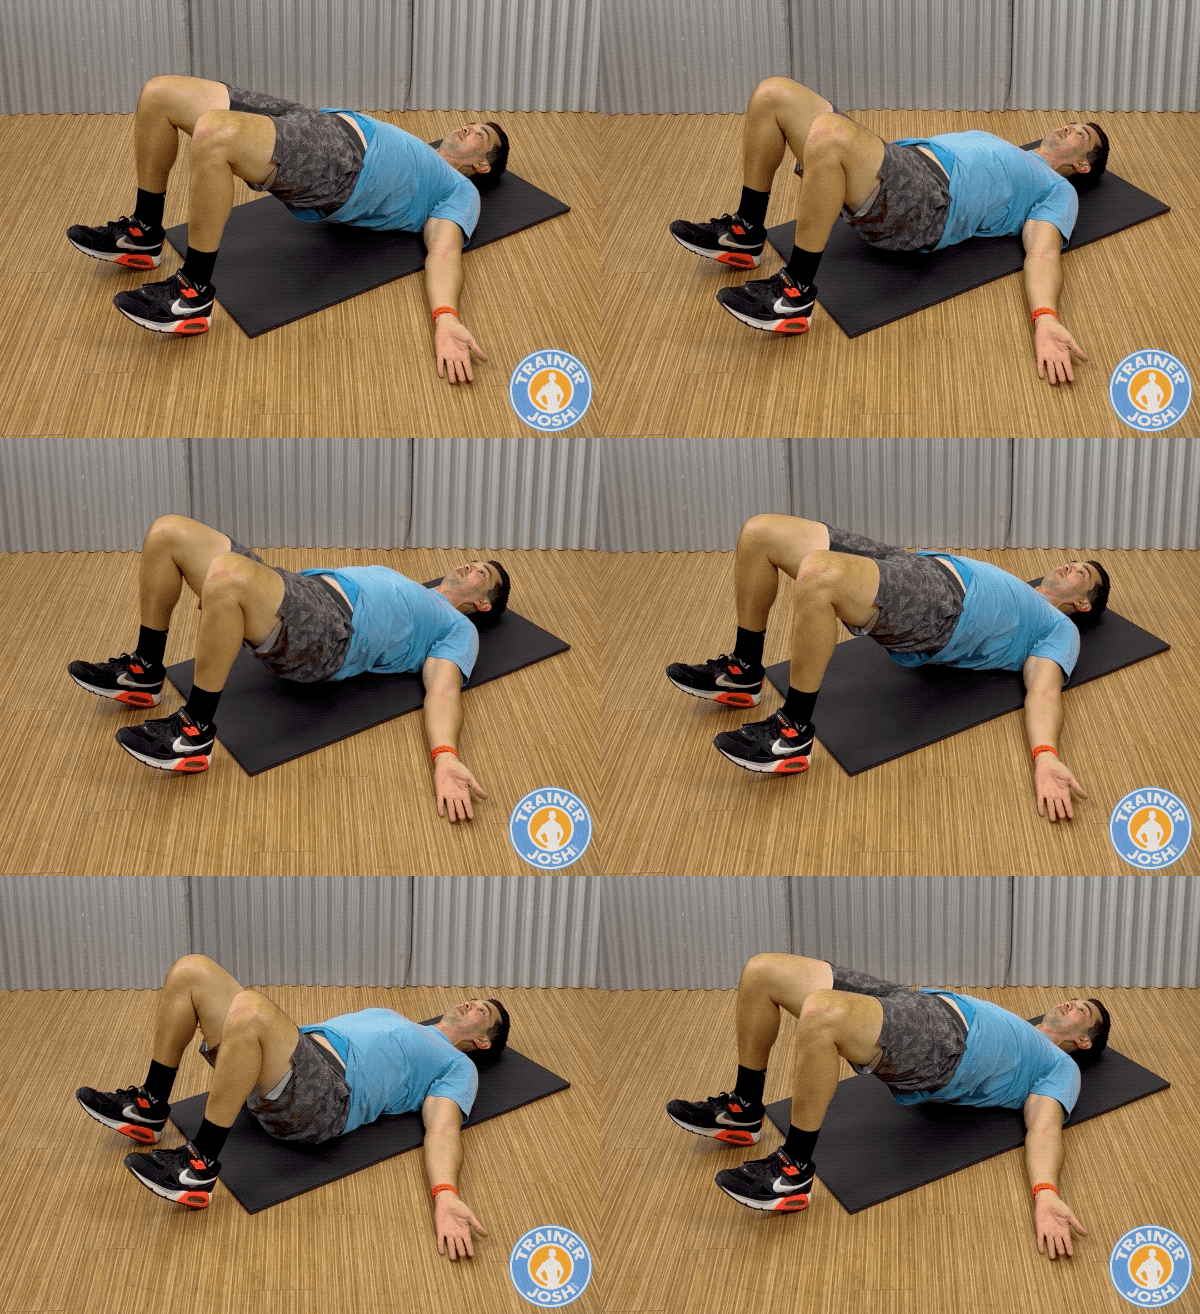
Glute bridges prepare the glutes and hamstrings before heavier lower-body work. The floor-supported setup also makes them accessible when you want hip activation without impact.
The glutes and hamstrings beginning to work as the hips move smoothly.
Sharp back or hip pain, hamstring cramping, or a need to overarch the lower back.
Use the standing hip-hinge option already included in the quick routine, or use a smaller bridge range.
Complete the full 15 controlled reps with a clear glute squeeze, staying short of fatigue.
“Lift from the hips and glutes; stop when your shoulders, hips, and knees form one line.”
Avoid:
World’s Greatest Stretch
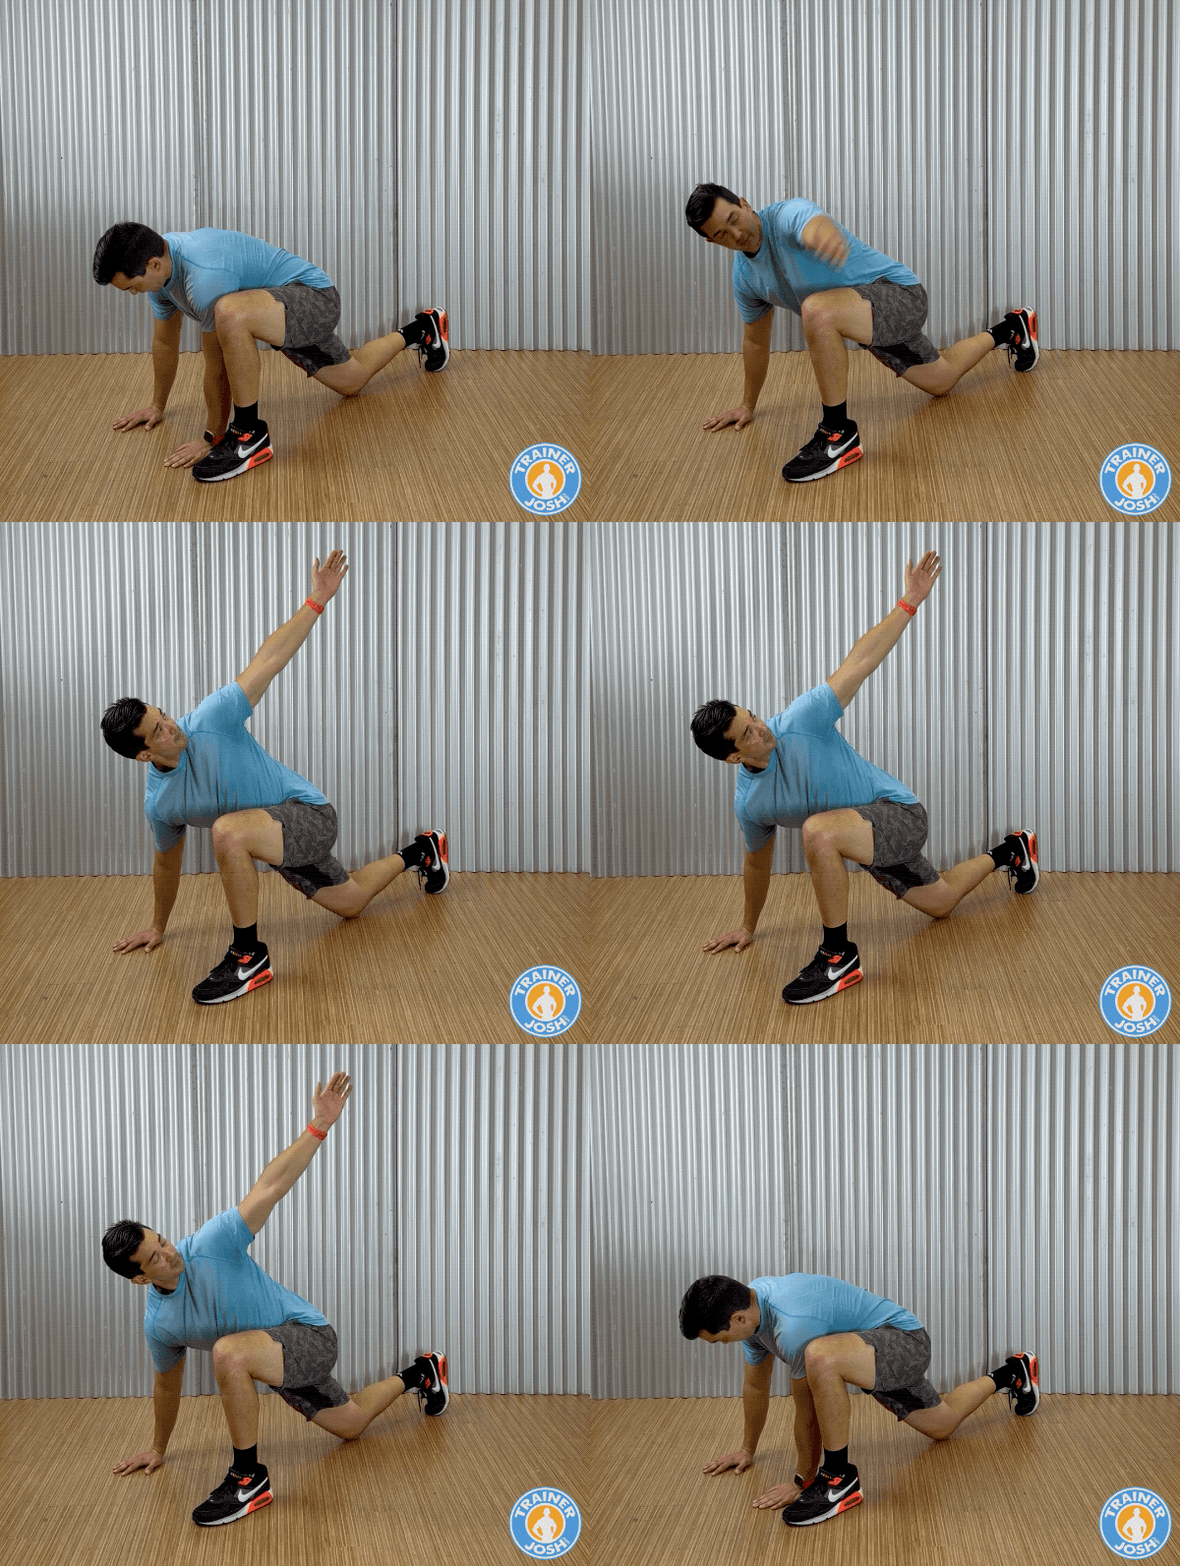
This sequence combines a deep lunge with upper-body rotation to move the hips, hamstrings, and thoracic spine. It is a useful final mobility drill when the upcoming workout needs all three areas.
A controlled stretch through the hips and hamstrings with smooth rotation through the upper back.
Sharp joint pain, pinching, or a need to force the lunge or rotation.
Shorten the lunge and rotation to a comfortable range.
Use the full comfortable position and complete the 2-second pause on all 5 reps per side.
“Let the range open gradually. Keep the motion controlled instead of forcing the deepest possible stretch.”
Avoid:
Warm-Up Exercises by Workout Type
The same warm-up doesn’t fit every workout. Match your preparation to what you’re about to ask your body to do.
Match Your Warm-Up to Your Workout
Trainer Josh Rule
The harder, faster, or more explosive the workout, the more your warm-up should resemble it. Easy walking may need very little formal prep, while harder or more explosive training deserves a more gradual build.
Trainer Josh Coaching Note
One of my clients plays competitive pickleball and used to start her matches cold. After we added lateral shuffles and leg swings, she told me she felt much more ready for those opening points.
How Long Should You Warm Up Before a Workout? (The Answer Isn’t One-Size-Fits-All)
For most workouts, 5–10 minutes is enough. Use less when the session is light or you already feel warm and mobile; allow closer to 10–15 minutes for heavy or explosive work, cold conditions, or days you feel unusually stiff.
The goal isn’t to hit an exact clock time. It’s to feel warm, move freely, and feel ready to train without tiring yourself out.
How Long Should You Warm Up?
Start with the workout you’re doing today, then adjust based on how your body feels.
Best for:
- Light workouts
- Upper-body sessions
- Already feeling warm and mobile
- Short training sessions
Enough to get moving without overdoing it.
Best for:
- Strength training
- Cardio
- Home workouts
- General fitness
- Most recreational training
This is the sweet spot for most people and most workouts.
Consider more time for:
- Heavy compound lifting
- HIIT or explosive sports
- Cold environments
- Days you feel unusually stiff
- Sessions needing several progressive build-up sets
Take the extra time when the workout or your body demands it.
Trainer Josh rule: Stop warming up when you feel ready to perform—not when you feel like you’ve already started the workout.
STUDY SAYS:
A 2024 study published in Arthroscopy, Sports Medicine, and Rehabilitation found that performing 7- to 10-minute dynamic warm-up routines significantly improved explosive lower-limb performance and lowered overall injury rates in athletes, including a 50% reduction in upper-extremity injuries among soccer goalkeepers using the FIFA 11+ program.3
Longer Isn’t Always Better
A warm-up should be hard enough to raise readiness, but excessive volume or intensity can shift the balance toward fatigue and reduce later strength, power, or sprint performance.4
The sweet spot is enough movement to feel ready without turning the warm-up into a training session.
Frikha et al. in Biology of Sport (2016) found that warm-up duration and the recovery interval after warm-up influenced subsequent anaerobic power. So performance depended on warm-up structure, not just total minutes.5
Don’t Wait Too Long After Your Warm-Up
How long does a warm-up last? There isn’t a hard cutoff, but research suggests some of the temperature and explosive-performance benefits can begin fading after roughly 10–15 minutes of passive rest, with greater losses possible as inactivity stretches toward 20–30 minutes.
So once you feel ready, I’d rather have you start training than finish your warm-up and sit around for another 15 minutes.
Once you’re warm, try to transition into your first working sets fairly quickly. Some of the temperature and performance benefits of warming up begin to fade during prolonged inactivity, as muscle temperature falls and explosive performance can decline.6
- Muscle temperature starts falling.
- Explosive readiness can begin to decline.
- A long delay may call for a brief re-warm-up.
In practice, treat your warm-up like a springboard into training… not something you finish and then walk away from for 15 minutes. When possible, keep the transition short; if you’re forced to wait for an extended period, briefly re-warm before a heavy or explosive effort.
In my experience, heavy lower-body sessions often need a little more build-up than upper-body sessions, especially when squats, deadlifts, or other demanding compound lifts are involved.
Research also suggests that lower-body lifts, such as squats, can be more sensitive to exercise-specific warm-up and re-warm-up strategies than upper-body lifts. A 2025 study published in the journal Sports found that completing a specific re-warm-up before squats during a resistance training session significantly enhanced propulsive lifting velocity and power output.7
If a long gap or unrelated exercise separates you from a heavy lower-body lift, a brief re-warm-up may help restore movement-specific readiness before you load it.
Only Have 3 Minutes?
Do something rather than skip your warm-up because you don’t have time for the “perfect” routine.
Use the opening minutes of the established 5-Minute Ground-to-Standing Warm-Up above, then begin training once you feel ready.
TRAINER JOSH TAKE:
A time-waster I see in the gym is doing a full warm-up sequence after every exercise. If you’ve already warmed up your chest on an incline press, I usually don’t have you repeat a full warm-up when you move to another pressing exercise. The same pressing muscles have already been working, and you’re not starting the next exercise from cold.
Instead, I’ll usually use a short “feeder” set of 1–3 easy reps to feel the new groove, check the setup, and make sure everything feels right before adding working weight. The point isn’t to warm the muscle up all over again. It’s to familiarize yourself with the slightly different movement without adding unnecessary fatigue.8
On a pin-loaded machine, I’ll sometimes run down the stack—5 reps, then 3, then 2, then a couple of singles—rest, and go into the work set. The goal is to learn the new feel without creating fatigue. Warm-up research generally supports maintaining muscle temperature while making preparation increasingly specific to the movement you’re about to perform.9
Dynamic Warm-Up vs Static Stretching: What to Do Before a Workout
For most workouts, dynamic movement should make up the foundation of your warm-up. It raises your temperature while taking your joints and muscles through the movements you’re about to use.
Static stretching isn’t automatically bad before training, but duration matters. Brief, targeted holds usually have little effect on performance, while prolonged stretching is more likely to temporarily reduce strength or power.
STUDY SAYS:
A 2019 review in Frontiers in Physiology found that static stretching for 60 seconds or less per muscle group produced only trivial average strength and power declines of about 1–2%, while holds longer than 60 seconds were linked with larger temporary reductions of roughly 4.0–7.5% in healthy adults.10
Generally small or trivial average performance effects
More likely to temporarily reduce strength or power
Duration and context matter. Static stretching isn’t simply “good” or “bad.”
Do Dynamic Warm-Ups First
Dynamic movement is the foundation of my pre-workout warm-ups because it gets you warmer while rehearsing the patterns you’re about to use. Leg swings, arm circles, squats, lunges, and inchworms do this without long holds.
They’re also less likely than prolonged static stretching to temporarily reduce strength or power, making them a better default before lifting, sprinting, or explosive exercise.
Static Stretching Isn’t Bad. Duration Matters.
Static stretching is not automatically harmful. Shorter holds generally have little effect on immediate performance. But holds around or above 60 seconds per muscle group are more likely to temporarily reduce strength or power.
Brief, targeted stretching can help when a specific restriction interferes with the movement you need. If you feel stiff, move dynamically longer and stretch only the area that’s limiting.
Why can long holds matter? They can temporarily alter muscle-tendon stiffness and neural activation, reducing the amount of force or power you produce immediately afterward.
For most workouts: dynamic movement first, brief targeted stretching when needed, and longer flexibility work later. Use longer holds when immediate power isn’t the priority.
TRAINER JOSH COACHING NOTE
One client in his 50s spent about 10 minutes static stretching before every squat session while his numbers were stalled. We replaced it with a short dynamic warm-up and progressive ramp-up sets. Over the next four weeks, his squat also moved up 15 pounds. I wouldn’t credit the entire increase to the warm-up change. It’s a coaching observation, not proof of causation.
What Should You Do Before Your Workout?
Dynamic Warm-Up
When: First
Use: Movement that resembles the workout ahead
March • Squat • Lunge • Arm circles • Leg swings
Purpose: Raise readiness through the ranges you’re about to use.
Brief Targeted Static Stretch — Optional
When: Only if a specific restriction interferes with the movement you need
Use: Short, targeted holds
Purpose: Gain the needed range without unnecessarily extending the warm-up.
Progressive Warm-Up Sets
When: Before the main heavy lift
Use: Practice the exact movement and gradually approach working weight
Purpose: Rehearse the lift under increasing load.
Save longer flexibility-focused holds for later in the workout or dedicated mobility work when maximizing immediate strength or power isn’t the priority.
THE BOTTOM LINE
Before most workouts, start with dynamic movement. Add brief targeted static stretching only if you need extra range, then use progressive warm-up sets before heavy lifts. Save longer stretching for later when immediate strength and power aren’t the priority.
What Is a Warm-Up Exercise? (Most Miss the Point Entirely)
A warm-up is the transition between rest and hard exercise. A warm-up elevates core and muscle temperature, increases nerve conduction velocity, reduces joint and muscle stiffness, and primes the neuromuscular system for the effort that follows.11
Think of it like an on-ramp: you don’t go from parked to freeway speed instantly.
For most workouts, think of it as two parts: warm up your whole body, then rehearse the movements you’re about to train.
The 2-Part Warm-Up
Examples: Walk • Bike • March • Light dynamic movement
Purpose: Raise body temperature, heart rate, and overall readiness.
Examples: Practice the movement • Add load gradually • Refine technique
Purpose: Prepare the exact movement pattern and progressively approach your working load.
General Warm-Up: Get Your Whole Body Moving
Use easy movement such as walking, cycling, or marching to raise temperature and blood flow and ready your joints. Research shows that short walking bouts can produce immediate, reversible changes in knee cartilage, showing that joint tissues respond quickly to movement rather than requiring a specific warm-up duration.12
Specific Warm-Up: Build Toward the Work
Rehearse the exercise with a lighter load, then add weight gradually. Compound lifts usually need more build-up sets; isolation exercises may need one. The squat sequence is only an example… adjust it to the lift, load, and your readiness. NASM likewise recommends more ramp-up for demanding compound lifts.13
STUDY SAYS:
A 2017 Temperature review found that progressive whole-body and joint-specific movement raises muscle temperature and heart rate while preparing the nervous system.14
The RAMP Method
Raise heart rate, body temperature, and overall circulation.
Wake up the muscles that matter for the activity.
Move relevant joints through the ranges you’ll need.
Increase intensity toward workout speed, load, or power.
RAMP drills should increasingly “shadow” the activity ahead (especially after prolonged sitting). Clinical testing in team sport athletes shows that dynamic RAMP (Raise, Activate, Mobilize, Potentiate) protocols yield superior acute improvements in vertical jump and sprint performance compared to static stretching or skipping a warm-up entirely.15
A 2011 study in trained adults found that combining a general warm-up with specific leg-press warm-up sets improved one-repetition maximum more than using specific warm-up alone.16
TRAINER JOSH coaching tip:
One mistake I see all the time is doing 10–12 reps on every warm-up set as the weight gets heavier.
That can turn your warm-up into part of the workout. By the time you finally reach your working weight, you’ve already burned through reps and created fatigue that didn’t need to be there.
For a heavier compound lift, I’ll often taper the reps as the weight goes up:
8–10 reps → 5–8 reps → 3 reps → 1 rep → 1 rep
The first lighter set gives you more reps to groove the movement. As you get closer to your working weight, increase the load while decreasing the reps.
You’re practicing the lift and exposing your body to heavier weight without tiring yourself out before the sets that actually count.
Trainer Josh rule: The closer you get to your working weight, the fewer warm-up reps you should usually need.
*This is a framework, not a mandatory formula. You may need fewer build-up sets for lighter exercises and more when you’re lifting very heavy, feeling stiff, or working up to a demanding compound lift.
Where Static Stretching Fits
Static stretching can have a place when a specific restriction gets in the way, but duration and context matter. I generally use dynamic movement first and keep pre-workout static stretching brief and targeted.
See Dynamic Warm-Up vs Static Stretching above →
If fat loss is part of your training goal, grab my Flat Belly Foods Cheat Sheet below.
What Should a Proper Warm-Up Feel Like?
A successful warm-up should leave you warmer, moving more smoothly, mentally ready, and prepared to train—without feeling drained.
The endpoint depends on the session. An easy walk may need little preparation, while heavy squats or fast intervals usually benefit from a more gradual build toward the exact movement.
On a cold day or after sitting for hours, give yourself a little longer. Keep moving rather than waiting for a specific sweat level or forcing a rigid time target.
- Noticeably warmer: You should feel clearly warmer than at rest. A light sweat can be useful, but it isn’t required—especially in a cool room or during a shorter session.
- Breathing faster but controlled: Your breathing should be somewhat faster while remaining controlled. You should be able to transition into training without needing a long recovery from the warm-up itself.
- Stiffness beginning to ease: The first reps may feel restricted, but range and comfort should gradually improve. Minor stiffness may settle as you move; sharp pain, catching, or worsening discomfort is a different signal.
- Movements feeling smoother: The patterns you’re about to train should feel more coordinated and comfortable than they did initially. If the movement still feels awkward, use another easy rehearsal before adding load.
- Mentally ready: Use the warm-up to shift attention toward technique, effort, and the session ahead. By the end, you should feel focused rather than rushed into the first working set.
- Not fatigued: You should finish ready to work—not with burning muscles, shaky legs, or the feeling that you already completed part of the workout. More warm-up is not always better.
Your first exercise should feel more comfortable than it did cold. If it doesn’t, add a little movement rehearsal, adjust the range, or reconsider the planned load rather than forcing the session forward.
A 2025 study found that warming improved rate-dependent measures such as power and rate of force development, while maximum force did not meaningfully change.17
I’ll sometimes use a light isolation exercise before a heavier compound lift—hamstring curls before squats or lateral raises before overhead pressing. This can help me see how the joint and surrounding muscles feel that day. The goal is a few easy, low-load reps, not fatigue.
TRAINER JOSH COACHING TIP:
On lower-body days, I often have clients start with backward walking on an incline treadmill or light sled work. It gets them moving, warms the knees and legs, and lets me see how everything feels before we start loading the main lifts.
Think of Your Warm-Up as a Diagnostic Check
Your warm-up is a chance to assess how your body feels today—not merely complete a fixed list. Progress isn’t linear, and the preparation you need can change from one session to the next.
- Does anything feel unusually stiff compared with your normal starting point?
- Does one side move differently or need more rehearsal?
- Does something hurt rather than simply feel tight or unfamiliar?
- Do you need another minute or a smaller range before loading?
- Are you ready to train normally today, or should the plan change?
If you notice sharp pain, catching, or worsening discomfort, use that information rather than overriding it. Reduce the range or load, modify the exercise, choose a different movement, or stop instead of forcing the planned session.
Need More Prep? Try This 10-Minute Warm-Up
The 5-minute Ground-to-Standing routine is enough for many workouts. Use this longer option when you feel especially stiff, you’re training in the cold, or you’re preparing for heavier work.
Jump to the 5-Minute Ground-to-Standing Warm-Up →
The 10-Minute Warm-Up Structure
Useful for training in a cold garage gym, older adults who need more time to loosen stiff joints, or lifters preparing for heavy barbell work.
An unnecessarily long general warm-up can become counterproductive. Use this simple 2 + 2 + 2 + 2 + 2 structure to organize the extra preparation.
Light cardio such as brisk walking, marching, or stepping.
Arm circles, arm swings, or shoulder dislocations with a towel.
Hip circles and leg swings.
Glute bridges and inchworms.
Practice movements that resemble what you are about to train.
A 52-year-old client training in an unheated garage used to skip his warm-up because it seemed too complicated. After using this simple 10-minute structure, he said it was the first time in years “his first set didn’t feel like torture.”
Warm-Up Modifications for Stiff Joints and Tight Muscles
If you feel stiff before training, start the first reps in a smaller, comfortable range. Let it increase as you get warmer.
The goal isn’t maximum range. It’s to make today’s movements feel smoother and more comfortable.
If You’re Over 40 and Feel Stiffer Than You Used To
“I can’t just walk in and lift anymore” is something I hear often from clients over 40. It doesn’t mean you’re fragile; you may simply need a longer ramp-up and more rehearsal before heavy loading.
Start easy, rehearse the exact pattern, and use progressive sets before heavy lifting. Modify or stop if discomfort becomes sharp or worsens.
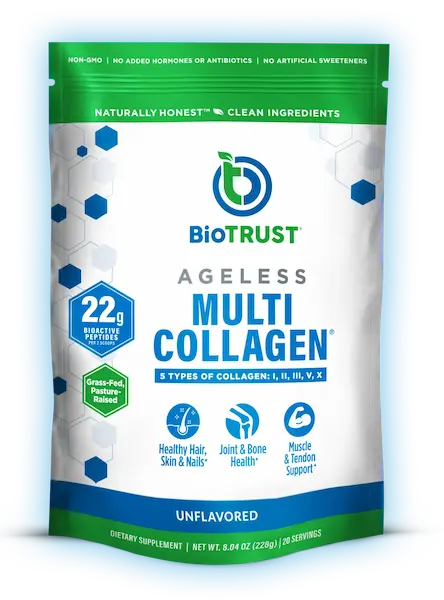
Training consistently over 40 also means paying attention to the connective tissues that help you move and load well. So if joint comfort and mobility are part of your goal, then BioTRUST Ageless Multi-Collagen is one option I like because it provides five collagen types to support joints, cartilage, and connective tissue.
Powered by 5 Types of Bioactive Naturally Hydrolyzed Collagen Peptides for Full-Body Support (Odorless & Flavorless)
- Natural GLP-1 Support: Helps support healthy appetite signals, fullness & metabolic function
- Lean Muscle Support: Helps preserve muscle, strength & healthy body composition during weight loss
- High-Protein Collagen: Adds 20g of protein with 5 collagen types to help support daily protein intake
- Skin, Joint & Hair Support: Provides collagen peptides to support skin elasticity, joints, hair & nails
- 3-Part Weight-Loss Support: Combines muscle, protein/collagen & appetite support in one simple daily stack
TRAINER JOSH COACHING NOTE
One client in his 50s returned after three years away and wanted to jump into working sets. We rehearsed bodyweight movements and built gradually toward loaded exercises. Over the next few weeks, he trained consistently without the back discomfort he had feared.
Where Do You Feel Stiff?
- Marching
- Glute bridges
- Heel raises
- Supported sit-to-stands
- Short-range squats
- Short reverse lunges
- Arm circles
- Wall slides
- Scapular push-ups
- Light push-ups
- Empty-bar pressing
- Light workout-specific presses
- Cat-cow
- Hip hinges
- Glute bridges
- Bird dogs
- Bodyweight squats
- Easy trunk control
Start with the 5-Minute Ground-to-Standing Warm-Up. Make the first reps smaller and easier, then let your range open naturally.
5 Warm-Up Mistakes to Avoid
Jumping in Cold
Why it’s a problem: Going from rest into heavy sets skips movement rehearsal, a readiness check, and gradual exposure to load.
Better move: Start easy, then build toward working intensity.
Making Static Stretching Your Whole Warm-Up
Why it’s a problem: Static stretching alone doesn’t provide the dynamic, specific preparation most workouts need.
Better move: Use dynamic movement first, targeted stretching when needed, and longer flexibility work later.
Warming Up Too Hard
Why it’s a problem: Finishing winded, shaky, or fatigued spends energy needed for training.
Better move: Stop when you feel warm, mobile, and ready—not tired.
Using Exercises That Don’t Match the Workout
Why it’s a problem: Getting warm helps, but preparation should resemble what comes next. Easy jogging doesn’t fully prepare a heavy bench press.
Better move: Match the final phase to the movement, speed, and load ahead.
Ignoring Pain Signals
Why it’s a problem: Mild stiffness may improve; sharp pain, catching, or worsening discomfort is different.
Better move: Modify the movement, range, or load—and stop if symptoms worsen.
Putting It All Together: My 4-Step Warm-Up Checklist
You don’t need to remember every study or variation. When I build a warm-up, I return to four questions.
Get warm, move what you’ll use, address what needs attention, then rehearse the workout.
My 4-Step Warm-Up Checklist
Use easy whole-body movement until noticeably warmer.
March • Walk • Bike • Row • Easy jog
Move needed joints comfortably before loading.
Arm circles • Hip circles • Leg swings • Ankle rocks
Rehearse an area that feels stiff, uncoordinated, or hard to engage.
Glute bridges • Bird dogs • Band pull-aparts • Dead bugs
Make preparation increasingly specific.
Bodyweight → loaded squat • Empty bar → working press • Easy → faster running
Warm + moving smoothly + workout pattern feels good + not fatigued
The closer you get to the workout, the more your warm-up should start to look like the workout.